

Dear friend,
A technique I learned from my good friend Charlie Kirk in street photography: what he calls the ‘cutoff technique’.
CONQUER YOUR FEARS AND MEET NEW PEERS at ERIC KIM WORKSHOP
The basic concept is this: When you’re shooting street photography on a wide-angle lens (anywhere from a 24mm-28mm lens), you must shoot more “head-on” in order to create a dynamic street photography composition. If you shoot too much from the side (what Charlie calls ‘oblique angles’), then the photograph won’t be as visually powerful and impactful.
How to do the ‘cutoff technique’
So basically the concept is this:
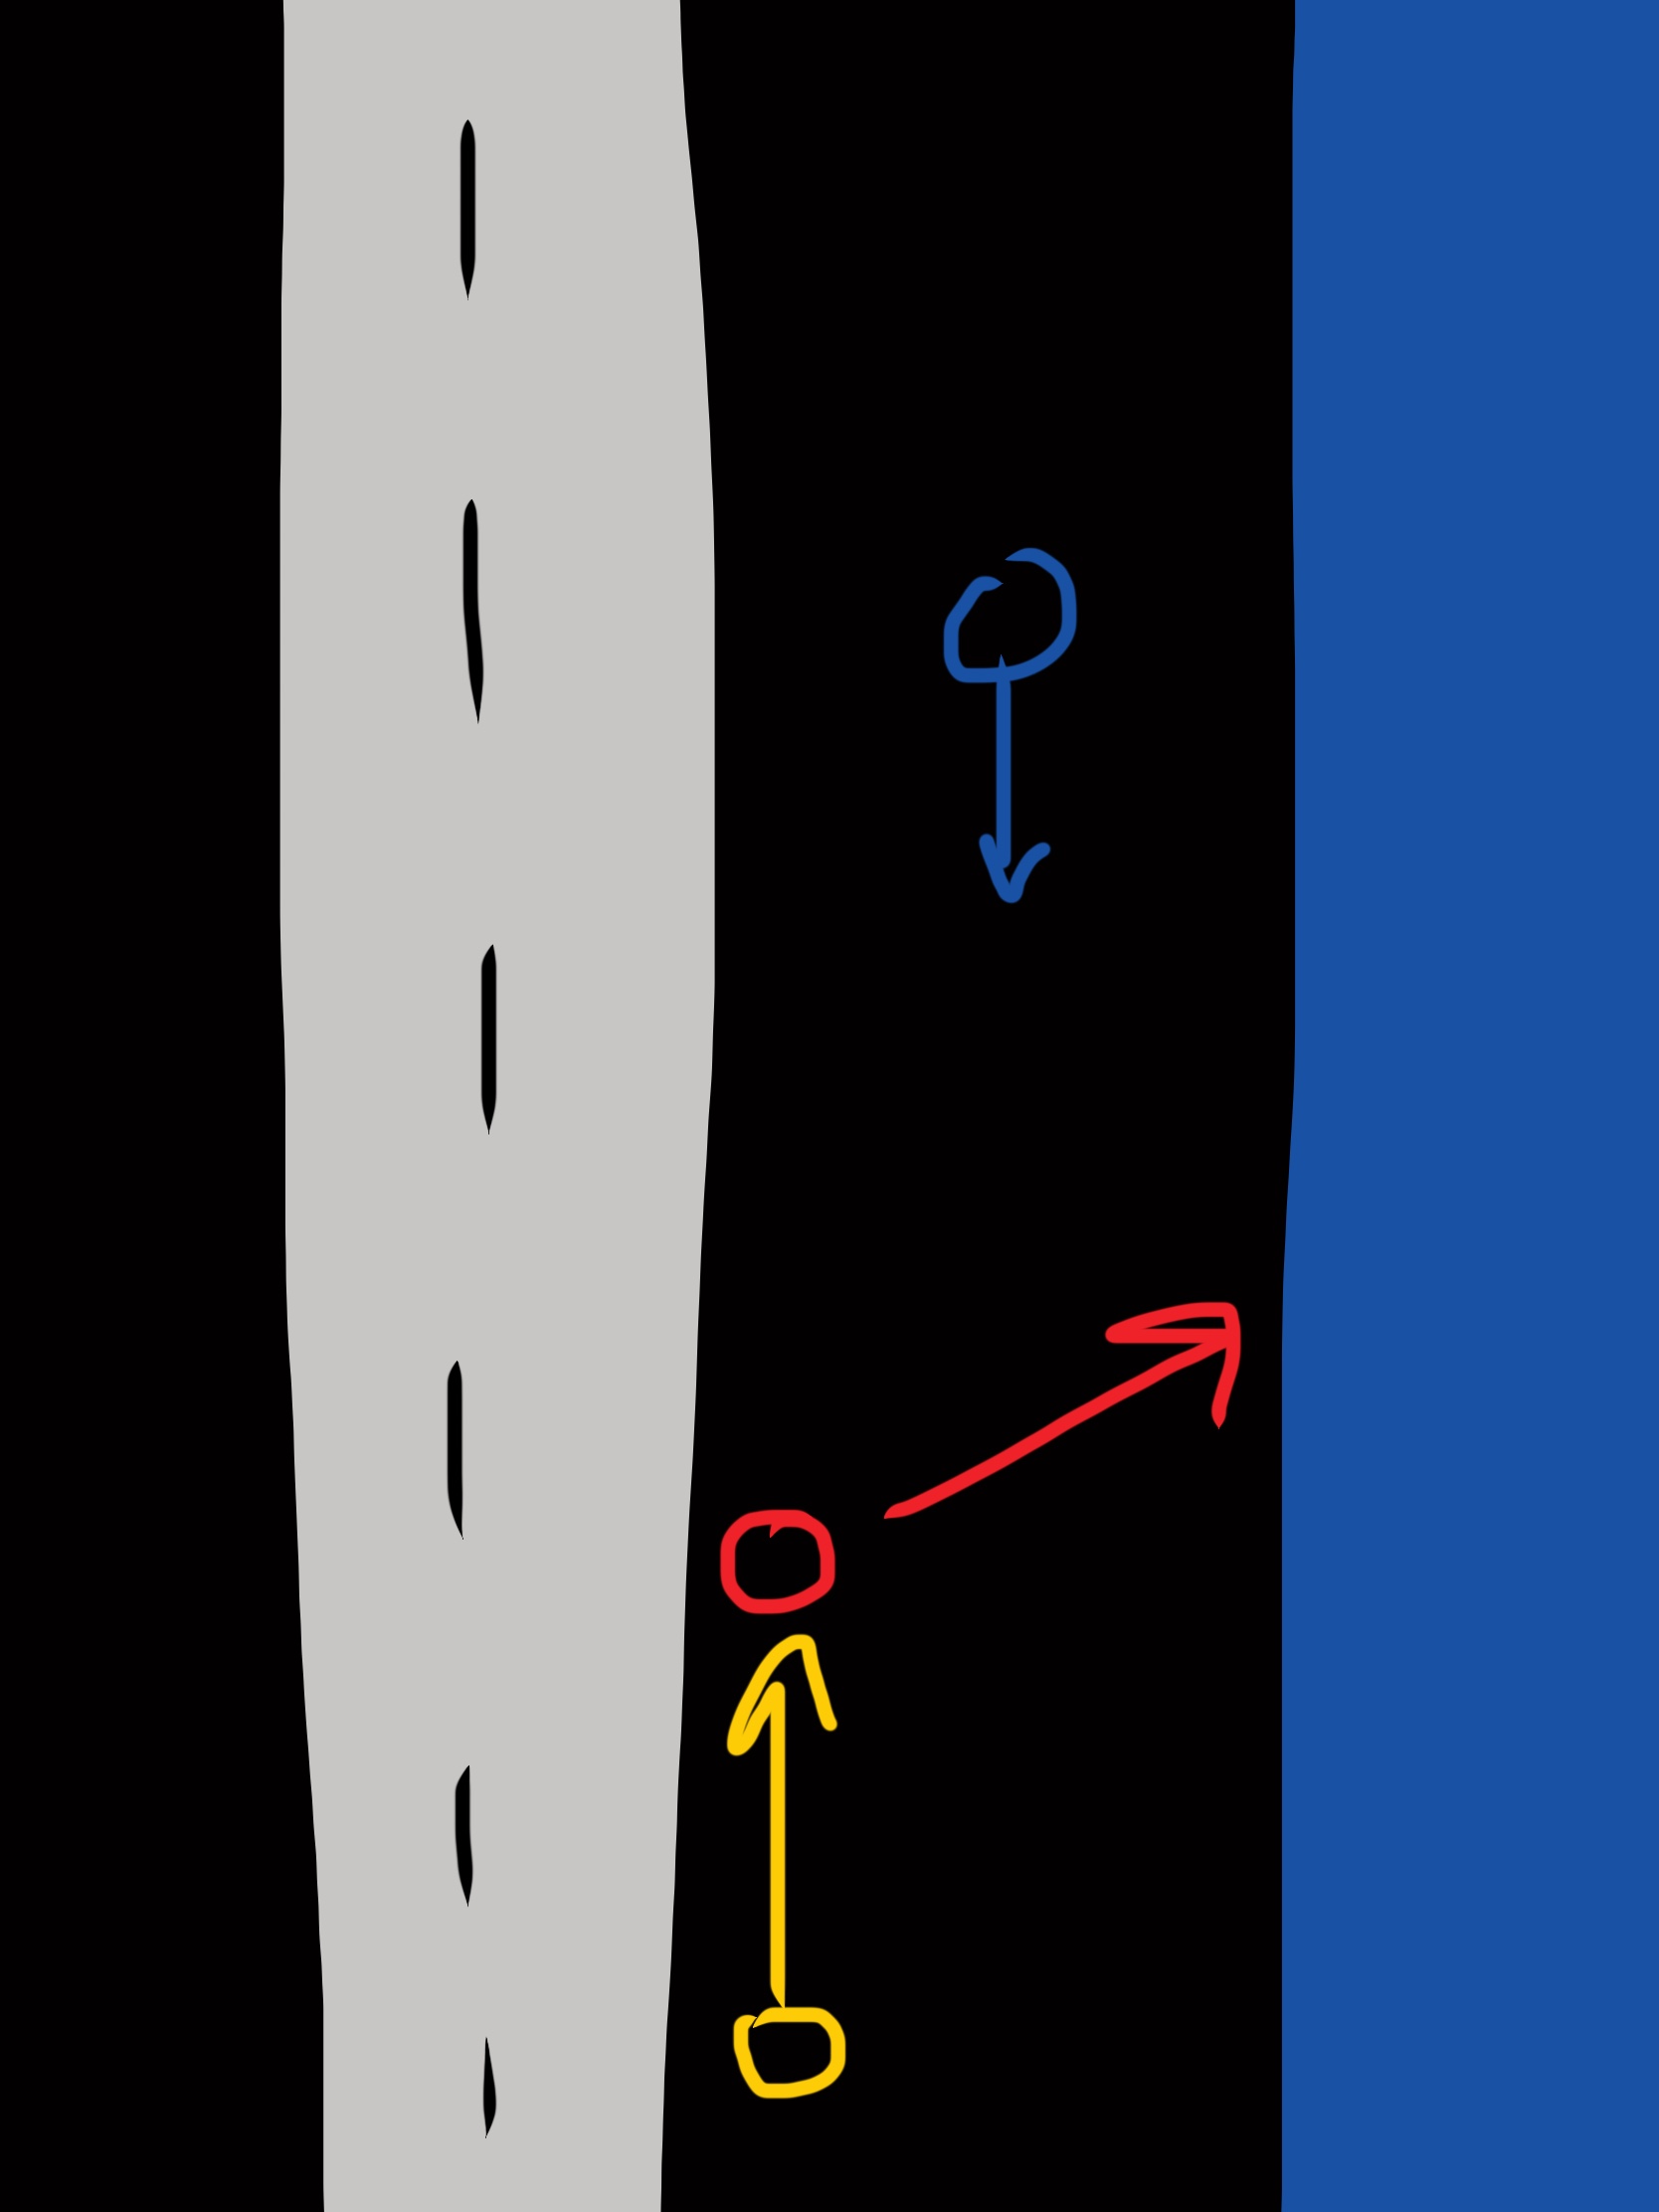
When you’re walking on a sidewalk, and you see someone you want to photograph (candid street photograph without their permission), you first start off by walking on one side of the sidewalk, and when you’re ready to make the photograph of them, you cut them off, by shooting head-on, and then continuing to walk past them.
Describing this via text is difficult, so let me try to explain via photos.
Oblique angles

Okay first of all, this above image is an example of shooting from an oblique angle. I’m shooting this photo on a 24mm lens on a Lumix LX100, and when shooting in real life, I’m actually pretty close to her (around 1.2 meters). But visually, the photograph lacks impact, because I’m still not “close enough” to fill in the frame with her. And I’m also shooting this photograph NOT head-on (this is an ‘oblique’ angle)– I’m shooting her about to pass me on the left side (I am on the right side).

I then get really close to her with the 24mm lens, and fill the frame with the subject (shooting vertically/portrait orientation). Now, the photograph is more dynamic and compositionally more interesting. Yet, even though I got really close, the photograph is shot from an ‘oblique angle’ (from the side), and therefore this photograph (to me) isn’t that interesting.
Cutoff technique example 1: Man with Flip Phone in Tokyo

So this photograph above with the man and the flip phone is a good example of a street photograph I shot with the Ricoh GR II (28mm lens) with the cut-off technique.
This is how I made the photo:
- I was walking in the narrow alleyways of Shibuya in Tokyo, and I saw this interesting character checking his phone.
- What I then did was walked to the left side of him, and once I got very close, I “cut off” his walking path (by walking diagonally in front of him), crouched down, and quickly shot a photograph with a flash on the RICOH GR II.
- The flash allows separate him from the background (figure to ground), saturates the colors, and because I crouched down low, the lower-angle perspective looks more interesting, and has better leading lines that direct to him:

Cutoff technique example 2: Man with hand over his face in Tokyo

Another good photograph to explain this concept is a photograph of a man with his hand over his face.
I was walking in a pretty sparse area in Ueno overpass in Tokyo, and in order to make a more dynamic and aggressive street photograph, I got in front of his walking path (he was an older Japanese man, walking slowly), and then I “cut off” his forward movement, by getting in front of him, crouching down low, and also shooting with a flash.
Why is he covering his face?
Because I was too slow in shooting the photo, he saw me about to photograph him, and therefore he responded BEFORE I made the photograph, by covering his face with his hand.
I then took the photograph with the flash, and it ended up making an interesting photo, because his hand covering his face is more mysterious– and therefore the photograph creates more of a ‘curiosity gap‘ (you as a viewer wonder, “What does his face look like, and what is his expression like?”)
Cutoff technique example 3: Women with shopping bags

The last example (for now) I will give you regarding the cutoff technique is this photograph.
Visually, note that the photograph looks like the woman are about to collide with you (the viewer). It looks like they’re walking directly INTO you, which adds more dynamism in the photograph, which makes the photograph more interesting.
To make the photograph, I was in Omotesando in Tokyo (my favorite neighborhood, make sure to check out the coffee shop ‘Cafe Kitsune‘ in the hood), and in the small streets, I saw a bunch of women walking. I then pretended like I was just walking on their left side, and then when I wanted to get the photo, I “cut off” their forward movement by walking in front of them, took the photograph, but then continued to walk on the right side of the street. This enabled me to make a dynamic street photograph, clicking the shutter at the moment when I was visually right in front of them (shooting head-on).
Garry Winogrand and the Cutoff Technique

One of the best street photographers to study the good use of shooting with a wide-angle lens (28mm lens) and shooting head-on (and also using the ‘cutoff technique’ is Garry Winogrand (thanks also to Charlie for introducing me to him).
You can see even in Winogrand’s famous photograph of the couple above with the chimpanzees, you can see the shadow of Garry Winogrand on the man’s suit jacket, because Winogrand was shooting head-on. I surmise in order to make the photograph, Winogrand had to walk right in front of them (with the cutoff technique) to make the photo. He probably made the photograph by first walking on their left side, cutting off their movement by walking in front of them, and then perhaps he said “thank you” and continued to walk on their right side.

An interesting aside: Garry Winogrand was shooting with his friend Tod Papageorge, who actually photographed the couple BEFORE Winogrand made his version. You can see Tod’s photograph isn’t as good, because Tod didn’t shoot head-on, and Tod shot the photograph too much from the side (oblique angle). Not only that, but when Tod initially took the photograph, the couple was actually walking the apes on the ground.
Funny story: when Garry Winogrand saw this scene, he actually shoved Tod out of the way, in order for him to get a shot for himself. Tod describes the shove:
“Then, bang!, I felt myself being pushed in the back away from this odd little group. A real shove, unfriendly, hard. And, of course, it was Garry, camera already up, making pictures, who’d done it.” – Tod Papageorge
Lesson: I think it was justified that Winogrand shoved Tod Papageorge out of the way in order to get his version of the photograph, because the photograph is a beautiful image– that treads the issues of inter-racial couples, as well as the interpretation that the viewer might have about an inter-racial couple and having chimpanzees as children.

You can also see via the ‘behind the scenes’ photograph by Tod that Winogrand had a nice laugh with the couple after he shot the scene.
Learn more about this photograph here: About a Photograph: New York, 1967, by Garry Winogrand or Download the PDF here.
Conclusion

To be frank, to describe this technique without seeing it in real life is very difficult. I don’t think I have done the technique/concept justice in clearly explaining it. I might try to get someone to record me (or I might do a GoPro Street Photography POV of me shooting it, to better explain it in the future).
These are the basic takeaway points:
- If you’re shooting with a wide angle lens, like a 24mm, 28mm or even 35mm lens, to make more dynamic compositions in street photography, shoot HEAD-ON. And to shoot head-on means that you might be perceived as an asshole when you’re shooting street photography. But realize if you want to make powerful and dynamic street photography compositions, you must be aggressive.
- Treat yourself like a street photography ballerina meets boxer: This is a concept I got from the photographer Joel Meyerowitz, and also from Bruce Gilden who said, “I love seeing how other street photographers dance in the streets.” You must practice your footwork when you’re shooting street photography to experiment with your compositions, angles, and position. Street photography is all about where you’re standing on the streets, when you click the shutter, and your perspective (whether you’re crouching down, or shooting at eye-level).
- When doing the cutoff technique and shooting head-on with a wide-angle lens, I generally find horizontal (landscape) orientation to look better visually. But of course, just always experiment.
- Shooting head-on and using the cutoff technique is hard. The most difficult part is having the aggressiveness, quickness and the lightness of your feet and movement, but also the difficult thing is TIMING: when to actually click the shutter.
Lastly, remember street photography is hard, difficult, and scary. But the more you build your confidence, the more you take risks, and the more you hustle hard on the streets, the more successful you will be!
BE BOLD,
ERIC
Take your street photography to the next level at ERIC KIM WORKSHOP
STREET PHOTOGRAPHY 101
If you’re new to street photography, start here:
- 100 Lessons From the Masters of Street Photography
- How to Shoot Street Photography
- Street Photography by Eric Kim
Ultimate Beginner’s Guide to Mastering Street Photography

Become the best street photographer possible by picking up a copy of Ultimate Beginner’s Guide to Mastering Street Photography. This book is full of all my distilled knowledge and wisdom on street photography over the last 10 years, crafted specifically to empower you in street photography.
For more free resources, presets, and PDF visualizations on street photography, join my free ERIC KIM NEWSLETTER to stay inspired and empowered.
Also join ERIC KIM EXPERIENCE if you want to take your street photography to the next level and conquer your fears and meet new peers.
To join a positive and passionate community, share your photos in ERIC KIM FORUM. Look forward to having you friend :)
Street Photography Articles

- Why Do We Feel Nervous Shooting Street Photography?
- Street Photography Philosophy
- Everyday Street Photography
- Why Street Photography?
- Why You Must Follow Your Own Voice in Street Photography
- How to Overcome Guilt in Street Photography
- 5 Dynamic Off-Center Street Photography Compositions
- 5 Night Street Photography Composition Tips
- How to Talk to Strangers
- How to Overcome Fear in Street Photography
- Street Photography Empowerment
- Eric Kim’s Top 30 Street Photography Tips
- How to Shoot Street Photography on a 35mm Lens
- 7 Tips How to Conquer Your Fears of Shooting Street Photography
- Street Photography Lifestyle
- How to Use Tactful Flattery in Street Photography
- How to Conquer Social Anxiety With Street Photography
- Street Photography Secrets Debunked
- 10 Dynamic Street Photography Tips
- The Benefits of Shooting Street Photography
- The Street Photography Manifesto
- My Experience Shooting Digital Medium Format in Street Photography
- Why Do You Feel Guilty Shooting Street Photography?
- Improvise in Street Photography
- Ethics in Street Photography
Street Photography Composition Techniques

- 10 Inspirational Sergio Larrain Compositions
- 5 Henri Cartier-Bresson Photography Composition Lessons
- Street Photography Technique: Overlap
- Street Photography Composition Lesson: Chunking
- The Fishing Technique in Street Photography
STREET NOTES.

Push yourself out of your comfort zone with STREET NOTES: Mobile Edition.
STREET NOTES PAPER EDITION ON AMAZON >
LEARN FROM THE MASTERS OF STREET PHOTOGRAPHY

Timeless wisdom from the masters of street photography.
FUNDAMENTALS OF STREET PHOTOGRAPHY

- The Psychology of Street Photography
- Fundamentals to Street Photography
- How to Conquer Fear in Street Photography
- Street Photography Secrets
- NEO STREET PHOTOGRAPHY
- Street Photography Lenses
- Street Photography Settings
- Street Photography Techniques
- Street Photography Ideas
- CLOSER.
- CLEAN BACKGROUND
Street Photography Inspiration

- How to Enter the Street Photography Zone
- Simple Street Photography Tips
- How to Defuse Confrontations in Street Photography
- How to Make Controversial Street Photographs
- Street Photography Project Ideas
- How to Make Good Street Photos
- Is Defining “STREET PHOTOGRAPHY” a Good Thing?
- STREET PHOTOGRAPHY “RULES” TO BREAK
- Walking Meditation in Street Photography
- 10 COMMANDMENTS OF STREET PHOTOGRAPHY
- Street Photography is Improvisation
- In Praise of Randomness in Street Photography
- How to Become a Fearless Photographer
- How to Make Better Street Photographs
- 12 ERIC KIM Street Photography Assignments
- Meaningful Street Photography
- 25 Street Photography Tips by ERIC KIM
Beginner Street Photography Articles

Get started in street photography:
Definitions in Street Photography
- Visual Sociology Street Photography
- Why Street Photography?
- What is Street Photography?
- Why Shoot Street Photography?
- The History of Street Photography
How to Shoot Street Photography
- How to Shoot Street Photography
- Street Portraits 101 by ERIC KIM
- The Ultimate Beginner’s Guide to Street Photography
- 70 Street Photography Tips for Beginners
- 15 Street Photography Techniques and Tips
- A Letter to My 18 Year Old Self: If I Started Street Photography All Over Again
Street Photography Equipment

- What is the Best Camera for Street Photography?
- What is the Best Lens for Street Photography?
- What to Consider When Buying a Camera
How to Conquer Your Fears in Street Photography
See all articles to conquer your fears >
Intermediate Street Photography Articles

Take your street photography to the next level:
- How to Become a Stoic Street Photographer
- The 10 Principles of Good Street Photography
- 7 Tips How to Capture “The Decisive Moment” in Street Photography
- The Importance of Social Skills in Street Photography
- The Street Photography Code of Ethics
- “Taking” vs “Making” Photos in Street Photography
- Follow Your Gut in Street Photography
- 10 Reasons Why You Should Never Chimp While Shooting Street Photography
Advanced Street Photography Articles

Find deeper meaning in your street photography:
- How to Master Street Photography
- How to Be a Zen Street Photographer
- Personal Street Photography
- The “Bookend” Technique in Street Photography
- Street Photography is Self-Therapy
- Zen in the Art of Street Photography
- Taoism and Street Photography
- How to Find Your Style in Street Photography
- Follow Your Gut in Street Photography
Street Photography Tips & Technique

Learn how to shoot on the streets:
- 70 Street Photography Tips for Beginners
- 15 Street Photography Techniques and Tips
- Flash Street Photography Guide
- Take More Risks
- Don’t Think About Composition When You’re Shooting Street Photography
- 7 Tips How to Capture “The Decisive Moment” in Street Photography
- 7 Tips How to Make a Great Street Photograph
- Tokyo Street Photography Contact Sheets
- Video: Why it is Important to “Work the Scene” in Street Photography
- Shoot Less, Better
- Make Shitty Photos
- Shoot Effortlessly
- 10 Tips for Candid Street Photography
- 103 Lessons I’ve Learned From Street Photography
See all street photography tips and techniques >
Street Photography Guides

In-depth guides on street photography:
- How to Shoot Candid Street Photography
- How to Shoot Street Portraits with Permission
- How to Shoot Black and White Street Photography
- How to Shoot Color Street Photography
- How to Shoot Street Portraits with Permission
- How to Shoot Layers in Street Photography
- How to Shoot Urban Landscapes
Street Photography Equipment

The best equipment for street photography:
- What is the Best Camera for Street Photography?
- What is the Best Lens for Street Photography?
- Why I Love Cameras with Non-Interchangeable Lenses
- The Ultimate Beginner’s Guide for Cameras in Street Photography
- What to Consider When Buying a Camera for Street Photography
- In Street Photography, The Smaller the Camera, the Better
- Why Sharpness is Overrated in Street Photography
- How to Shoot Street Photography on a DSLR
Street Photography Editing and Workflow
- Video: Introduction to Editing, Processing, and Workflow in Lightroom
- How to Edit (Choose Your Best Photos) in Street Photography
- How Studying Contact Sheets Can Make You a Better Street Photographer
- Debunking the “Myth of the Decisive Moment”
How to Start a Street Photography Project
- Free E-Book: The Street Photography Project Manual
- How to Start Your Own Street Photography Project
- How to Come Up With a Personal Photography Project Idea
Learn From the Masters of Street Photography

“He without a past has no future.”
Start here:
- Why Study the Masters of Photography?
- Great Female Master Photographers
- Cheat Sheet of the Masters of Photography
- 100 Lessons From the Masters of Street Photography
- Beginner’s Guide to the Masters of Street Photography
- Download All Articles >
The Masters of Photography

Classics never die:
- Alfred Stieglitz
- Alec Soth
- Alex Webb
- Alexey Brodovitch
- Anders Petersen
- Andre Kertesz
- Ansel Adams
- Araki
- Blake Andrews
- Bruce Davidson
- Bruce Gilden
- Constantine Manos
- Daido Moriyama
- Dan Winters
- David Alan Harvey
- David Hurn
- Diane Arbus
- Dorothea Lange
- Elliott Erwitt
- Eugene Atget
- Eugene Smith
- Fan Ho
- Garry Winogrand
- Gordon Parks
- Helen Levitt
- Henri Cartier-Bresson
- Irving Penn
- Jacob Aue Sobol
- Jeff Mermelstein
- Joel Meyerowitz
- Joel Sternfeld
- Josef Koudelka / Part 2
- Josh White
- Lee Friedlander
- Lisette Model
- Magnum Contact Sheets
- Magnum Photographers
- Mark Cohen
- Martin Parr
- Martine Franck
- Mary Ellen Mark
- Rene Burri
- Richard Avedon
- Richard Kalvar
- Robert Capa
- Robert Frank
- Saul Leiter
- Sergio Larrain
- Sebastião Salgado
- Shomei Tomatsu
- Stephen Shore
- The History of Street Photography
- Todd Hido
- Tony Ray-Jones
- Trent Parke
- Vivian Maier
- Walker Evans
- Weegee
- William Eggleston
- William Klein
- Zoe Strauss
Free Downloads
Free Street Photography Books

Distilled information on street photography:
- STREET PHOTOGRAPHY MANUAL by ERIC KIM
- The Art of Street Photography
- 100 Lessons From the Masters of Street Photography
- Street Photography Contact Sheets
- Street Photography 101
- Street Photography 102
- Film Street Photography Manual
- The Street Photography Composition Manual
- The Street Portrait Manual
- 31 Days to Overcome Your Fear in Street Photography
- Zen in the Art of Street Photography
For more resources on photography, Start Here >