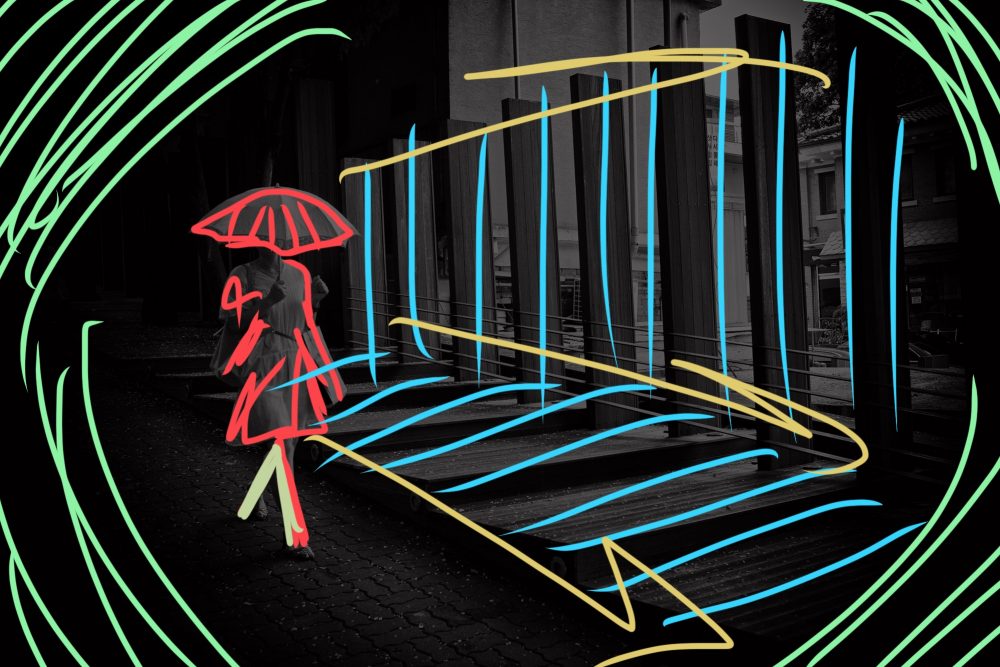
Make better photos by integrating S.A.P. (shape, arrangement, position) as well as C.I.A. (Contour, Inter-Contact, Position) to your photography!

A thought from my buddy Democritus, in photography (and maybe in reality) there only exists (S.A.P.):
- Shape
- Arrangement
- Position
And within these things, the only differences include (C.I.A.):
- Contour
- Inter-contact
- Attraction
Tree S.A.P.
We all like mnemonics (memory tricks) to help us remember concepts. Medical students do this all the time.
Anyways, a fun mnemonic I came up for this concept is “SAP” (think of the syrupy tree sap that comes from the trees in Canada, and taste delicious with your pancakes).
- Shape: What compositional shapes do you see in your photo? Triangles, circles, squiggly lines (arabesque), rectangles, squares, fractal shapes, etc.
- Arrangement: How are the subjects of your photos arranged? If you have a photograph with 3 people — how are they arranged? Or if you have many visual forms in a scene, how do you arrange these elements in your frame? Who is in the foreground, middle ground, and background? Are the elements of the photo on the left side, right side, upper left, upper right, bottom left, bottom right? In other words, “How do you organize the rectangle?” [how do you arrange your subjects in the viewfinder when you are taking photos?]
- Position: What is your position relative to your subject(s), and what is the position of your subject(s) relative to you?
Watch out for the C.I.A.
Another fun mnemonic — CIA (contour, inter-contact, and attraction). Imagine the CIA swat team, with big guns, and reflective ‘aviator’ glasses (or whatever visual helps you remember).
- Contour: In the shapes of your subjects (like if you are photographing a person) — what are the controus of your subject? Where do you see the curves?
- Inter-contact: How do the visual elements in your photos inter-contact with one another? How do the visual elements in your photo interact or engage with one another?
- Attraction: What is your viewer attracted to look at in your photo? For example, if your subject in your photo is looking directly into the lens, it will give the viewer the sensation that the subject in your photo is actually starting directly at them! Therefore, your viewer will be more attracted to your photo. Or leading lines in composition help point or direct your viewer’s eyes to look directly at what is at the end of the leading lines.
Photo theory, shmeory
To be absolutely honest, sharing too much photo theory is bad. Why? We think too much about theory, and we forget the most important thing — just going out and shooting photos!
Yet, I still like to philosophize on photo theory, because it gives us a fun mental framework to think about photography and visual art.
Practical ways to apply S.A.P. in your photography
To improve your photos and to apply Canadian Maple syrup S.A.P. to your photos, some ideas:
- Shape: Shoot triangle compositions
- Arrangement: Add depth to your photos by arranging your subjects in the following manner: certain subjects really close to you (foreground), certain subjects in the middle-ground, and certain subjects really far away from you (background).
- Position: Modify your position relative to your subjects by moving closer to them! The best zoom in photography is foot-zoom. Or tae a step back, and change your position relative to your subject!
Practical C.I.A. Tips
Watch out for the CIA — here are some practical photo tips:
- Contour: Add more curves to your photo.
- Inter-contact: Take photos of your subjects touching/interacting with other things. For example, take a photo of two people giving one another a high-five.
- Attraction: After you shoot your photos, and you’re not attracted to your own photos; the photo isn’t good.
JUST SHOOT IT!
ERIC
Composition 101 >

Master composition for yourself:
Photography Composition Tips

- 10 Tips How to Fill the Frame in Photography
- Look Up! 16 Photography Composition Perspective Tips
- 5 Simple Street Photography Composition Tips
- Depth Perception
- Golden Angle Composition in Street Photography
- Photographer as an “Arranging Artist”
- Dynamic Off-Center Street Photography Compositions
- 5 Essential Composition Tips in Photography
Color Theory

- Red and Green Composition Color Theory For Photographers
- The Ultimate Beginner’s Guide to Color Photography
- Opponent Process Color Theory For Photographers
- Color Theory For Photographers
- Color Manual
- How to Shoot Color Street Photography
Learn From the Masters of Composition

- 10 Lessons Matisse Can Teach You About Art and Life
- Henri Cartier-Bresson Composition
- 10 Timeless Lessons Edward Weston Can Teach You About Photography
- 10 Inspirational Sergio Larrain Compositions
- 5 Henri Cartier-Bresson Photography Composition Lessons
Dynamic Photography Composition 101

- Introduction to Dynamic Photography Composition
- How to Visually Analyze Your Photography Compositions
- Dynamic Tension: Opponent Based Theory For Photography
- Opponent Process Color Theory For Photographers
- Dynamic Photography Composition 101: Figure to Ground
Painting Compositions

Dynamic Photography Composition Tips

- 7 Simple Photography Composition Tips
- How to Make Aggressive Photography Compositions
- 10 Dynamic Photography Composition Tips
- How to Make More Dynamic Picture Compositions
- Unorthodox Photography Composition Techniques
- Deconstructed: Saigon Eric Kim Photos
Composition Theory

Take your composition to the next level:
- Gestalt Theory
- Juxtaposition
- Center Eye
- Low-Angle
- Dutch Angle
- Deep Depth
- Spacing
- Silhouette
- Leading Lines
- Figure to Ground
- Fibonacci Spiral
- Cropping
- Emotion
- Composition by Eric Kim
Street Photography Composition 101

For distilled lessons on composition, read the free ebook: “The Street Photography Composition Manual.”
Further articles to improve your compositions in photography:
- Composition Lesson #1: Triangles
- Composition Lesson #2: Figure-to-ground
- Composition Lesson #3: Diagonals
- Composition Lesson #4: Leading Lines
- Composition Lesson #5: Depth
- Composition Lesson #6: Framing
- Composition Lesson #7: Perspective
- Composition Lesson #8: Curves
- Composition Lesson #9: Self-Portraits
- Composition Lesson #10: Urban Landscapes
- Composition Lesson #11: “Spot the not”
- Composition Lesson #12: Color Theory
- Composition Lesson #13: Multiple-Subjects
- Composition Lesson #14: Square Format
Composition Theory

Learn compositional theory:
- Why is Composition Important?
- Don’t Think About Composition When You’re Shooting Street Photography
- How to Use Negative Space
- Street Photography Composition 101
- The Theory of Composition in Street Photography: 7 Lessons from Henri Cartier-Bresson
Compositional lessons from the masters of art
Composition lectures
Composition pictures/grids


Golden Diagonal Composition


