Practical tips and insights how to make more dynamic, or “edgy” photography compositions.
1. Tilt your camera

They call this the “Dutch angle”, to tilt your camera, to make the picture feel uneasy.
When I do this, I try to connect the diagonals, and the EDGES of the frame.
Secret: DON’T CROP. When you’re composing, don’t look at the center of the frame. Only look at the edges. And connect as many diagonals and edges as possible.

Also another tip: use your LCD screen if possible. It’s easier to see the edges of a frame when using an lcd screen, when compared to a viewfinder, which forces you to only look in the center of the frame.
2. Fill the frame
I like minimalism in pictures, but also MAXIMALISM. To shove lots of visual elements in a frame, and filling it, with minimal overlap or distractions.
I often do this by looking at the edges of the frame, filling them, and often using a flash.
Below is a picture I shot from inside a cab with my RICOH GR II and flash in P mode. The flash balances the ambient light inside and outside. And the frame is well filled with visual elements, from inside and outside.

3. Shoot weird angles— like unusually high looking down or super low angles.
What we need is more novelty of perspectives. I’ve beem experimenting, and holding my camera up super high, and looking downwards.
Novel perspectives are less boring, and more interesting and dynamic.
For example, here is a very high angle looking down:

For this picture, I shot 30 pictures of Cindy at a shrine in Kyoto. I got down super low with my RICOH GR II, and was lying on the concrete, looking up. I tried to get the edges of the shrine in the frame:

4. Look for diagonal elements

I am really into diagonals as of late for composition. Why?
I’ve been studying a lot of the BAUHAUS and early Masters of Photography, and I love how they experimented with dynamic angles. They bring the pictures to life, and to have more visual force and energy.
I love Laszlo Moholy-Nagy and Alexander Rodchenko especially.
Look for diagonals in visual lines in the background. Also, to accentuate the dynamism of your pictures, use a wide-angle lens, like a 28mm.
You can also see diagonals in leading lines:

Also, see the dynamic tension or okay between a diagonal element in your picture, with your subject.
For example, this plant has a diagonal composition and the diagonal building in the background:

5. Reflections
Reflections are more interesting and dynamic, because of their surreal aspect. You’re not sure what is reality, and what is false reality.

For me, I like pictures which are a bit obscure… and difficult to see what is going on. That is what makes photography and pictures so fun to look at.
You don’t want a visual picture to be too easy to interpret or understand (just like people). Having an air of mystery in your picture encourages the viewer to LINGER on your image, and keep looking.
The longer you can make your viewer look and explore your picture, the better.

6. Overlap visual elements
If you want more depth and layers in your pictures, separate the elements in your picture. Avoid overlap.
If you want more fun and surreal pictures, intentionally overlap them.
For example, if you can overlap the visual plane of a man walking (his feet) and make it look like he’s walking on something else (like a fence) you’ve created a visual “hat trick”: a common technique in Street Photography.

7. Curves
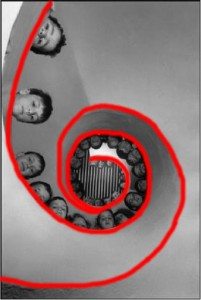
Look for curves in objects, people, roads, or things. Curves are the most dynamic and sublime compositions you can make.

For example, study the Fibonacci spiral:


Examples of leading lines and curves


Curves from the masters of photography
Some other examples of curves from the masters of photography to inspire you:


Curves in the real world


8. Study visual composition outside of photography

Study everything. You can find great design and art in everyday objects, things, or visual pictures.
This is why I like studying car design… they have the best curves.


Conclusion

Don’t be bounded by “good” or “bad” compositions. Just experiment. The whole world in photography is your visual playground.

Try to make pictures which you perceive to be good compositions. Then seek to DECONSTRUCT your own picture, and ask yourself… why are these compositions good or interesting? Self learning is the best way to learn.
For more inspiration and guidance, IMPROVE YOUR COMPOSITIONS AT ERIC KIM EXPERIENCE >
COMPOSITION 101

Photography Composition Inspiration
Composition Theory

Take your composition to the next level:
- Juxtaposition
- Center Eye
- Low-Angle
- Dutch Angle
- Deep Depth
- Spacing
- Silhouette
- Leading Lines
- Figure to Ground
- Fibonacci Spiral
- Cropping
- Emotion
- Composition by Eric Kim
Street Photography Composition 101

For distilled lessons on composition, read the free ebook: “The Street Photography Composition Manual.”
Further articles to improve your compositions in photography:
- Composition Lesson #1: Triangles
- Composition Lesson #2: Figure-to-ground
- Composition Lesson #3: Diagonals
- Composition Lesson #4: Leading Lines
- Composition Lesson #5: Depth
- Composition Lesson #6: Framing
- Composition Lesson #7: Perspective
- Composition Lesson #8: Curves
- Composition Lesson #9: Self-Portraits
- Composition Lesson #10: Urban Landscapes
- Composition Lesson #11: “Spot the not”
- Composition Lesson #12: Color Theory
- Composition Lesson #13: Multiple-Subjects
- Composition Lesson #14: Square Format
Composition Theory

Learn compositional theory:
- Why is Composition Important?
- Don’t Think About Composition When You’re Shooting Street Photography
- How to Use Negative Space
- Street Photography Composition 101
- The Theory of Composition in Street Photography: 7 Lessons from Henri Cartier-Bresson
Compositional lessons from the masters of art


