
Dear friend,
Here are some tips to take your street photography to the next level:
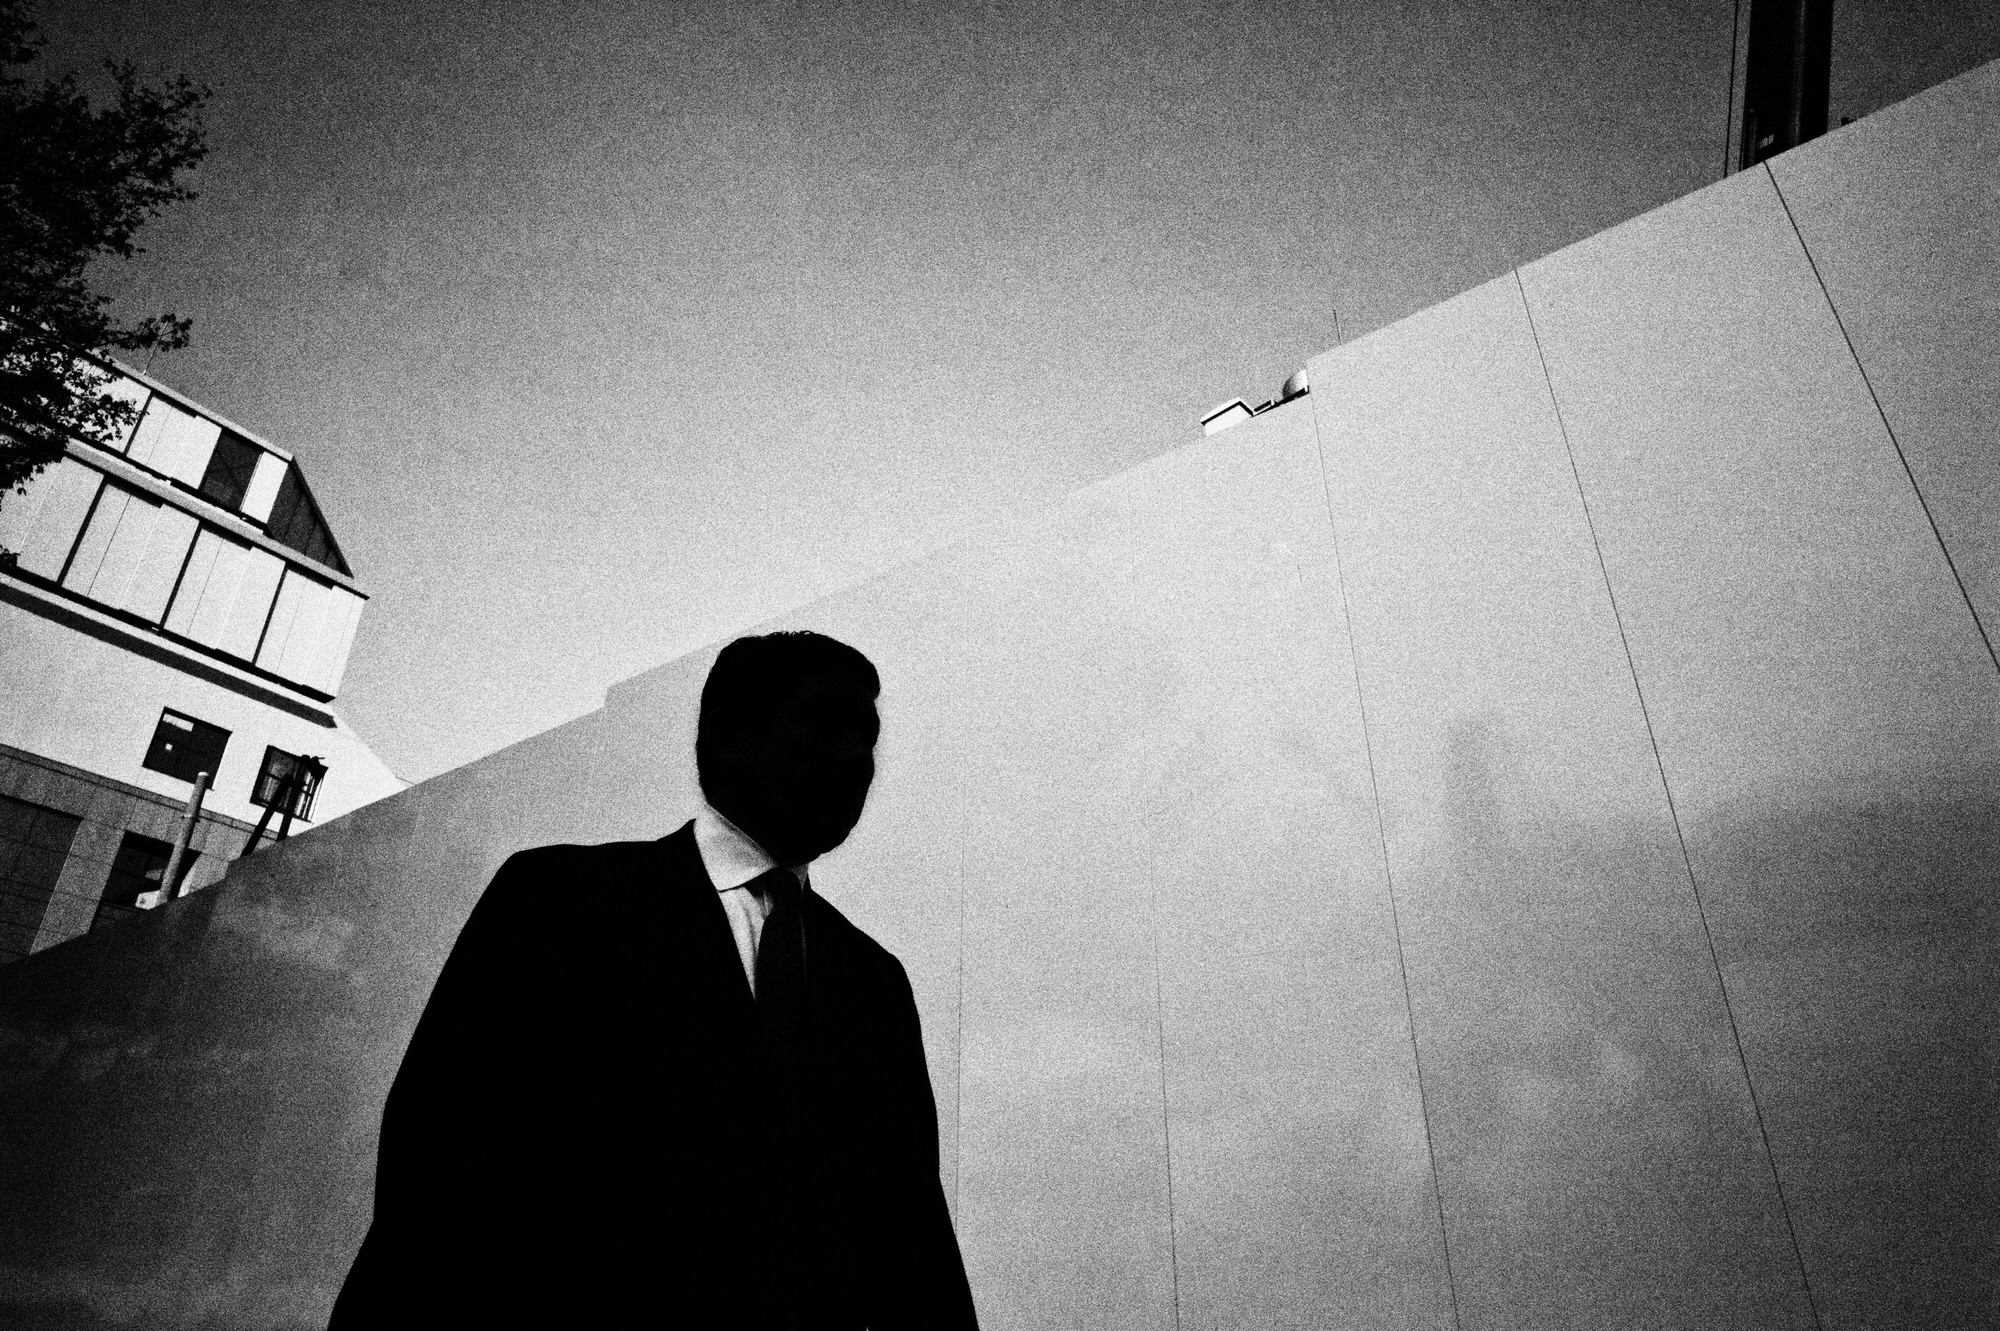
1. Figure-to-ground
The common mistake that almost all street photographers make is that their photos aren’t simple enough.
You need to establish a stronger contrast or ‘figure to ground’ to make your subject pop out from the background.
The simple test: it is the ‘Thumbnail Test’ — your photos need to be recognizable as small thumbnails if you want a good composition.

What I think makes this photograph strong is the strong contrast and separation of the subject from the background.
You can see the silhouette of the side of the man’s face— you can see his eyelashes, his lips, and the sense of longing.
Also emotionally, it works because you have the flowers on the bottom of the frame. Because I shot this with a flash (P mode, ISO 1600, during the day at around noon) — the flowers pop out:
 So the practical lesson is to simplify your composition.
Try to shoot high-contrast black and white, and make sure there is some white space or separation between your subject and the background.
Also while you’re shooting, even use a flash during the middle of the day, to add more contrast and ‘figure to ground.’
2. Identiy the ‘Cherry on top’
In street photos, a small detail that makes a good photograph great is called the ‘cherry on top.’
In this photo, it is the woman’s hand on the bottom-right side of the frame:
 Honestly speaking, 99% of people won’t see it. But if you ever do notice it— it is like the icing on top of the cake.
Lesson: You cannot identify the cherry on top while you’re shooting. But you can identify it afterwards. And it is your job as a photographer to identify it, and decide to keep the photo, and to publish/share it.
3. Get low
Simple technique— but shoot low. Very low. Use a camera with an LCD screen, and shoot crouching down, until your thighs are on fire.
This photo was shot in Sapa, Hanoi — and I stalked this water buffalo and photographed it 106 times:

Here is the contact sheet:


What I think makes the photo work is the fact that it is dark and mysterious. The bull looks like a monster, or a devil head floating in the sky.
I didn’t notice the nice composition until after I shot it. My friend Neil and Cindy identified the shot, and told me they liked the mystery of the shot.
Lesson: You are not always going to notice your best photos. Therefore, always get a second-opinion, especially to those photographers whose opinion you trust.
4. Shoot in Macro Mode (very close)
If you want more dynamic photos, shoot macro mode, and get very close — so close you cannot focus anymore.
I made a lot of street portaits on the Ricoh GR, with macro mode (at 28mm). It creates a fascinating, distorted look of individuals— but it draws in the subject. Because the view is unique, it is interesting.

For example, this is the laughing lady photo in NYC — when I was making this image, I was actively looking at the edges of the frame, and making sure I got ‘close enough’:
If you look at the contacts, note how many photos I had to make of her:  The best photo was pure chance. She started to laugh because I kept making so many photos. She told me, ‘You’re crazy—HAHAHAHA!’ and then lifted her chin.
When I was making the photo, the buffer on my Ricoh GR was still loading. So the LCD screen was all blacked out. But I kept clicking.
Lesson: Get very close to your subjects to make more dynamic images, with a wide-angle lens (28mm-35mm). And also, know that a lot of chance goes into your street photos. Often your presence in the photo will make a more interesting photo. I couldn’t have got a laughing lady without her noticing my presence— and I put a little bit of my soul in this photo (I like making people laugh).
5. Symbolism
The last tip: try to create symbolism in your street photos.
In this photo, what is the symbolism?
 To me, the ‘cherry on top’ is her Pinnochio Nose. And to me, the symbolism is that she is lying. But about what?
By having open-ended questions, it makes the photo more engaging to the viewer.
I made this photograph while shooting with some students, here is the contact:

Note the photo was with permission. But it doesn’t quite look like it. We asked her to look in different directions, and to look down.
By asking her to look down, she looks more pensive. Also note the image is not cropped. By not cropping, it will force you to improve your compositions.
Lesson: You will not see symbolism when you’re shooting on the streets. Rather, identify the symbols in your photos after you’ve made them. Then publish the photos with symbols in your photos.
6. Center the eye of your subject

Another tip: eyes are the windows to the soul. Try to get eye contact (your subject looking into your lens).
When you see someone interesting, stay there, and wait for your subject to look at you. And if possible, put the eye in the center of the frame.
In this image, her eye isn’t perfectly centered, but close enough:
 When I made this photo on a Ricoh GR II, I had the grid overlay on the LCD screen, so it is easy for me to center the eye.
This is another example of a centered-eye composition:

 Lesson: Eye contact will make your photos stronger, because it looks as if your subject is gazing into the soul of your viewer.
Learn more: Center Eye Composition >
7. Photograph hands
This tip is very simple; yet learn to create meaning and emotion in your street photos via subtraction.

Only photograph hands, and use a flash, to darken everything in the frame. Also use Lightroom and the ‘Adjustment Brush’ to darken any part of the frame which takes away from the image:
 Hands often tell a stronger life story than photographing faces.
Conclusion: Keep it simple
“Simplicity is the ultimate sophistication.†– Leonardo da Vinci
To be a more advanced street photographer is to be a more simple street photographer.
Don’t fall victim to wanting to create layers for the sake of layers. I admire the work of Alex Webb and his colors and complex frames, but I feel the work of Josef Koudelka has more soul— through his images in his ‘Exiles’ book. I think great street photography is showing and documenting emotions and the human spirit— not just interesting visual gymnastics.
 Therefore to advance, SIMPLIFY.
Be strong,
Eric
Take your street photography to the next level with STREET NOTES // and see upcoming ERIC KIM WORKSHOPS.
Free Street Photography Books

Never stop learning:
- The Art of Street Photography
- 100 Lessons From the Masters of Street Photography
- Street Photography by Eric Kim
- Street Photography Contact Sheets Volume II
- Street Photography Contact Sheets Volume I
- Street Photography Composition Manual
- Street Portrait Manual
- How to Shoot Street Photography
- Street Photography 101
- Street Photography 102
- 31 Days to Overcome Your Fear in Street Photography
- Letters From a Street Photographer
- Street Photography Aphorisms, Heuristics, and Sayings