
Dear friend,
I am excited to share my new book: “Street Photography Contact Sheets Volume II” — a behind-the-scene looks to some of my best (recent) street photos.
Download
PDF (13 MB):
iBooks Author (61MB):
Why Contact Sheets?
Dear friend,
I wanted to share this book for you, in order to show you how I got my best shots. I am a big believer of sharing information, sharing techniques, and your secret “magic tricks.â€
The most confident chefs are the ones who share their recipes, and aren’t worried about others copying or imitating them. I hope these contact sheets will help you gain some new ideas in street photography.
My biggest hope: share your own secrets with others. Make the best photos you can, but help empower other photographers.
Always,
Eric
Hanoi, 2016
Lesson 1: Look up

When it comes to shooting street portraits, I like to direct my subjects. One of the best tips I have is to tell your subject, “Look at me, look up, look down, look left, and look right.â€

In this photograph, I was walking around “Federation Square†in Melbourne during an event for the elderly. I saw this man with this incredible face, with these wrinkles that told a story. He also reminded me of the man from the Pixar movie: “Up.â€
I shot this in “macro†mode with a Ricoh GR II digital camera, at 28mm (my camera was around 20 centimeters away from his face). I shot these photos in “P†(program) mode, with ISO 800, and the built-in flash. The settings ended up being f/8 at around1/4,000th of a second.
The first 4 photos are of him looking straight into the lens, but the last shot is when I asked him to “Look up.†When you’re shooting street portraits, try to ask your subject to look up.
Contact sheet


Lesson 2: Elicit a reaction

Another street photography technique: when you see an interesting scene, keep taking photos of the scene, and wait until your subject notices you — then makes eye contact with you. Often when this happens, you elicit a reaction from your subject, which can be more interesting than just a normal candid street photograph.
For this scene, I saw a potentially good scene with the mannequin and the man. I started off shooting from a distance, and every time I clicked, I took a step closer. At around shot 5, I got the framing and composition I wanted. Shot 6 the man noticed me. Shot 7 he turned towards me. Then shot 8 he said, “You should ask for permission before taking photos!†I clicked, and this is the best image.
Contact sheet


Lesson 3: Shoot both horizontal and vertical

When you’re shooting a photograph, you never know whether a vertical or a horizontal shot will work best.

My suggestion: whenever possible, try to shoot both. Work the scene, and turn the orientation of your camera, to try out different perspectives. The other perspective might not always work, but it will force you to be more creative with your framing.
Contact sheet


Lesson 4: Don’t smile!

One of the best ways to make a more interesting photograph is to ask your subject not to smile.

In this photo, I was in a crowded bus in Istanbul. I loved the chaos, and brought up my camera to make a photo. The second I was about to shoot, everyone started to laugh (what a crazy tourist!)
I then told the man in the center, “One photo, no smiling!†The second shot he restrained a bit, and by the last shot was totally serious.
Contact sheet


Lesson 5: Don’t just take 1-2 photos

One of the biggest misconceptions in street photography is that you just take 1-2 photos and get a good shot. I believe you need to “work the sceneâ€, to increase your chances of getting a good shot.

The more times you swing the bat, the more likely you are to hit a home run. Or the more you kick the ball, the more likely you are to score. Don’t settle for just 1-2 photos, learn to “work the scene†from different angles.
Lesson 6: Photograph while people are talking

Another practical lesson: if you stop someone in the streets for their photo, take photos while they’re talking. Often you can catch an interesting “unguarded moment.â€

For this photograph, I was teaching a workshop and my students and I met “Marty†in the streets, another SF-based street photographer. We started to chat with him, and took a bunch of photos while he was talking.
The second shot looks as if he’s afraid, or anxious. But in real life, he was sociable and fearless. The best street photos lie.
Contact sheet


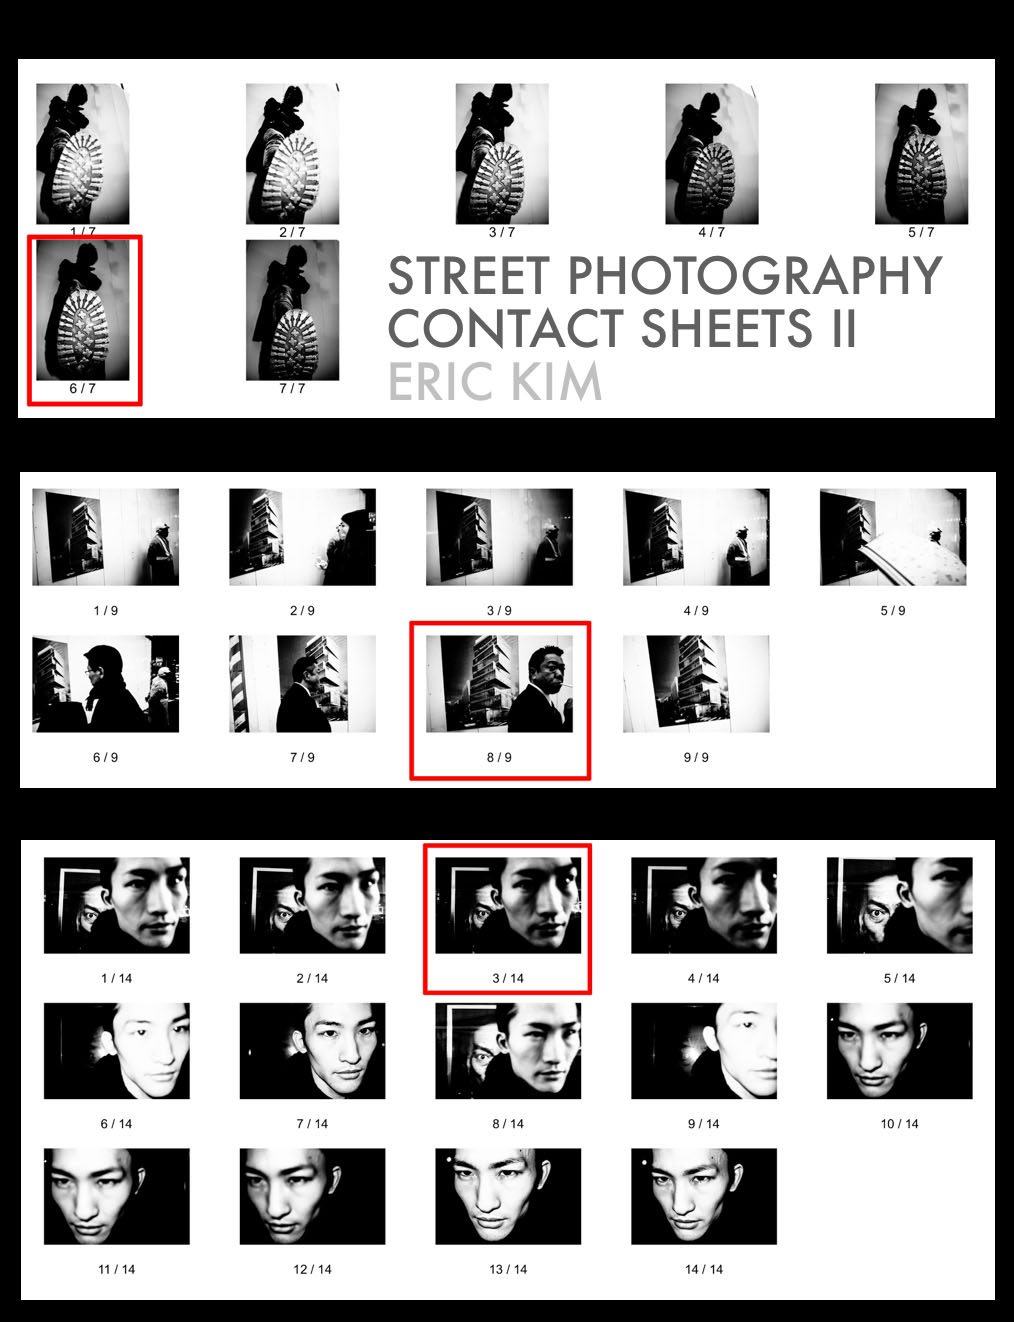
Lesson 7: Get low

Another way to get more interesting photos: shoot from a lower perspective. We’re normally taking photos from eye-level, which gets boring, and repetitive.

For this photograph, I didn’t want to just shoot a standard portrait of this man in Tokyo. Rather, I was drawn to his military-styled boots. I had a random idea: I asked him, “Can you lift up your shoe?†I then took my camera, and shot from a very low angle (using the LCD screen), and took photos in macro mode (focusing on his shoe, and using the built-in flash of the camera).
This photo makes you feel like an ant; about to get squished.
Contact sheet


Lesson 8: Find an interesting background, then wait

I feel one of the most effective ways to shoot street photography is to start with an interesting background, and wait until the right people enter the scene.

For example, I saw this juxtaposition between a building poster and the construction worker on the right. I first took a series of images to contrast these two subjects.
After I shot photograph #6, I saw a man in the suit enter the frame, with a cigarette in his mouth. I then got close to him, and took two photos. Before I shot the second photo, he noticed me, and turned around. I had no idea that would have happened, but I’m glad that I first found an interesting background, and allowed serendipity to happen.
Contact sheet


Lesson 9: Focus on what’s furthest away

When we start photography, we are always taught to photograph what is closest to us. My suggestion, don’t focus on what is closest to you. Rather, focus on what is furthest away from you — in the background. This creates more depth and mystery to your photograph.

For this photo, I saw an interesting background (poster with a man with intense eyes). I waited, and stopped a passer-by, to stand in front of the poster. He complied, and I took a series of photos (some with flash and some without). Shot #3 ended up being the best, as I love the focus being on the eye in the background. This wouldn’t work if I was focused on the foreground.
Contact sheet


Lesson 10: How to make your own contact sheets in Lightroom

To create contact sheets, I first open up the images in Lightroom.
Then you can select all the images (Command+A) and then press “Print†in the top-right corner of Lightroom.

In the “Print†screen, make sure you have “Single Image / Contact Sheet†selected in the “Layout Style†dialogue in the top-right corner.
Under “Image Settingsâ€, make sure to have “Zoom to Fill†checked.

Then under “Page Gridâ€, you can adjust the number of images in “Rows†and “Columns†(you just adjust this to have all the images appear on one page).
Scroll down on the right column, and make sure under “Print Job†that you have “Print to†set to “JPEG File.†Then click on “Print to file†and save the contact sheet as a JPEG.
Once you finish this step, you can open up the JPEG file and use an image-editing software (like Photoshop) to add the little red boxes to your contact sheet.

In Photoshop, I use the “Rectangular Marquee Tool†(hotkey M), circle the image I like, and then right-click (Control+click with Mac). Then I select “Stroke†and use a width of around 3px to highlight the images.

Another free tool you can use to make screenshots is to use “Jing†(a free screenshot app that you can make rectangular red boxes very easily).
Learn More About Contact Sheets


Here are further resources on contact sheets:
- Street Photography Contact Sheets (Volume I)
- Debunking the “Myth of the Decisive Momentâ€
- How Studying Contact Sheets Can Make You a Better Street Photographer
- The Importance of “Working the Scene†(YouTube)
- Magnum Contact Sheets
Books by Eric Kim

Never stop learning: