
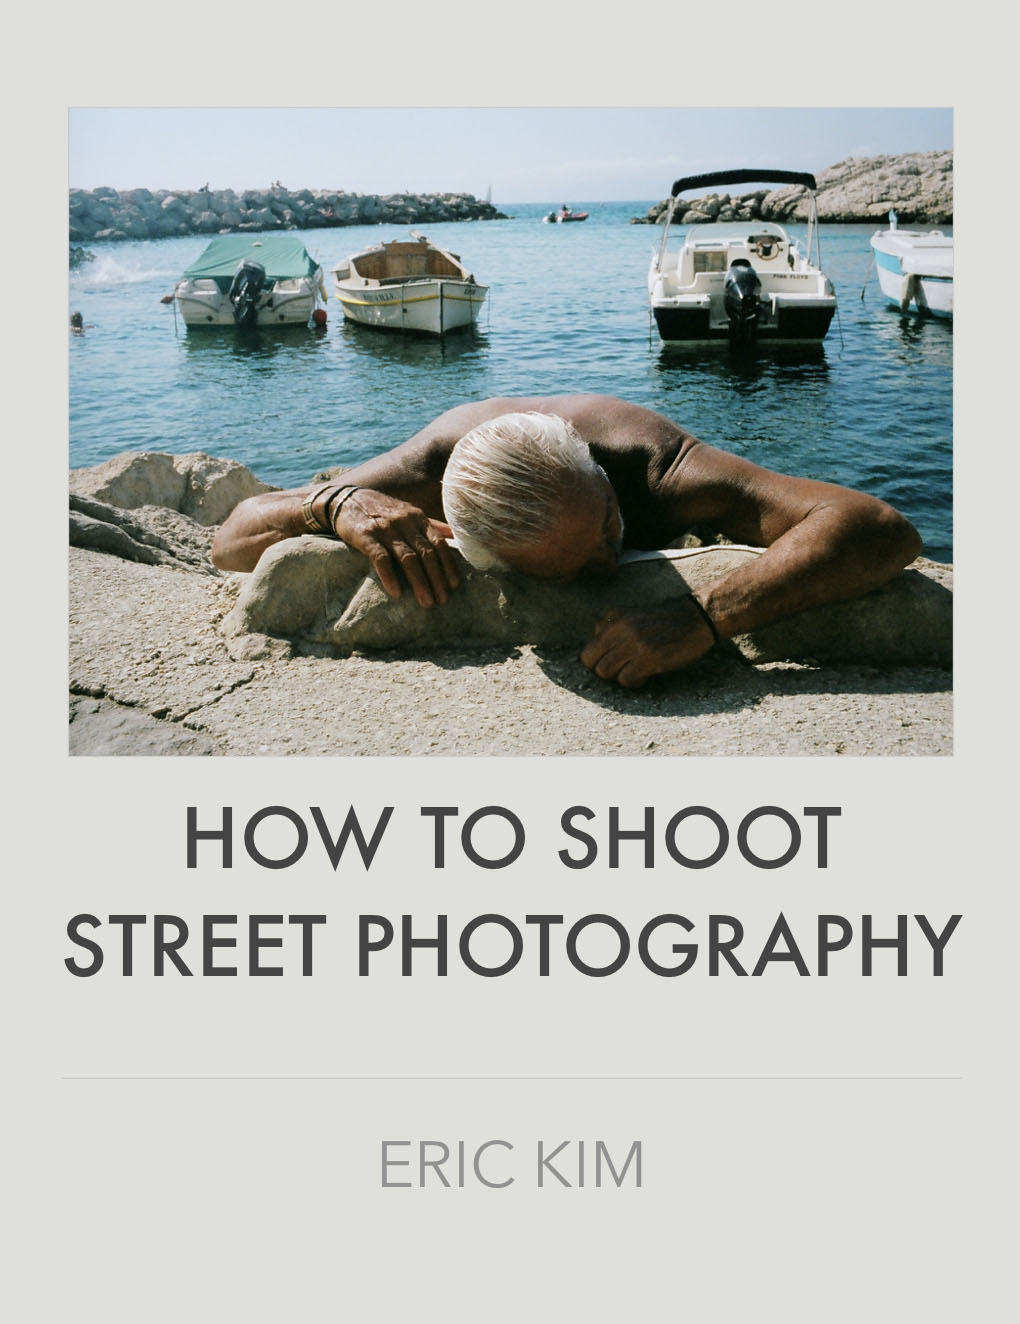

Dear friends,
“How to Shoot Street Photography” is a new free ebook which will give you all the information how to start shooting street photography.
I have included a PDF and .ePub format.
The benefit of download the .ePub format is that you can increase the text size, decrease the text size, and easily read it on your iPhone, Android device, iPad, or even computer:
Download (PDF/4.6MB)
Download (.ePub/4.6MB)
Download (.txt)
—
Download iBooks Author File for PDF (to edit, remix, translate)
Download iBooks Author File for .ePub (to edit, remix, translate)
—
The book is open source, which is free to download, share, distribute, remix, and translate.
More downloads available on Archive.org
Chapter 1: What is street photography?

If you are a beginner in street photography, all you need is this guide to get started. I was quite frustrated when I started street photography. I had no idea what camera to use, what settings to use, what to look for, how to approach strangers, and most of all– how to overcome my fear of shooting in the streets.
All of the information in this guide are my opinion and isn’t the only “right” way to shoot street photography. But I hope it is a good starting point. Take everything with a pinch of salt– take what you want, and leave the rest.
The first question you might be thinking is: “What is street photography?”

Simply put, street photography is about documenting everyday life and society. I personally don’t think street photography needs to be shot in the street. You can shoot at the airport, at the mall, at the beach, at the park, in the bus or subway, in the doctor’s office, in the grocery store, or in any other public places.
Furthermore, street photography is generally done candidly (without permission and without knowledge of your subjects). However I personally don’t think that street photography has to be candid. You can ask for permission when taking a photograph of a stranger. I don’t think just because a photo is candid makes it any better than a photo with permission. The most important thing in street photography is to capture emotion, humanity, and soul.
Therefore if you are drawn to taking photos in public (of mostly people) you are probably interested in street photography. Also as a side-note, I don’t think that street photography has to include people in it (although the best ones generally do have people in it).
So don’t worry so much about what “street photography” is and isn’t. The most important thing at the end of the day is creating powerful, compelling, and emotional images.
Always, Eric
Chapter 2: What is the best camera for street photography?

The most beautiful thing about street photography is that you don’t need a specific camera to shoot with. You can shoot street photography on any camera. In-fact, I know many talented street photographers who only shoot with smartphones.
What camera do I need to shoot with in street photography?
Generally I prefer smaller cameras when it comes to street photography. Larger DSLR’s tend to be big, awkward, obtrusive, loud, and annoying to carry around with you everywhere you go. The most important rule in street photography is: always have your camera with you. The best street photography opportunities always come when you least expect it.
However having said that– it doesn’t mean you can’t shoot street photography with a DSLR. In the guide below, I will give some general tips and guidance in terms of shooting street photography (with whatever camera you own).
There is no “ideal” camera in street photography. There are all pros and cons with each camera. The tip is finding the camera which best suits your personal needs.
Compact Cameras for Street Photography

I’m also a huge fan of compact cameras for street photography. Hands down I would recommend the Ricoh GR II. It has a large APS-C sized sensor, a fixed 28mm lens (there is a 35mm crop mode), and it fits in your pocket.
As I mentioned earlier, the most important thing in street photography is to always have your camera with you. With the Ricoh GR II, you can simply slip it into your front pocket or toss it into your handbag. You will never miss another street photography opportunity again.
One downside (can be an upside) is the camera only had an LCD screen. Personally I don’t have any problems shooting with an LCD screen in street photography (in fact, it can be better, as people don’t notice you taking photos). If you want an external viewfinder, you can purchase one for it. But frankly speaking, I don’t know many people who use the external viewfinder for the Ricoh.
DSLR guide to Shooting Street Photography

Let’s start off shooting with DSLR’s. Most photographers I know who start off in street photography generally have DSLR’s.
Here are the pros and cons of shooting street photography on a DSLR:
Pros:
- Accurate framing
- Very responsive (no shutter lag)
- Quick buffer/processing times (you can take many photos in a row without having your camera freeze)
- Great battery life
Cons:
- Large
- Heavy
- Loud shutter sound
- Difficult to carry with you everywhere you go
- Moderately fast/accurate autofocus
What lenses do I recommend for DSLR’s?
When it comes to street photography, I recommend using prime lenses (lenses that don’t zoom).
Why not zoom lenses? Don’t they allow you to get close to your subject without disturbing them?
Well I first believe that as well. But there is a saying in street photography: “Creepiness is proportional to focal length.” Therefore the longer your focal length, the creepier you generally look.
Not only that, but zoom lenses make you lazy. The best street photographers move their legs quite a bit– getting close to their subjects, moving to the left, to the right, crouching down, and experimenting with different angles.
The benefit of prime lenses is also that they are smaller, lighter, and force you to get to know one focal length really well. This will better help you quickly frame street photos. For example, I have shot with a 35mm lens for the last 6 years, and I know my framing even before I bring my camera to my eye. This allows me to take my photos in the street quickly and efficiently.
The prime lenses I recommend in street photography are the following (full-frame equivalent):
- 35mm
- 28mm
- 50mm
If you have a crop-sensor DSLR (1.6 crop) the lenses roughly translate into:
- 24mm (equals roughly 38mm)
- 17mm (equals roughly 27mm)
- 35mm (equals roughly 56mm)
Breakdown of lens recommendations (remember if you have a crop-sensor, choose the closest focal length to the full-frame equivalent):
35mm (#1 choice)
I generally recommend a 35mm lens for the majority of street photographers. Why is that? I find it is the ideal focal length in terms of not being too wide– or being too close. Apparently the focal length of the human eye is around 40mm, so a 35mm comes close to our natural field-of-view.
When choosing your 35mm lens, you don’t need a fast aperture (like f/1.4). I generally shoot most of my street photography at f/8-f/16 so you can settle with a f/2 or f/2.8 lens. Whatever is cheaper or more compact for your camera.
- If you have a full-frame Canon DSLR, I can’t recommend the Canon 40mm f/2.8 pancake lens enough. It is super compact and an ideal focal length for street photography (and quite close to a 35mm lens).
- If you have a full-frame Nikon DSLR, I recommend the Nikon 35mm f/2 lens.
- If you have any other DSLR camera system, just get the closest to a 35mm with an aperture of f/2 or f/2.8.
28mm lens (#2 choice)
I also like 28mm lenses in street photography, as they allow you to get close to your subjects, fill the frame, and make you feel like you are “really there.” Telephoto lenses compress the scene too much, and feel very impersonal (both in terms of how close you get to your subjects, and ultimately how the photograph looks).
The difficult thing about a 28mm is filling the frame without having too much negative space around the edges of the frame. This means you have to be quite close to your subjects when photographing them (around 1.2 meters or closer, which is 3-4 feet or closer). Not only that, but you have to shoot quite head-on (as the perspective of the 28mm lens is quite awkward with people when you shoot from the side).
Once again, get the closet lens to a 28mm lens either f/2.8 or above. You don’t need a fast f/1.4 lens (which are generally too big and heavy).
There are also 24mm lenses available, but I personally wouldn’t recommend them. They are generally too wide for most people (28mm is the widest most street photographers I know can effectively utilize). But if you are confident in getting close to your subjects and filling the frame, you can shoot with a 24mm lens. Anything wider than a 24mm is too wide in my opinion, and creates distortion which is too distracting for my taste.
50mm lens (#3 choice)
Henri Cartier-Bresson (the godfather of street photography) shot mostly with a 50mm his entire life. The benefit of a 50mm lens is that you can create very clean compositions with them, and it is a superb portrait lens.
However the downside I have personally found with a 50mm lens is that it is a bit too tight in most situations. I find the 50mm cramps the frame a bit too much in street photography. Therefore I feel that a 35mm is more ideal, as it is slightly wider without being too wide.
However a 50mm is still definitely useable in street photography– and some people prefer it. It allows you to have a little more distance from your subjects, and create cleaner compositions. A 50mm is also a great lens for taking portraits of people on the streets.
Once again, you don’t need a super-fast lens (like a 1.4 lens) in street photography. I’d opt for a 50mm f/1.8, which is the ideal size, weight, and price. The lenses I recommend:
- Canon 50mm f/1.8
- Nikon 50mm f/1.8
Or any other camera brand you own, just get a 50mm f/2.
DSLR Technical Settings for Street Photography
When it comes to shooting with a DSLR, there are generally two modes I recommend shooting with:
“P” mode
If you don’t like fumbling around with technical settings, I generally recommend shooting in “P” mode, using autofocus, and ISO 800-1600 during the day and ISO 1600-3200 at night.
Why these settings– and what do they do?
“P” mode stands for “Program” mode– which is essentially auto mode (except you can choose ISO, which affects your shutter speed).
“P” mode will automatically choose your aperture and shutter speed for you. It also does a great job balancing having an “ideal” aperture (which has a relatively deep depth-of-field, meaning most of what is in the frame will be in focus) and shutter speed (which means your subject won’t be blurry, but sharp).
I recommend using an ISO of 800-1600 during the day (depending on how bright it is). On a super-bright and sunny day (if you live in Los Angeles or the Middle-East) I recommend using ISO 800. If it is during the day and a bit cloudy and overcast I recommend ISO 1600.
Why these settings? Well, if you increase your ISO it will increase your shutter speed and f-stop. Rule of thumb: you generally want at least 1/250th second of a shutter speed when in the streets. This allows you to freeze the motion of people who are walking.
Why not use Auto-ISO? Well, the problem is with Auto-ISO is that the camera will automatically choose the lowest ISO possible. Meaning, if it is a bright sunny day, your camera might choose ISO 100 (which will cause you to have a slower shutter speed, or a smaller f-stop). This might cause your photos to be more blurry.
When I shot street photography on a Canon 5D I generally shot in “P” mode, ISO 1600, and with center-point autofocus. Why? I like to focus on framing my subjects, composing well, and sometimes interacting with my subject. The last thing I want to do is fumble with my settings. With my camera I simply like to “set it and forget it.”
Pros of “P” mode:
- You don’t have to think about your settings
- You might capture more moments because you aren’t fumbling around with your camera
- You can focus more on composition, framing, and shooting
Cons of “P” mode:
- You have less control how a photograph “looks” (the difference between shooting with a deep depth-of-field versus shooting with a shallow depth-of-field)
- You might miss some moments if your camera has slow autofocus
Zone-focusing
There is another technique in street photography called “zone-focusing.” Pretty much the concept is you pre-focus to a certain distance (let’s say 1.2 meters or 3-4 feet), you set your aperture to a high f-stop (I prefer f/8), and you shoot manually.
Before autofocus cameras were invented, most street photographers and photojournalists shot with zone-focusing on rangefinders and SLR’s, because it allowed them to capture the moment quickly (while having a sharp and in-focus image).
If you are shooting street photography on a DSLR, here are some settings I’d recommend you to use to effectively zone-focus with your camera:
- Aperture-priority mode (A or Av mode)
- Aperture: f/8 (it is a good balance between having a deep depth-of-field and allowing in a good amount of light)
- ISO: 800-1600 (during the day), 3200 (when it is darker)
- Shutter speed: In aperture-priority mode, your camera automatically chooses your shutter speed. Generally you want your shutter speed to be at least 1/250th of a second (if your shutter speed is slower than 1/250th of a second, increase your ISO)
- Manual focusing: You can pre-focus your lens to around 1.2 meters or around 3-4 feet.
The advantage of using zone-focusing is that you should never miss another photograph again because of your autofocus being too slow. However the downside is that you can’t use zone-focusing at night, unless you use a flash. This is because if you keep your aperture at f/8-f/16, it will be too dark and your shutter speed won’t be fast enough.
Of course you can zone-focus using fully-manual settings. But if you have a camera with A or Av mode, I’d just stick to it. It will make your life a lot easier, and if you want more precise exposures you can either use +2/3 exposure compensation when shooting in the shade, and -2/3 exposure compensation when shooting in the bright sunlight. Make sure to always shoot in RAW to recover blown highlights or dark shadows. You don’t always need a hyper-precise exposure when shooting street photography in my opinion. Focus on capturing the emotion, composition, and framing of the scene.
Another thing to note is that not all lenses have distance markings on them. If your lens doesn’t have distance marks on them, you can simply pre-focus on a tree or a mannequin when you’re out on the streets. Determine how far you are generally from your subjects, and set your pre-focus and shoot.
With zone-focusing with a DSLR, know that if you’re shooting at f/8-f/16 your focusing doesn’t have to be 100% precise. This is because with an aperture of f/8-f/16, you will have a deep depth-of-field and most of everything in the frame will be in focus (even if it looks out-of-focus in your viewfinder). Also the wider your lens, the more depth-of field you have. If you’re shooting with a 35mm or a 28mm lens, you will have a lot more depth of field than if you’re shooting with a 50mm.
What about shooting wide-open?
I don’t recommend shooting street photography wide-open (at f/1.4-f/2).
Why is that? Well although shooting wide-open is a good way to isolate your subjects when photographing portraits– I feel that it isn’t ideal in street photography for two of these main reasons:
1. It is difficult to get your subjects in focus
If you are shooting wide-open (and your subject is moving) it will be very difficult to get them sharp and in-focus. While you don’t always have to have your subjects sharp and in-focus, I think generally it is best to do this to capture gestures, emotions, or the “decisive” moment.
2. You lose context of the background
If you shoot wide open, the benefit is you blur out the background. But the downside of shooting wide-open is that often you want context from the background. A great street photograph includes both an interesting subject and an interesting background. You generally want both in perfect harmony to make a compelling image. By shooting wide-open, you lose that context.
Of course I don’t want to impose rules and restrictions in your street photography and creativity. Experiment shooting wide-open in your street photography and if it works for you– that is great. But based on my personal experience, I wouldn’t recommend shooting wide-open. Almost none of the really great or memorable street photographs I have seen were shot wide-open.
However if you are shooting at night and don’t want to use a flash, you have no other option but to shoot wide-open.
To learn more shooting street photography on a DSLR, check out: 6 Tips How to Master Shooting Street Photography with a DSLR
Micro 4/3rds guide to Shooting Street Photography

If you want the fastest and most reliable autofocus camera for street photography, I highly recommend the Olympus micro 4/3rd cameras. They are a very popular camera for street photographers, as they are small, relatively inexpensive, have interchangeable lenses, and insanely fast and accurate autofocus. There are of course other excellent Micro 4/3rds cameras out there, but I feel the Olympus’ are the best value for the money in my opinion.
In terms of the technical settings, I’d just recommend “P” mode and ISO 800-1600 (depending on how bright it is). ISO 800 for bright days, and 1600 when it is slightly darker.
I don’t recommend zone-focusing with the Olympus micro 4/3rds cameras, as the autofocus is hyper-quick and accurate already. But they do have some excellent lenses like the 17mm f/2 (~35mm full-frame equivalent) and the 12mm f/2 (~24mm full-frame equivalent) which have distance markings which makes it very easy to zone-focus.
I’d recommend experimenting with both settings and see which one works best for you.
Pros and Cons of Shooting on a Micro 4/3rds system:
Pros:
- Accurate framing
- Very responsive (no shutter lag)
- Small
- Compact
- Lightweight
- More depth-of-field (because it has a 2x crop sensor, which means shooting at f/4 gives you the same depth of field as f/8 — good for street photography)
Cons:
- Image quality is amazing, yet APS-C or full-frame sensors still have a small edge
For further reading, check out my Olympus Pen-F and 17mm f/1.8 review.
Fujifilm X-Series guide to Shooting Street Photography

One of the best bang-for-the-buck options in street photography are the Fujifilm X-series cameras. These include X-100-series and the X-Pro series. They are all ideal cameras for street photography for their great image quality (APS-C sensors), ergonomics (size, handling, and weight), as well as price (affordable).
Personally out of the current Fujifilm X-series lineup, I prefer the Fujiflim x100 for street photography in terms of value and bang-for-the-buck.
Check out my Fujifilm x100T review >
I would break-down the pros/cons of the following Fujifilm X-series cameras as following:
Fujifilm X100-series
Pros:
- Optical viewfinder + Electronic viewfinder
- Compact range-finger styled design
- Great image quality
- Insanely quiet shutter (you can barely hear it go off)
Cons:
- Moderately-accurate and quick autofocus
- Manual focusing is difficult
- Fixed 35mm lens (I actually find this to be a pro, but some people prefer to have a interchangeable lens)
How to Shoot Street Photography with a Fujifilm Camera
If you have an x100-series, or an X-Pro series camera, I recommend shooting it with zone-focusing mode.
Assuming you have a 35mm lens on it, I recommend shooting it at aperture-priority mode, choosing the aperture at f/8, ISO 800-1600, and pre-focusing at around 1.2 meters (3 or 4 feet). By shooting in zone-focusing mode you will miss fewer photos.
Rangefinder / Leica guide to Shooting Street Photography
One of the most classic cameras for street photography are rangefinders. Most master street photographers including Henri Cartier-Bresson, Garry Winogrand, William Klein, Joel Meyerowitz, Bruce Gilden, and many more have shot with a film Leica camera.
What is the benefit of shooting with a rangefinder? I’ll break down the pros and cons below:
Pros:
- Small
- Compact
- Unobtrusive (looks like an old-man’s camera)
- Very quiet shutter
- Easy to adjust aperture and shutter speed very quickly
- Viewfinder doesn’t black out when you’re taking photos
- You can see outside of the frame
Cons:
- Parallax error (when you’re photographing a subject closer than 1.2 meters, your framing isn’t accurate. What you see isn’t necessarily what you get.
- Expensive (if you want to purchase a digital Leica)
You can buy lots of different film rangefinders which are generally quite affordable (Bessa, Zeiss, Leica). However the only digital rangefinders are available from Leica (Leica M, Leica Monochrom) which are quite expensive.
How to shoot with a rangefinder/Leica in the streets
Pretty much the only way you can realistically shoot street photography with a rangefinder is using zone-focusing. You can take nice portraits with a rangefinder/Leica shooting wide-open, but it is pointless shooting wide-open when on the streets. Rangefinders were designed to be shot at f/8-f/16, as it allows you to focus quickly and capture “the decisive moment” easily.
One of the great things about shooting with rangefinders is that with most lenses (the Leica and Voightlander lenses) are that they have a focusing tab on the bottom. You can use the focusing tab on the bottom to get a feel of how far your focusing should be.
Generally with most Leica lenses, you will have three main positions:
- Middle distance (the tab is smack dab center at 1.2 meters). This is the default resting position I recommend. Also rule of thumb: 1.2 meters is around two-arm lengths away.
- Far distance (the tab is turned 45 degrees to the right, which is around 5 meters). This is around 3 arm-lengths away, and assuming you’re shooting at f/8, almost everything in the background should be in-focus.
- Close distance (the tab is turned 45 degrees to the left, which is around .7-.8 meters). This is pretty much minimum focusing distance, which is around 1-arm length away. You will only use this distance when working at extremely close distances or shooting portraits.
Over time what you want to achieve shooting street photography with a rangefinder is being very good with your focusing and distances. So by looking at your subject, you know exactly how far away they are, and how much you need to rotate your focusing tab to the left or the right.
I have been shooting with a Leica the last 3 years and now I am extremely accurate with the focusing. I am quite good at guessing distances, and my finger will intuitively know how much to turn to the left and right when photographing on the streets.
If you have a lot of money and prefer shooting with a rangefinder in street photography, I would recommend the Leica M. However if you don’t have $10,000 in spare cash lying around– I don’t recommend buying a digital Leica and lens for street photography. I would recommend starting off with a film rangefinder, the Leica M6 is the best bang-for-the-buck camera out there for street photography.
To learn more, check out: How to Shoot Street Photography on a Leica or Film Rangefinder >
Leica lens recommendations for street photography
For street photography (if you have the money), I would recommend the Leica 35mm f/2 Summicron ASPH. It is the best balanced Leica lens for street photography in my opinion. The Leica 35mm Summilux f/1.4 ASPH FLE is generally too big and heavy for street photography (and you don’t really need f/1.4 in street photography). If you prefer shooting wider, the Leica 28mm f/2.8 Elmarit is the most affordable Leica lens. If you want a closer lens, the Leica 50mm Summicron f/2 is lovely (but unfortunately doesn’t have a focusing tab).
The best bang-for-your-buck lens in street photography is the Voigtlander 35mm f/2.5 lens. It is super compact, sharp, and ideal for street photography.
Use the simplest, smallest, least-complicated camera
Ultimately my suggestion about cameras for street photography is this: use the simplest, smallest, and least-complicated camera for street photography. That might be the camera you already own, a smartphone, or compact camera.
Chapter 3: What is the best lens for street photography?

A lot of aspiring street photographers often wonder— what is the best lens for street photography?
For me, I generally prefer a 35mm focal length lens (full-frame equivalent) for street photography. Why? A 35mm lens is generally wide-enough to capture most of everything happening in a scene, yet also close enough to shoot portraits of people.
However a caveat— if you are shooting with a compact camera, or a point-and-shoot camera, or if you’re using the LCD screen to shoot— I recommend a 28mm focal length lens. Why?
When you are shooting with a point-and-shoot camera, you generally take photos and frame your scene by sticking your arm in front of you. Therefore, your framing will be tighter, than if you’re holding your camera next to your face.
Prime or zoom?

I also think that the best lenses for street photography are prime (non-zoom) lenses.
Why?
Prime lenses are a “creative constraint.” They force you to make do with the limitations of the lens, which forces you to be more creative. You take a certain scene or situation, and you adjust your position in accordance with your subject to make a good composition. You can use your “foot zoom” to either take a step further, take a step closer, take a step to the left, or take a step to the right. By using a prime lens, you have to hustle and work harder to make an interesting frame. This usually results in better photos.
By using a zoom lens, you tend to get lazy. There is a saying that a zoom lens only has two focal lengths— the widest focal length, and the closest focal length. So if you have an 18-200mm lens, you will generally only ever shoot at 18mm or at 200mm. And if you’re a timid street photographer starting off, you’re going to default to around 200mm (at least I did when I started off).
Why shouldn’t you zoom?
I don’t recommend zooming in street photography because by zooming, you flatten your perspective of the scene. The viewers of your photos tend to feel more separated with your subject. The photos of a telephoto lens don’t feel as intimate.
However when you shoot with a wide-angle lens, you feel like you’re really there. You put the viewer in your shoes, and make them a part of the photograph.
Furthermore, zoom lenses just tend to look creepy when you shoot street photography. There is a saying, “Creepiness is proportional to focal length.” The longer your zoom lens, the creepier you look.
Also when you shoot with a wide-angle lens, you look more discrete. Wide-angle (prime) lenses tend to be smaller, and less conspicuous. Not only that, but you don’t need to point your lens directly at your subject to make sure they show up. If you use a zoom lens, you have to point the lens straight at your subject, which often gives you away, or makes you more visible.
Lastly, wide-angle (prime) lenses tend to have larger maximum apertures (f/1.4, f/1.8, f/2, f/2.8) which let in a lot more light. This means that you can shoot at night with less motion-blur at lower ISO’s. Telephoto lenses have smaller maximum apertures (f/2.8, f/4, f/5.6) which let in less light, which means that your photos have a higher likelihood of being blurry.
In a practical sense, wide-angle prime lenses are also cheaper than zoom or telephoto lenses. Wide-angle prime lenses are also generally shaper than zoom lenses. Lastly, wide-angle prime lenses are generally lighter and more compact than zoom/telephoto lenses (which means you can walk around longer, with less fatigue, and more photo-opportunities).
###What about 50mm lenses?
Famous street photographers like Henri Cartier-Bresson shot with (mostly) a 50mm his entire life (he sometimes shot with a 35mm, especially in India where the streets were more crowded).
My theory is that in the time of Henri Cartier-Bresson, the streets were probably more empty than they are now. There are more human beings on earth than there were in the past, so a 35mm might have not been needed in the past. A 50mm might have sufficed when there was more room in the streets to shoot.
I personally find that a 50mm (full-frame equivalent) lens is too narrow and constricting, especially if you’re shooting in a crowded city. I shot with a 50mm lens on a full-frame Canon 5D DSLR for a while, and found out in most situations (especially when shooting indoors) it was simply too tight.
However one of the benefits of the 50mm lens is that it flattened the background more, which meant more simple compositions. Considering that Henri Cartier-Bresson was obsessed with geometry and composition (he studied painting), the 50mm worked for him.
What about lenses wider than a 28mm focal length?
I see some street photographers experimenting with lenses even wider than a 28mm — like a 24mm, a 17mm, or even a 10mm fish-eye.
In my experience, I find any focal length wider than a 28mm is “too wide.” Meaning— when a lens is “too wide” you get distortion in the edges of the frame, which make your subjects look strange and goofy.
Furthermore, one of the biggest difficulties that street photographers have is not getting close enough to their subjects and filling the frame.
The wider your lens, the closer you have to get to your subject.
When you’re shooting with a 35mm lens, if you want a tight frame that fills the frame, I recommend shooting around 1.2 meters away (roughly two arms lengths away, or even closer).
If you are shooting with a 28mm lens, I recommend you to shoot from .7 meters to 1.2 meters (about 1-2 arm-lengths away) to fill the frame.
If you shoot with any lens wider than a 28mm, you have to get close. Really close. I mean damn close. Close enough that you might hit your subject with your lens.
And also the wider your lens is, the more difficult it is to get a proper perspective. I find that the street photographs that are the most dynamic are the ones that are shot head-on. If you’re shooting with a very wide-angle lens, it is hard to shoot head-on with such a wide lens. You might end up shooting all of your photos from the side, which create a strange perspective of your subjects.
Find the lens which is ideal for you
And of course if you’ve made it this far — I hope you realize that this is all just my personal opinion based on my experiences (and the experiences of other street photographers I’ve met in the last 10 years).
There are some famous street photographers from the past (Saul Leiter being a good example) who shot with telephoto lenses who made these wonderfully-mysterious and beautiful street photos.
There are also many street photographers who use zoom lenses in their work (Martin Parr is also a great example) who make beautiful images.
There is no perfect lens or focal length for street photography. When you are starting off, I recommend you to experiment, and try out what works for you.
Perhaps it might be a 24mm, a 28mm, a 35mm, a 50mm, a 85mm, a 135mm, or 200, or something even longer. Or maybe a lens even wider.
But once you have found a lens that fits 80% of your needs and suffices for the majority of your needs, just stick with it. The longer you stick with one focal length, the more likely you are to master that focal length. You will start to see the world in that focal length, and will be able to frame a scene without even thinking about it. You will become very keen about the edges of your frame, and never need to crop your photos ever again. You will improve your composition, and make better photographs.
Use cameras with non-interchangeable (prime) lenses
I recommend shooting street photography on cameras which have non-interchangeable lenses, as they give you a “creative constraint” and for you to be more creative with your photography.
Furthermore, by not having the option to change your lenses, you don’t need to stress out whether the lens you are currently using is the “ideal” lens for a scene.
Chapter 4: 15 Street Photography Techniques

To get started, here are some practical street photography techniques and tips you can use in the streets:
1. Work the scene

One of the common mistakes I see in street photography is that photographers only take 1–2 photos of the scene, and move on (because they are either too self-conscious, nervous, or impatient).
Try this instead: work the scene. Take multiple photos of the scene. Preferably 15–20 (more tends to be better).
Why? The more you “work the scene” the more likely you are to make a great photograph. Sometimes a subtle difference between what is happening in the background, the eye contact of a person, or a hand gesture is what makes the photograph.
Think of the analogy of baseball— the more times you swing your bat, the more likely you are to hit a home run.
###2. Use your flash
If you’re like me (a lazy photographer) you don’t always shoot when the light is good (sunrise/sunset). So if you’re shooting in the middle of the day, in the shade, or indoors— try to use your flash to have your subject “pop” from the background.
I personally keep my camera on “P” (program) mode and use the automatic flash settings. Use the flash built into your camera (if you have it) or a small external flash if your camera doesn’t have a flash.
You can use a flash when you’re photographing a subject against the sun, or when they are in a poor lighting situation.
I used to shoot off-camera flash with a trigger like Bruce Gilden, but nowadays just shoot with an on-camera flash (because I don’t need any crazy flash angles anymore).
I also suggest to try to shoot with a flash during the day (people don’t notice it) rather than the night (when it can blind and scare people).
3. Get eye contact

There is a saying: “Eyes are the windows to the soul.” I feel that by getting eye contact in your photograph, the viewer feels a lot more connected to your image. It almost looks like the subject of your frame is looking directly at the viewer.
The stronger the eye contact, the more emotional, and more memorable the photograph generally is.
But how do you get eye contact when you’re shooting on the streets? My suggestion: get close to them, and keep clicking, until they notice you and make eye contact with you. The second they make eye contact, that is when you click.
###4. Get low
Many photographers shoot from eye-level. The problem is that this is a boring perspective. We are always used to seeing the world from this perspective— try to get a unique perspective by getting low.
By crouching down and shooting your subject from a low angle, you make your subject look bigger than life. Things on the edges of the frame also get exaggerated (which look novel).
Not only that, but by crouching down and getting low— you seem a lot smaller and less intimidating to your subject. Imagine a knight bowing down before a king.
###5. Capture the “unguarded moment”
We often talk a lot about trying to capture the “decisive moment” (the moment something interesting happens). However I also suggest to try to capture the “unguarded moment” (the moment when someone forgets about you, and drops their guard).
I like to ask to take photographs. What I try to avoid is having someone just look at me and pose for me with a peace-sign. What I try to do instead is to capture an “unguarded moment” — a moment when they forget me, forget about the camera, and show a little bit of their soul.
How do you capture the “unguarded moment”?
Well— you can either ask them open-ended questions like, “What are your plans for today? Where you from? How would you describe your personal style? What is your life story”? And then when people start to talk and get into “story-telling mode” — you can capture more authentic moments that aren’t as “posey.”
###6. Direct your subject
If you ask for permission from your subject, know that you can also direct them. I generally ask them to stand against a simple background, and try to get them to do an interesting hand-gesture.
To get a subject to do an interesting hand-gesture, I ask them about their sunglasses, their hair, or even their watches. I will ask them “Where did you buy it?” and when they start talking, they make hand gestures— that is when you should shoot.
You can also ask your subject to loosen up by jumping up and down, by “working it”, by playing with their hair, or by “looking tough.”
But isn’t that “inauthentic” in street photography? For me, street photography is about creating your own version of reality, not “objective” reality (leave that to the photojournalists and documentary photographers).
One great photographer who was a “director in the streets” is William Klein. Even his famous photograph “Kid with gun” was captured because William Klein told the kid: “Look tough!”
###7. “Can you do that for me again”?
Sometimes when you’re shooting a person, you see an interesting gesture, movement, or happening. I think it is fine to tell your subject, “Can you do that again?”
For example, when I was in Downtown LA and photographing this man, his partner started to wipe the sweat from his forehead. I saw that interesting gesture and asked her, “Oh— can you do that again? Can you keep wiping his forehead?” She listened— and I ended up making one of my favorite photographs (that looks candid, but was actually with permission).
###8. The “fishing” technique
This is one of the most classic techniques in street photography – identify an interesting background, and wait for your subject to enter the frame.
You can either look for an interesting background, billboard, leading lines, and create a juxtaposition with your subject who walks by it (or somehow interacts with it).
The reason why it is called the “fishing technique” is because in fishing— sometimes you can cast out your rod and catch no fish for hours on end. Sometimes you catch a lot of fish. You never know—but the skill to have is patience.
###9. Shoot head-on
Another common mistake I see a lot of beginner street photographers make is that they don’t shoot head-on. Rather, they shoot from the side.
If you want to make photographs that are a lot more engaging, full of energy, and dynamic— shoot head on. Sometimes you might accidentally bump into people, but this is important especially if you’re shooting with a wide-angle lens. When you’re shooting with a wide-angle lens and head-on, the photographs make the viewer feel that they’re really there.
So the way you can do this is walk down a crowded street, stop somewhere in the center, and wait for people to walk head-on towards you. Then after you take the photos, play dumb, and move on.
###10. Create layers/depth
If you want more engaging photographs with more depth and complexity, try to incorporate layers/depth.
What I suggest is putting your camera to manual focusing, and pre-focus to the background (whatever is furthest away, between 3–5meters). Shoot in Aperture-priority mode, keep your camera at f/8 to get more depth, and a high-ISO like 1600 or 3200.
Then try to incorporate more subjects into your frame— the foreground, middle ground, and background.
A good photographer to study is Alex Webb, who does this extremely well.
###11. Look for lines/patterns/texture
If you’re not in the mood to photograph people, know you can do more conceptual street photography without people that focuses on lines, patterns, and textures.
I do this a lot when I’m shooting “urban landscapes.” I feel that by finding lines, patterns, and textures of old buildings or places— you add more character and emotion into your photograph.
###12. Embrace negative space
I am more of a minimalist and prefer having negative space in my photograph. Why? Negative space allows your photograph to “breathe” and for your viewer to focus more on the single subject in your photograph.
Where to add negative space? My suggestion is to just use it intuitively — if your frame feels too crowded, add more negative space.
Furthermore, you can add more negative space to your photograph by capturing dramatic shadows. Shoot either at sunrise or sunset, or shoot in the bright light with –1 or –2 exposure compensation. In post-processing increase the “blacks” and contrast of your image.
A great photographer to study who uses minimalism, negative space, and shadows well is Rinzi Ruiz.
###13. Minus exposure compensation
This is related to the prior technique. The idea is to put your subject into the bright light, and set the exposure-compensation of your camera anywhere between –1 and –3. This is a technique I learned from my friend Neil Ta— which can add dramatic shadows in the background (even when you’re shooting in the middle of the day).
###14. Leading lines
Leading lines can be found anywhere— from alleyways, to street poles, to parks, or even drive-ways.
An easy way to incorporate leading lines is to first identify the leading lines, and then wait for the right subjects to enter the frame. You can pair this with the “fishing” technique.
###15. Subtract from the frame
The last tip is remember: what you decide not to include in the frame is more important than what you decide to include in the frame.
So when you’re shooting, think to yourself, “What is superfluous in my frame? What is a distraction at the edges of my frame? What should I decide to keep, and what to ditch?”
Keep subtracting from your frame, until there are no distractions left, and you are left with the essence of your image.
Conclusion
These are some practical tips and techniques to use in street photography, but know that this isn’t a full-list. Try a combination of these techniques, or if you want to practice, just focus on 1 of these techniques in a day.
The more tools you add to your street photography toolkit— the more prepared you will be for certain shots.
Even though we all have different styles and approaches, trying something outside of your comfort zone will help you grow and develop as a photographer (and human being).
So be brave friend, go forth, and make beautiful photos!
Chapter 5: How to shoot candid street photography

I think in street photography, there are many different “sub-genres.” For example, you have the traditional candid street photography, you have “street portraits” (taking photos of strangers, primarily of their faces), you have photos of urban landscapes, and of just random stuff you might find on the streets.
Here are some practical tips I have in shooting candid street photography:
###1. No sudden movements
The biggest thing that gives us away in street photography when we’re shooting candidly is that we make sudden movements.
For example, if you want to take a photograph of someone, by moving your camera too quickly to your face, you will give yourself away.
Assignment: Keep your camera close to your eye
A solution: try to have your camera really close to your face. This way, when you want to make a photograph, the distance between moving your camera to your eye will be very short.
If you have a camera neck strap, tighten it very close to your chin. Then you can quickly bring up your camera to take a photograph, without attracting too much attention.
If you use a wrist-strap, walk with your camera close to your face. Then when you want to take a photograph, you can just move your camera very subtly to your eye, and click a photo.
###2. Use your LCD screen
If your camera has an LCD screen, it can be less obvious that you are taking photos.
It is more “stealthy” to shoot with an LCD screen instead of a viewfinder. Because with an LCD screen, we look more like a tourist. Not only that, but it is less obvious who we are taking a photo of.
Assignment: Don’t use your viewfinder
I am not a big fan of “shooting from the hip”— taking photos with your camera at waist-level (without looking at the LCD screen). I used to do it a lot, but the problem if you can never frame accurately.
Rather, try to shoot without your viewfinder, but just use the LCD screen (if you have one).
###3. Don’t make eye contact
Another practical tip: when you’re shooting candid street photography, don’t make eye contact. When you make eye contact, that is when you’re automatically given away that you’re taking a photo of someone.
The funny thing is that you can stand really close to someone, and still take candid photos of them not really noticing. Just look at your subject through your viewfinder or LCD screen— avoid making eye contact.
Assignment: Look behind someone while you’re taking a photo of them
Get close to your subject, and pretend like you’re taking a photo of something behind them. See their reaction.
###4. Shoot in a crowded area
If you shoot candid street photography in a very quiet area of town, with few people walking, it will be a lot more awkward and obvious that you’re making photos of them.
Rather— try to go to the most crowded area of town. That might be in the downtown area. Or perhaps at a mall. Or maybe at the city next-door.
The benefit of shooting in a crowded or touristy area is that you disappear into the crowd. People pay less attention to you — because you’re just a part of the mob.
Assignment: Look like a tourist
Another assignment you can do is to look as much of a tourist as possible. Buy a “I love [name of your city]” shirt. Wear a bright-yellow fanny-pack. Don’t look like a local. Generally I find more people will ignore you, or not really give you any flak for shooting in the streets.
###5. The “video camera” technique
A good technique you can try to be more candid when shooting street photography is the “video camera” technique.
The concept is that you walk around the streets with your camera glued to your eye, or your eyes glued to your LCD screen. You walk around slowly, and point your camera all around you, like you’re shooting a video. Except while you’re doing this, make photos.
Assignment: 360 degree video
Try to go to a busy area, and stand in the center. Then hold your camera to your eye or LCD screen up, and turn around (360 degrees) and slowly take photos all around you. Do this while you’re close to others, and pretend like you’re just shooting a panoramic video. See how others react to you.
###6. The “fishing” technique
If you look at a lot of photographs by the “In-Public” collective— you can see many of them have employed the “fishing technique” — looking for a good background, and waiting for the right person to enter into the scene.
This is often how Henri Cartier-Bresson got a lot of his famous shots (the bicycle shot comes to mind). He would pre-visualize his composition, setup his framing and camera, then just wait for someone to enter the scene, to complete the image.
If you’ve ever been fishing — you know the secret to the game is patience. The more patient you are, the more likely you are to catch a good fish.
But at the same time, there are days you will catch no fish (no matter how good of a fisherman you are). Therefore I’ve found that the biggest benefit of fishing is just enjoying the peace, solitude, and having the chance to relax.
Assignment: Fish for 30 minutes
Find an interesting scene, background, or wall, and wait there for 30 minutes. Try to wait for the right person to walk by the wall, to create some sort of interesting juxtaposition or scene.
Take a lot of photos, and then when you go home, choose the best one.
Also as a tip, if you take photos of people walking by a wall, try to get their legs in a “V” shape (which is much more engaging, and dynamic).
###7. Capture hand-gestures
When you’re shooting candid street photos, the biggest problem we make is that we take photos of people, just walking — and these photos are boring.
Rather, try to capture hand-gestures. When you’re walking on the streets, look for people sneezing, stretching their arm to hail a cab, itching their head, or trying to shield the sun from their eyes.
By capturing hand-gestures, you will have more dynamic images. Not only that, but your photos will have more emotion.
Assignment: Hand-gestures
Simple: only photograph hand gestures for an entire day. Don’t take any photos of people not making any hand gestures. See how many different hand gestures you can observe and capture.
###8. Zone focus
One of the problems of candid street photography (especially when we’re moving quickly, and our subjects are moving quickly) is that it is hard to capture the “decisive moment” of subjects (without having blurry photos).
The solution (especially if your camera has slow autofocus) is this: use zone-focusing.
The concept of zone-focusing is this: you manually pre-focus your lens to a certain distance (I like 1.2 meters) and keep it on manual, you set your ISO relatively high to have a fast shutter speed (I recommend at least ISO 1600), you set your camera to aperture-priority mode (A/Av mode), you set your aperture to f/8-f/16 (to have a deep depth-of-field), and you have a relatively wide-angle lens (to get more things in focus, I recommend a 28mm or 35mm lens).
Then when you go out and shoot, only take photos of people 1.2 meters away (about 2-arm lengths away). By having a high ISO (1600) your shutter-speed will be relatively fast. If you want sharp photos of your subjects, try to have your shutter-speed at least 1/250th of a second, or better yet, 1/500th of a second (and faster).
The reason they call it “zone focusing” is that when you pre-focus to a certain “zone” or distance — your subjects will be in-focus (a little further and closer to that zone). For example, with a 35mm lens, if you pre-focus to 1.2 meters, at f8, everything between around .9 meters to 1.5 meters will be in focus.
So if your camera’s autofocus sucks, try out zone focusing.
Assignment: Don’t use autofocus
For a week, try out zone-focusing. Don’t use autofocus. See if you can capture more “decisive moments” in your candid street photography. If you don’t like zone-focusing, just go back to using autofocus.
###9. Focus on the subject furthest-away from you
If you want to add more depth and layers to your candid street photos, focus on the subject furthest away from you in the frame.
When we start off in photography, the beginner technique is to always focus on what is closest to us. But by focusing on what is furthest away from us (and having a subject in the foreground), you will have more depth, layers, and intrigue in the frame.
Assignment: Pre-focus to 5 meters
For a day, pre-focus your lens to 5 meters, and try to add more elements in your foreground, to add more layers and depth.
###10. When in doubt, click
Whenever you see a street scene that you think might be a good photo, just click. Don’t think too much. Just take the photo. Don’t hesitate.
I always wonder, if we always took a photo of a scene that interested us, and never “chickened out” (because of some nervousness or fear) — how many more good photos might we have made?
Personally, I have hesitated too much in my street photography, and as a result, have missed thousands of potentially good shots.
Assignment: When in doubt, click
Keep this mantra in your mind when you’re shooting:
When in doubt, click.
Not only that, but if you see a good scene, take many photos. Learn how to “work the scene”, and don’t doubt yourself. Make many different versions of a potentially good scene, and the more likely you are to get a good shot.
Conclusion
These are 10 brief tips for candid street photography.
I feel the best thing about candid street photography is the sense of thrill, excitement, and spontaneity that comes around. Not only that, but candid street photos tend to look less “posey” — and more “real” in a way.
I don’t necessarily think that candid street photos are “better” than street photos shot with permission. They’re just different. Shooting without permission is just another tool you can add to your “street photography toolbox.”
Chapter 6: How to shoot black and white street photography

There is nothing more classic than black and white street photography. When we look at old street photos of the past, we reminisce on the nostalgic images of Andre Kertesz, Henri Cartier-Bresson, Robert Doisneau, and many others.
Why black and white street photography?
Of course in the past, when photography first started off, there was only black and white. Therefore when we think of “street photography” (in the classical sense), we only think about monochrome.
When color photography first got introduced to the world, it was used for mostly amateur snapshots. It wasn’t taken as a serious “art” as black and white, because color didn’t have the same fidelity as black and white, history, and dynamic range.
Nowadays times are different. Modern digital cameras boast impressive image quality, with billions of different gamuts of color. With technology, we are able to post-process our photos however we would like.
Yet there is still a charm for black and white photography.
For me, I love black and white because of the simplicity, minimalism, and the ability to get rid of distractions and clutter.
Black and white photos tend to age well— because the aesthetic is timeless.
Furthermore, black and white give us a chance to focus on the essence of a scene. Often color can be a distraction.
Black and white or color are just different ways to shoot street photography. Choose what works better for you.
If your heart is drawn to black and white, here are some tips and suggestions I would give you to shooting monochromatic street photography:
###1. See the world in monochrome
To see the world in black and white is different from seeing the world in color.
For me, when I look at the world in black and white, I look for the following:
- Contrast between lights and darks
- Shapes, forms, lines
- Expressions (facial, body-language)
- Eye contact
- Minimalism
- Nostalgia, emotion, somberness
Obviously we don’t see the world in black and white. Therefore we need to train our retinas to see the world in monochrome.
Assignment: Only shoot monochrome for a year
My suggestion if you want to learn how to see the world in black and white: only shoot monochrome for a year.
If you shoot digitally, shoot JPEG JPEG+RAW (with a monochrome preset). If you shoot film, just stick to black and white film.
By giving yourself this “creative constraint” — you will force yourself to see your surroundings in black and white. You will start to pre-visualize how a photograph will look like in monochrome.
Try not to switch in-between black and white and color for this year-long period of training. Because you’ll never hone your monochromatic vision.
Also as a tip, if you shoot JPEG+RAW, make sure to apply a black-and-white preset when you import photos into your computer. By default, if you use Lightroom, it will automatically convert your photos back into color.
To get started, you can download my free street photography presets for Lightroom.
###2. Simplify
For me, black and white is the purest form of photography — in terms of minimalism, cutting clutter, and cutting distractions and complexity.
Always seek to simplify in monochrome. Seek to make the scene less complicated. Seek to make simple compositions. Stick to single-subjects (at least when you’re starting off).
When you’re walking on the streets, start off with a simple background. A totally white, grey, or black background is a good starting point. Then wait for the right subjects to walk into the frame.
Learn to ignore the colors that people are wearing. Rather, try to ask yourself, “How would this color look like if it were converted into black and white?” This will help you see the world according to different brightnesses and shades of grey, rather than color.
Assignment: Subtract the superfluous
For a month, try to subtract the superfluous from your photos and your frame.
Look at the images you want to photograph, and think of what you can take out of the image, rather than what you can add.
And when you’re framing a scene, ask yourself: “Does this element really need to be in my frame?”
Try to distill your images to the essence.
Simplify, less is more.
Not only that, but remember the motto: less, but better.
###3. Take risks
With black and white photography, you never know what you’ll get until after you’ve shot the image.
The world isn’t black and white. Our camera renders it into black and white after we’ve clicked the shutter.
So nobody is able to truly pre-visualize a monochromatic image in their mind (100%). If we shoot black and white film, we have less control how our ultimate image will look. If we shoot digital and RAW, we have tons of control over how our final monochromatic image will look. If we shoot black and white JPEG, we have a similar constraint like film.
Assignment: Take risks
Therefore when you’re shooting black and white in street photography, take risks. Shoot against the light. Try to get flares in your images. Play with your exposure-compensation in black and white. Try to do +1, +2, -1, -2 exposure compensation. Learn how that affects how your images ultimately turn out.
You never know what a monochromatic image will look like until you shoot it.
###4. Study the master black and white photographers
Of course, if you want to learn how to take better black and white photos, it is always good to study the masters. Here is a list of some photographers I recommend you start off studying:
Study their images, and see how they compose their images. Not only that, but look at your favorite images of theirs, and try to deconstruct them. What works, and what doesn’t work? How does the light look? What kinds of emotions or gestures are in the frame?
###5. Focus on emotions
What I love about black and white photography is the emotion it evokes. Monochrome images feel quieter, more still, and are more somber and nostalgic. They reckon the past.
The cliche is when you photograph sad things, you photograph in black and white. Because black and white has a more somber mood.
However you can also switch it up — try to photograph happiness in black and white. Also try to photograph despair. Photograph a wide gamut of emotions in your black and white images.
This concept of photographing emotions is universal to all forms of photography. Yet black and white is a certain aesthetic which evokes a certain mood to the viewer.
Assignment: Evoke certain moods in your photos
Consider what kind of mood black and white stirs in you — and try to photograph those emotions. And as an assignment, also try to evoke the opposite emotion in black and white, to push yourself outside your comfort zone.
###6. Dodge and burn
One thing that photographers have been doing for decades is “dodging and burning” their photos (brightening and darkening their photos, in certain parts of the frame).
In the past, they did this in the darkroom. Now we can do it in the “Lightroom” (clever Adobe).
A lot of newbie photographers think that dodging (brightening) and burning (darkening) certain parts of the frame is “cheating.” No. There is no “cheating” in photography — it all depends what your artistic vision is.
You can use digital or traditional tools to brighten and darken certain parts of your frame. I am a big fan of the “adjustment tool” in Lightroom, which gives you more control over how much you want to darken or brighten a part of your frame. Also if you want to darken parts of the frame which are too bright, try using the “radial tool” or “gradient tool” in Lightroom — to allow for a more natural-looking change of brightness in your photo.
Darken parts of the frame you find distracting. Brighten parts of the frame you find interesting (but you want to shine more light on them).
The viewer’s eyes are drawn to the area of your photo with the highest contrast. Keep this in mind.
Also when it comes to dodging and burning, you don’t want to over-do it. For example, when you dodge or burn a photo too much — it looks fake. And if your viewer can tell if a photograph has been excessively dodged or burned, it will be a distraction. Treat dodging and burning, and post-processing in monochrome like adding salt or seasoning to your food. A little seasoning adds a lot of great flavor. Too much seasoning will ruin the dish.
Assignment: Limit your post-processing to under a minute
Personally, I find the longer I spend post-processing my monochrome images, the worse they look. I try to limit my post-processing to under a minute.
I do this by shooting RAW+JPEG, but also applying a standard black-and-white preset to my images (upon import). Then I will make small adjustments to the photograph, in terms of exposure, contrast, shadows, highlights. I will often burn parts of the photo I find distracting.
Once the photograph looks 85% good to my liking (in terms of the monochromatic look) I stop. Anything more will ruin the image. Try the same yourself.
###7. Use a flash
A good way you can add more “pop” to your images is to use a flash. Just use the integrated flash in your camera, or use a small flash.
The benefit of using a flash that it will add intensity and a pop to your images. Great photograph needs good contrast, and dramatic light. If you’re shooting in the shade, your black and white photos will probably lack contrast, and lack that aesthetic interest.
Assignment: Photograph all your subjects with and without a flash
For a week, practice by using your flash on everything you photograph. Photograph flowers, trees, people, and things on the ground with a flash (in monochrome).
Also when you take a photograph of each subject-matter, shoot in both flash and without flash. Then when you go home, judge both images. See how the flash affects your images, in terms of the aesthetic look, the emotional impact, and the intensity.
Then at the end of the day, treat flash as another tool in your street photography toolkit. Use it when you see it is needed, and don’t use it when you find it superfluous.
###8. Shoot in dramatic light
Photography means “painting with light.” So try your best to shoot when the light is good (golden hour — during sunrise, and sunset).
My good friend Rinzi Ruiz does this really well — he will find a great shaft of light, be patient, wait for the right person to walk in, and he gets a beautiful, minimalist monochromatic street image.
In terms of technical settings, if you shoot in aperture-priority or program mode, adjust your exposure compensation to -1 or -2. Also when you go home, you can increase the “black slider” in Lightroom (or your program of choice) to darken the shadows. They often call this “crushing the shadows.”
It is often good to have some details in the shadows, but when you’re starting off, there is something exciting about having an aesthetic of totally black blacks, and a sliver of light illuminating your subject.
Assignment: Stalk the light
Whenever you go out and shoot, always try to stalk the light. See where you can find nice little slivers of light, and try to adjust your exposure-compensation to minus -1 or -2. Be patient. Wait for the right person to step into the frame.
Try to experiment with different perspectives. Take the elevator to the top of a skyscraper, and shoot down. Or shoot up.
Better yet, try to wait until sunset until you shoot — when you get dramatic long shadows in your subject. Or if you’re really tough, wake up early for sunrise.
Know that at the end of the day, great light will make an ordinary street photograph into a great street photograph.
###Conclusion
This is just a brief guide and start to shooting black and white street photography. Know that to truly master monochrome, it will take a lifetime. It means training your eye, to learn the light, and to take lots of images.
There is no truly “wrong” or “right” in street photography — whether you decide to shoot black and white or color.
For most street photographers starting off, I recommend starting off in black and white. Why? Because it allows you to train your eye to the fundamentals, and not to get distracted by color. I generally recommend color street photography for more intermediate/advanced street photographers.
But ultimately, there are no rules — only guidelines and tips.
Above all, I feel black and white photography is all about capturing soul. Photograph with your heart, and capture the soul of your subject through the images you make. A photograph without emotion is dead. Make your photos immortal with your monochrome.
Chapter 7: How to shoot color street photography

I feel that shooting color street photography is more difficult than shooting in black-and-white.
Why?
With color, there is more complexity. If you have a photograph that has distracting colors that don’t add to the frame— your photo won’t work.
Black and white cuts out complexity, by distilling the image into just monochromatic shades of black and white.
Color introduces complexity, by adding different colors, shades, and hues (which can make or break your photo).
In something as unpredictable in street photography, how can we better make color street photos? Some ideas:
1. Only shoot in color for a year

It takes a while to train yourself to see in color. For me, when I started to get interested in color photography (after getting bored with black-and-white), I decided to stop black and white all-together, to only focus on color.
It was a good choice. Because I feel it is impossible to both improve your color and black and white photography at the same time.
By trying to chase two hares, we will catch neither. To do two things at once is to do neither.
Focus on one thing at a time that you’re trying to improve.
For color, learn to see the world in color. Look for interesting colors that pop out to you. Look for intense shades of red, cool shades of blue, or calming colors of green. Look for interesting juxtapositions of colors — a pop of orange against a green background. A pop of red against a blue background.
Look for complementary colors. Look for scenes that all have a similar shade of color (a scene of only warm colors: red, orange, and yellow). Or scenes with only cool colors (blue, green, purple).
###2. Study painting
One of the best ways to study color is to study painting. Why? Because the painters could create their own colors at their own will, whereas as photographers we are slaves to the scene.
Look at how painters use different colors to bring your eyes around the frame. See what colors and shades they use to create different emotions and moods into their images.
Then try to apply the same to your photos.
3. Don’t just convert your photos from color to black and white

When it comes to street photography, you need to be more brutal when it comes to editing your photos (choosing your best photos). Because you might have a great photograph (that works in black and white), but it might not work in color.
Instead of doing the easy thing (converting a color photo that doesn’t work into black and white) — just focus on your color photography. If the colors of your street photograph don’t work, ditch it.
Our eyes are generally drawn to the areas of the greatest contrast in an image. For color, I’ve found that my eyes are most drawn to the colors red and yellow (a coincidence that these colors are mostly used for advertisements, fast-food chains, and sale signs?) The color red reminds me of blood and death (always catches our attention). And the color yellow is for “caution” (most road signs are painted this color).
4. Start off with simple colors
When you’re walking on the streets, start off by training yourself to see in color by working on simple colors.
For example, if you see just a simple blue background, try to get someone wearing a bright red (something) to pass by. Start with very basic colors, and nothing too fancy or complex.
Or when you’re walking on the streets, wait until you see something or someone colorful. Then try to make them the focus of your scene.
###5. Shoot with a flash
Most of the time, you won’t have good light. The hard thing about street photography and color is that if you don’t have good colors, the photos tend to look aesthetically ugly.
Black and white is more forgiving in poor light. Color isn’t.
So when you’re faced with a situation with poor light, try to shoot with a flash. A flash will add contrast to your scene, the colors will look more bright and vibrant and saturated.
In terms of technical settings, I just recommend using the integrated flash on your camera (if you have one), and shooting in “P” (program mode), with ISO 800. If your camera doesn’t have a flash, just use the smallest and most compact flash possible.
###6. Shoot in good light (golden hour)
The best color street photographs I’ve seen are in epic light — mostly during golden hour (sunrise, and sunset).
There is nothing more blissful than seeing golden light. I am still blown away by the beautiful Kodachrome colors of the photos of Alex Webb and Steve McCurry.
Personally I don’t have the will to wake up early to shoot sunrise. But whenever it is near sunset, I try to shoot like a madman. This is when the shadows become very long (longer than the height of your subjects), when there is dramatic contrast, and you feel the day coming to an end.
So if you want to make better color street photos, try to shoot sunrise or sunset. Also if you’re shooting in aperture-priority mode or program mode, try to use exposure-compensation for a better exposure (usually -1 exposure compensation works well).
###7. Study great color photographers
When I first started to study color photography, I studied the work of the masters and pioneers of color photography, which include some of the following:
The funny trend I’ve noticed in photography is this — most photographers start off in black and white, then evolve to color. It very rarely happens the opposite way.
I suspect because a lot of these photographers started to shoot in color, because it was more difficult, challenging, and complex. And we all need a challenge to push ourselves in our photography, to grow, evolve, and improve.
###Conclusion
I’m passionate about both color and monochromatic street photography. Both have the pros and cons.
Neither is better — it just matters what your personal preference is.
If you’re interested in shooting more color, I hope these tips will help you in your photographic journey.
The world is a beautiful and colorful place. Keep capturing the vibrance of life.
Chapter 8: How to shoot street portraits

If there is one genre of street photography I specialize in, it is “street portraiture.” I love talking with my subjects, engaging with them, and focusing on their faces. If I started shooting street portraits all over again, this is the advice I would give myself:
###1. Don’t hesitate
Avoid all regrets. If you see someone even moderately interesting that you want to photograph, approach them and ask for permission. It is better to ask and get rejected, than to never ask.
Assignment: Approach people who you think will say “no”
The problem in life is that we seek to avoid getting rejected— never do we seek to get rejected.
As an assignment, go out into the streets with your camera, and try to intentionally get 10 strangers to reject you. Approach people who you think look “mean” and unapproachable. Tell them what you find interesting about them, and ask to make their portrait.
You can’t stop until you get 10 rejections. Then observe and learn how hard it is to get 10 “no’s”.
###2. Smile
As human beings, we are naturally suspicious of one another. In prehistoric times, one wrong look could have meant life or death.
However we are fortunate in today’s world— we won’t get killed by a neighboring tribe if we give them a wrong look (unless, unfortunately, you live in some ghettos or crime-ridden areas).
For the most part, street photography is tame. What is the best way to make your subject feel more comfortable? Simple — just smile.
In psychology, there is something called “mirror neurons”. The concept is that as humans, we mimic the behavior of others. Therefore, if someone smiles at you, you are genetically pre-wired to smile back.
There is nothing better than a smile. Better yet, even a smile from a stranger.
A smile will elevate your mood, make you feel more confident, and connected with society. Most people (it seems) walk around with a frown on their face by default (myself included). But whenever I encounter people, I try to give them a huge smile whenever possible. And that shifts their perception of me. What was initially a suspicious look, turns into an equally-enthusiastic smile.
Assignment: Click, smile, and say “thank you”
For your assignment, if you want to shoot candid street photos, just take a photo of a stranger, click, smile, and say, “Thank you.”
Then afterwards once you’ve caught their attention, approach them closer, and ask for permission to make their portrait.
The benefit of this approach: you get both a candid photo, as well as a portrait with permission. This helps you “kill two birds with one stone.”
3. “Make” a photo, don’t “take” a photo

The words you use matter. Especially when it comes to shooting street portraits.
For example, ask yourself, what is the difference between these two questions:
- Excuse me sir, do you mind if I take your photo?
- Excuse me sir, do you mind if I make your photo?
For me, “take” sounds forceful. It seems aggressive. It seems suspicious.
However “make” is more curious. It sounds more creative, open, and collaborative. Many Europeans say “make a photo” (not take a photo — perhaps this is what makes a lot of European photographers more creative than American photographers).
###4. Make a “portrait”, not make a “photo”
Not only that, but change the word “photo” into “portrait”.
To continue from our past example, what is the difference between:
- Excuse me sir, do you mind if I make your photo?
- Excuse me sir, do you mind if I make your portrait?
To me, “photo” sounds like you just want to take a snapshot. A “photo” is something you just upload to Facebook. A “photo” seems unintentional, and perhaps a bit touristy.
However a “portrait” sounds more intentional, artistic, and considered. Artists paint portraits. And very few people have proper “portraits” of themselves.
Assignment: Shift your vocabulary
So for your assignment, when it comes to shooting street portraits, change your vocabulary.
- Don’t say “take” a photo— say “make” a photo.
- And don’t say make a “photo”— say make a “portrait.”
Try experimenting this approach with your subjects, and see how they respond differently.
###5. Make your subject part of the portrait-making session
I feel the most beautiful part of shooting street portraits is how you can collaborate with your subjects. You can make them part of the portrait-making session. You don’t just steal their soul by taking a quick snapshot, and running away.
How do you make your subject part of the portrait-making process? Some ideas:
- Ask your subject: “What is your good side?”
- If your subject is feeling stiff, ask them to “jump up and down” (this will make them laugh, and allow some blood to flow in their body)
- After making a portrait of your subject, show them your LCD screen and ask them which version they prefer the best
- Offer to email them the portrait, or perhaps even print and mail it to them
Assignment: Have your own portrait made
I learned this assignment from Sara Lando — if you want to learn how to make your subjects feel more comfortable, learn how to be on the other side of the camera.
That means, hire a professional photographer to make your portrait.
Learn how they make you feel comfortable. Figure out what makes you feel uncomfortable. Then treat your subject how you would like to be treated (or how you don’t want to be treated).
###6. Compliment your subject
Nobody hates being complimented. As humans, we are vain, egotistic, and into ourselves.
I love complimenting others— because it is free. And it uplifts, encourages, and makes people happy.
What you don’t want to do is give people false or fake compliments. People have a good B.S. meter — so always make sure your compliments are genuine.
But the key is to tell your subject why you want to photograph them. The reason you approach a subject is because you find something unique or interesting about them. So don’t be shy — compliment what you find interesting about them.
Assignment: Compliment everyone for one small thing (for an entire day)
For an entire day, compliment each person you meet. It can be small — compliment them on their earrings, their tattoos, their haircut, their outfit, their smile, their friendliness, or something else.
Make it a habit to compliment others. It will uplift them, uplift you, and help you build a stronger bond with them.
###7. Hang out with your subject longer than you think you should
Most people are lonely, and lacking human contact. Even in big cities— we are constantly surrounded by people, but we feel alienated. Most of us just want someone to talk to, and share our life story with.
Yet we make the mistake of thinking that everyone else is always busy, and hates to talk. The truth is, we love to talk, socialize, and be human.
The mistake we also make in street photography is that when we approach a stranger, we want to quickly take their portrait, and move on. Because we feel guilty for “wasting their time.”
Shift your perception. Think that you are adding value to their lives— that you are making their mundane days more interesting.
Think about it— if you approach a stranger to make their portrait, compliment them, and chat with them — you will not only make their day, but you will have a great story for them to tell their friends and family.
For example, I was once making a portrait of this amazing woman, and someone called her. She picked up her phone, and said, “You wouldn’t believe what happened to me! I was just walking in the streets, and this strangers approached me to take my photo! He thinks I’m someone famous or something! Haha!”
There are millions of people out there — by singling out one individual — you are telling them that they are unique, special, and one-of-a-kind.
Assignment: Shift your perception
Approaching a stranger to make their portrait is a compliment. Keep that in mind.
Also when possible, try to stick around with your subject as long as possible. Keep asking them open-ended questions, and make portraits while they’re talking. When shooting street portraits, try to take at least 10 photos. Some of my best photos required me to take nearly 100 photos of them.
###8. Ask your subject open-ended questions
Going to the prior point— sometimes you approach strangers to make their portrait, and they say “yes.” When they say “yes” — they often ask you, “So, what do you want me to do?”
As a default answer, I will tell them: “Can you just look into the lens, and don’t smile?” This makes the photo look more natural.
What I also like to do is to ask them open-ended questions like:
- “What is your life story?”
- “What are you up to today?”
- “How have you seen this city change over the years?”
The benefit of asking open-ended questions is that your subject goes into “story-telling mode”. And when they do, they forget about you. You disappear into the background. And this causes your subject look more natural.
Assignment: Click while your subject talks
Try to make photos while your subject is talking.
Try to capture their mouth moving, their hand gestures, or body language. Try to get photos of them with eye contact and without.
“Work the scene” and try to make as many different versions of the photo. Often when you make photos while people are talking, they are more fluid, vibrant, and dynamic.
###9. Look for a clean background
One of the photographers who have inspired me the most is Richard Avedon. He was famous for photographing his subjects against a simple white backdrop.
This allows you to put 100% of your focus to your subject’s face.
One of the mistakes a lot of us make in street portraits is that the background is distracting or messy. You might find someone interesting in the streets, and just quickly snap a photo of them. But you might have a distracting pole sticking out of their head or shoulder, messy trees, or power lines.
So when you approach a stranger to make their portrait, and they say “yes” — look around, and ask them to move against a simple background. You can explain it to them too — say, “Oh excuse me, the background here is pretty messy. Do you mind standing in front of this simple white background here on the left? It will make a better photo.” This will make your subject more willing to cooperate. And surprisingly, I have never met a subject who said “yes” to my request to make their portrait not want to move against a simple background.
Assignment: Find clean backgrounds
My suggestion: when you’re out shooting in the streets, try to first identify a clean background. It can be a gated background, a brick wall, or just a clean white/grey/single-colored background.
Then just wait for your subjects to come to you. Then when they come close by, ask your subject to make a portrait of them against the background you’ve identified.
###10. Capture a hand-gesture
I generally find street portraits of just faces a bit boring. For me, my favorite street portraits is when you get an interesting hand-gesture or body-language.
To get your subject to make an interesting hand-gesture, comment on something near their face. You can try the following:
- “I love your glasses! Where did you buy them?” (most people will start playing with their glasses, that is when you start clicking).
- “Wow your beard is so long! How long did you grow your beard?” (most people will start playing with their facial hair, which is an interesting hand gesture, then you start clicking)
You can also ask them to just pose for you a certain way, and ask them to mimic you. Some interesting hand gestures:
- Fist on the chin
- Scratching forehead
- Hand on the side of the face
To build upon this, you can also ask your subject to look in different directions (ask them to look up, down, left, and right).
And to top it off, you can even try to provoke a funny reaction from them. For example, ask them to give you a big laugh and start laughing really loud yourself. Say, “HA HA HA!” and usually people will laugh (back at you), and that is when you start clicking.
###Conclusion: Learn to be comfortable in your own skin
Shooting a street portrait (imho) is more difficult than shooting traditional “candid” street photos.
Why? Because when you shoot a “street portrait”, ask for permission, and interact with your subjects— it takes a lot of guts. It takes great courage. You need to step outside of your comfort zone, and put yourself out there.
It is easy to snap a photo of a stranger without permission, and move on.
It is hard to empathize with your subject, bare your soul, and make yourself naked.
The last piece of advice I have you when it comes to shooting street portraits is to shoot with your heart. Do so openly, with a huge smile, and don’t hesitate.
Also know that the skills of approaching strangers and making their portrait will help you in all forms of your life. You will become more confident, more courageous, and hesitate less (in personal life, in business, and with your relationships).
Lastly, are you comfortable in your own skin — and being on the other side of the lens? Learn to first be comfortable with who you are, before you decide to go out and photograph others.
Chapter 9: How to shoot layers in street photography

Recently I’ve been trying to add more complexity to my work— to shoot more layers. Shooting in layers is more challenging than single-subjects, and requires more visual gymnastics, and luck.
Below is a brief guide on how to shoot layers in street photography — and why you might want to try it out:
###Why layers?
The reason why you should try to shoot layers in your street photography is because you want to take your work to the next level. I think it is a fun challenge, where you can create images that are more complex and interesting.
I personally am drawn to single-subjects in photos. I like minimalist photos, but being here in Vietnam at the moment— I want to capture more layers to show more of the chaos of the streets.
Some of the best street photographers to study for layers include Constantine Manos and Alex Webb (for color).
Find the right background

First of all, you need to find the right setup. Meaning— you need to be in an environment where there is a decent amount of foot traffic— that will allow you to create layers in your street photography.
If you’re shooting in a downtown area, try to stand on the far edge of the curb, and shoot towards the storefronts. Find a sidewalk with enough space and depth— so you can practice shooting layers.
###Layers, deconstructed
A basic example of layers in street photography:
- Foreground
- Middle-ground
- Background
The foreground is what is closest to you.
The middle-ground is what is a little further away from you.
The background is what is furthest away from you.
To make an effective layered street photograph, you want something interesting to be happening in each of these layers.
Also to note, you can create layers in street photography with 2 layers, or even 4-5 layers.
Also by adding negative space around the subjects and objects in your frame, you will add more depth. You want to try to avoid over-lapping figures.
###Example technical settings for layers
In terms of technical settings, I recommend to focus on the subject the furthest away, which will give your photos a deeper illusion of depth.
Here is an example setup:
- Aperture-priority
- f/8
- ISO 1600
- Manual-focus (pre-focused to 5 meters)
This setup works well with manual-focusing lenses, especially rangefinders. Or with Fujifilm cameras, or any other camera that has a poor autofocusing system.
By focusing to 5 meters (pretty far), you can have more depth in your photos.
Or you can always just keep your camera in “P” mode, ISO 1600, and center-point autofocus (what I usually recommend for micro 4/3rds cameras, because the autofocus is really fast. I also use these settings on my Ricoh GR II). And when you’re using autofocus, just try to focus on whats furthest away in the background.
###Find “anchor” subjects
When you’re shooting on the streets, you want to find “anchor subjects” — subjects that aren’t moving.
For example, in the background you can see a guy smoking a cigarette. That person is your first “anchor” (because they probably aren’t moving around much).
Then you want to identify a second anchor (another person a bit closer to you in the foreground). This second anchor might be someone checking their phone.
Lastly, you want to add someone to the foreground (closest to you). In my experience, it is hard to find 3 subjects that are anchor subjects and aren’t moving. Therefore the subject in the extreme foreground tends to be someone walking into and out of the frame.
For the person in the foreground, you want them to be out-of-focus. Why? This gives you an illusion of depth.
Newbies tend to always focus on whats closest to them in the frame (in the foreground). But the more advanced you become as a photographer, you spend more time focusing on things in the background (furthest away from you).
###Color or black and white?
You can of course shoot layers in color or black and white.
Color tends to be easier for layers, because it helps separate your subjects.
Black and white is harder for layers, because the elements blend in more together.
But of course, it is personal preference at the end of the day. Try both, and see what works better for you.
###Shoot in good light
Also if you want very effective layers, you want to shoot in good light (sunrise, sunset, or ‘golden hour’).
This is because you can create more black shadows, dramatic contrast, and the light really brings your images to life.
So either try to wake up early and shoot sunrise, or shoot at sunset.
Another thing you can experiment with is shooting with a flash. This works especially well when you are shooting during the day, and the light is harsh and flat. The flash creates more contrast in your images, and more separation between your subjects (especially when you are shooting in the shade).
###Fill the frame
As you get more advanced and experienced with shooting layers, you will try to fill the frame (and avoid over-lapping subjects).
As a fun assignment, try to fill the frame to the brim without it becoming too chaotic. Always play that line between having enough people in the frame and not being too busy.
Also as a tip, try to focus on filling the edges of the frame. As photographers, we tend to tunnel-vision too much in the center of the frame. If you focus on the edges, you will get cleaner compositions, better framing, and more interest.
###Book-ends
Another thing to consider when creating layers is to add “book-ends” to your frame.
What is a “bookend” in the context of street photography?
Well, it is to have a subject or element in the extreme left or right of the frame, which draws the energy of the frame closer together.
For example, you can have someone’s face extremely close to you, which will fill up the entire 30% of the left or the right side of the frame. The good thing about this technique is that it removes distractions from the background.
###Shoot a lot
Lastly, shooting layers is hard. A lot of capturing the right layers in a street photograph is luck.
So you need to shoot a lot. Alex Webb says street photography is 99.9% failure. I agree with him, especially when it comes to shooting layers.
You might shoot 1,000 photos and still get no good layered photographs.
But the more photos you shoot, the more likely you are to hit a home run.
###Things to avoid when shooting layers
When shooting layers, try to avoid the following:
1. Overlapping figures: You want to have a little separation between the subjects and elements of your photograph. For example, it isn’t appealing to have a hand or a limb growing out of someone’s head in the background.
2. Extremely bright objects: Avoid white cars, white plastic bags, and other distractions in the background. They tend to draw attention away from the subjects in your frame.
3. Not shooting close enough: If you want good layers, you need to be pretty close to your subjects (in the 1.2-3 meters zone). If you feel that your layers aren’t edgy, dynamic, or interesting enough — get closer. Also as a note, if you’re starting shooting layers— a 35mm lens (full-frame equivalent) is a nice balance of being wide enough, yet not too wide.
###Layers for layer’s sake?
When it comes to street photography, adding layers will add more interest to your photographs.
Yet remember— don’t shoot layers for layer’s sake. Anyone can add multiple subjects in a frame and not have them overlapping.
But ultimately you want a photograph with depth of emotion. Try to capture multiple-subjects where you have multiple gestures, body-languages, and emotions. See if you can create a layered street photograph with some people who are happy, and some who are sad. Try to photograph in one frame— both old and the young. Big and small.
Juxtapose different elements in a layered photograph (both compositionally and emotionally) — and you will make a great street photograph.
Chapter 10: How to shoot urban landscapes

I consider “urban landscapes” as a sub-genre of street photography. But it is tricky — what differentiates a great “urban landscape” from just a snapshot of a building?
In this guide, I will try to offer some tips, and deconstruct how to shoot more emotional, memorable, and powerful urban landscapes:
###What is an urban landscape?
To start off, an “urban landscape” is literally taking a landscape of something urban. We think of landscapes as generally pretty sunsets, mountains, and the such.
Yet I find it fascinating to photograph the urban environment. The fake environment that humans have created.
To me, urban landscapes are more interesting than natural landscapes— because they offer more of a social commentary, critique, or reflection of society. Many urban landscapes are alienating and unnatural. They trap us as humans, and make us live these unnatural lives (think of life in the suburbs, where we don’t even have sidewalks).
1. Find buildings with emotion

I think to start off, a great urban landscape needs to have emotion. This is the only way we can relate to a building, an urban environment, or a scene with some sort of empathy or feeling.
For example, look for buildings that are worn down. That have character. That have history. That have peeling paint, bricks falling off the side, or a small detail somewhere that evokes emotion.
There is no science to this. It is just how you feel.
Assignment: Add emotions to buildings
As an assignment, walk around and try to photograph these different emotions with buildings:
- Sadness
- Happiness
- Joy
- Excitement
- Despair
- Loneliness
- Solitude
Of course, buildings have no emotions. However as humans, we can add or impute our emotions to buildings.
What would a “happy” building look like to you, vs a “sad” building?
Just use your own judgement, and try it out.
###2. Take a lot of photos
With urban landscapes, the benefit is that they don’t move, yell at you, or change when you bright up your camera.
The mistake a lot of photographers make when shooting urban landscapes is to just click once, and move on.
Assignment: Work the scene
Rather, try to take a lot of photos of the urban landscape you find interesting. Photograph it from different angles and perspectives. Shoot really close, then take a step back. Shoot from the left, the right. Crouch down. Perhaps try to get to a higher perspective and shoot at eye-level or down.
Try out different exposure-compensations. Shoot it at 0, -1, -2, +1, +2.
Take as many photos as you can, and realize afterwards that a subtle difference in terms of framing or exposure will totally change the impact of the image.
###3. Look for the “cherry on top”
I think the key to a great urban landscape is to have a “cherry on top” — a small little detail which turns an ordinary snapshot into something more intentional or interesting.
Perhaps the “cherry on top” in your photograph can be a lone safety cone. Or it can be a single crack in a window. Or it can be a person walking by the urban landscape. Or it can be a certain color in the frame.
Essentially you want to make your photographs to look more intentional — that you didn’t just take a snapshot. Rather, you want your viewer to know that you intended to take a photograph a certain way. That you found something unique about a certain urban landscape. And by highlighting a “cherry on top” — you try to point out to the viewer, “Hey! This is what I found interesting — and this is why you should take a closer look at this image.”
Assignment: Look for the “cherry on top”
If you’re shooting an urban landscape, pause, and look around. What can you add to the frame that is a “cherry on top”?
Perhaps there is an abandoned bicycle close-by. Then try to take a step back, and figure out how you can include the bicycle into your frame.
Whatever the “cherry on top” is— see how you can include it into the frame.
But what about moving things around in a scene? Honestly, just do what feels right to you. Personally I don’t like to move things into the frame, but I don’t mind moving things out of a frame. Just follow your own gut and rule of ethics.
###4. Perfect your composition
If you’re photographing an urban landscape that doesn’t move — you have no excuse for making a bad composition. To the best of your ability, try to make a perfect composition.
I recommend perfecting your composition by taking your time, and by focusing on the edges of the frame. Think of how you can avoid distracting elements, or overlapping figures in your background.
Assignment: Remove clutter
I feel the best way to have a better composition is to remove or subtract clutter, distractions, or complexity from your frame. See how you can make your urban landscapes as simple as possible, yet still have that emotional impact.
Also try to separate the different elements in your frame by avoiding over-lapping figures. Add some negative-space in between things in the background, which will add more depth to your frame.
Or on the flip side, try to see how you can make different elements in your background stack on top of one another. Try to flatten the perspective.
###5. Shoot during golden hour, or use a flash
The light affects the emotion of a scene. If you shoot an urban landscape, try to do it during sunrise or sunset. Flat light usually means flat emotions.
If the light isn’t good — try to use an artificial lighting source (like a flash). Sometimes the harshness of a flash can affect the mood of an urban landscape (to make it feel more alienating, anxious, or depressing).
Assignment: Revisit the same place over and over again
When you see a good urban landscape, try to shoot it in different lighting situations. Return over and over again. Shoot it during sunrise, sunset, or in the middle of the day. Shoot it with a flash.
Try to also experiment shooting your urban landscape in black and white and color. See which aesthetic changes the emotion and mood of a scene.
###Conclusion
Shooting urban landscapes is harder than shooting people — because generally buildings are boring, and just look like snapshots that any tourist could have photographed.
If you want to learn how to shoot truly great urban landscapes, I recommend studying the “New Topographic” photographers, as well as some of these other photographers:
As street photographers, we are usually focused on documenting people. But realize that the urban environment is equally important — because photographs of our urban cities is a reflection of who we are as humans, and a society.
Not only that, but think about how your photos of urban landscapes will look 20, 50, 200, 1000 years from now. You are documenting history in the making.
Chapter 11: 70 street photography tips

To the best extent of my abilities, I have outlined my top street photography tips below. This is a culmination of the last 10 years I’ve been shooting street photography in earnest. All of these are just “tips” and “suggestions”— none are rules.
So feel free to pick and choose with what resonates with you, and throw away the rest.
1. There is no such thing as the “decisive moment”
In-fact, there are multiple possible “decisive moments” in every scene.
A decisive moment might be the moment when your subject makes eye contact with you. A decisive moment might be the moment when your subject throws back his head in frustration. A decisive moment might be the moment your subject jumps on the train before it speeds off.
I used to think the “decisive moment” was a universal moment. However, if you sit and observe a person or a situation, be patient. 5, 10, or even 100 “decisive moments” might occur in a scene.
Furthermore, you never really know which moment is “decisive” or not until after-the-fact. By taking many different photos at different times in a scene, you have a higher likelihood of capturing the “best” decisive moment.
2. Social skills are more important than photographic skills
I feel in street photography, your social skills are more important than your photographic skills.
Meaning, as a street photographer— you need to have the right social communication tools. You need to have the confidence to approach a stranger to approach them with (or without) permission. You need to be able to interact with your subjects to calm them down (in-case they get upset, are confused, or just need an explanation).
If you shoot street photography and you feel bad, guilty, or dirty — you’re doing something wrong.
I feel that when you shoot street photography, you should feel an affirmation for life. You should feel more connected with people on the street. You should feel more empathy for people on the streets, and feel connected with them on a deeper emotional level.
I often photograph strangers without permission, and then once they stare at me and give me a “what the fuck” look — I will wave at them, say hello, sit down and have a chat with them. I then end up making a new friend, rather than just snapping a photo and running away.
A lot of aspiring street photographers I meet are very socially shy and awkward. If you don’t feel comfortable in social situations as a human being, focus on building your social skills before your street photography skills.
3. Street photography is more about you than your subjects
As photographers, we filter reality through our own perception and eyes. We decide what to photograph, and what not to photograph.
Generally I find that our own emotions and life-experiences color how we see the streets.
For example, if you’re optimistic— you will generally look to photograph optimistic or happy people on the streets. If you’re more pessimistic and moody, you might identify more lonely, isolated, and solitary people in the streets.
Therefore the street photos you shoot are self-portraits of yourself. Your street photos aren’t objective of a place or an area. It is merely a reflection of your own inner-mental state.
So don’t forget, every time you take a photograph of a stranger, you’re really taking a photo of yourself.
4. Don’t “take” street photos, “make” street photos
In the West and America we usually say “take” photos. However in Europe and other countries, they say “make” photos.
If you say “take a street photograph” — it sounds forceful. Like you’re stealing the soul of your subject. However when you say “make a street photograph” — it sounds more personal. It sounds like a collaboration between you and your subject to make art.
The change of terminology will change how you approach your street photography. Rather than feeling like a creep and a thief, you’re an active participant on the streets. You engage with your subjects, and bond with them on a deeper emotional level.
Even when I approach strangers, I always ask them “Excuse me sir, I love your look. Do you mind if I make a portrait of you?” instead of saying “Do you mind if I take your photo?”
“Make” sounds more creative and inclusive. “Portrait” sounds more professional and considered than “photo.” It sounds more artistic, and less creepy.
5. Be physically strong
As a street photographer, your most important asset are your legs. You will probably walk and trek for miles, hours on end, and the strength of your legs will determine how likely you are to get good street photographs.
Some of the best street photographers I know can walk for nearly 10-12 hours straight in a day. While I’m not shooting street photography, I try to keep my legs fit by practicing lunges, squats, deadlifts, and 1-legged “pistol” squats.
Trust me, when I’m in America, I barely walk. I take my car everywhere. And when I do shoot street photography, my feet and legs get sore after just an hour.
So as a practice, try to keep your body fit. Not just your legs, but your upper-body too. Do pushups, chin-ups, go to the gym and try other strength-training exercises (bench-press, dips, etc).
When you build up your body physically, you build yourself up mentally as well.
If you are physically strong, you will also be mentally strong. Which brings me to the next tip…
6. Be mentally strong
I feel that street photography is 90% mental. I’ve hesitated taking photos on the streets, because I let nervousness, self-consciousness, and fear get the best of me.
How many potential street photographs did you not photograph, because you felt nervous about the consequences? Did you ever get worried that your subject might yell at you, call the cops, or even worse— punch you in the face?
Build mental resilience. Train your body physically, but also train your mind.
How do you train your mind?
Personally, I have found studying “stoic” philosophy from Seneca, Marcus Aurelius, and Epictetus to be my greatest teachers. They have taught me mental exercises to always imagine the worst case-scenario, to not fear the future, and to always think about death. I usually read stoic philosophy once or twice a day — in the morning to prime my mind to stay strong, or to relax me in the evenings before I sleep.
Starting off, I recommend reading “Letters From a Stoic” by Seneca, or “Meditations” by Marcus Aurelius.
Train yourself to be a little less fearful everyday. Everyday, try to push yourself a little outside of your comfort zone. Photograph what you’re afraid of, and channel your fear into excitement.
7. Walk on the side of the curb, and shoot towards storefronts
When you’re shooting street photography, your positioning is crucial. As a tip, I recommend trying to remove clutter from your background, by walking on the side of the curb and shooting towards the storefronts on the sidewalk (a tip I learned from my friend Charlie Kirk).
If you’re walking in the middle of the sidewalk, and shoot forwards, you are likely to have distractions in the background — random heads, and other people.
If you’re walking in the middle of the sidewalk and shoot into the streets, you will get distracting white cars, plastic bags, and telephone poles.
However by walking on the curb-side of the sidewalk and shooting towards the store-fronts, you are more likely to have a simple and minimalist background. You will cut down clutter, and also have the chance to make an interesting “juxtaposition” (contrast) between your subject and the background.
8. Shoot your subjects mid-stride in a “V” shape
As a practical tip, when you’re photographing your subjects walking, try to get their legs fully-spread in a “V” formation. Why? It looks more dynamic, as their legs make 2-diagonal lines, or a little triangle.
If you do the “fishing” technique in street photography (look for an interesting background, and wait for your subject to walk into the frame), wait until their legs are split in the “V”.
In terms of camera settings, either use burst mode of single-shot. I know some people who have more success in burst mode, while other street photographers prefer the precision of the single-shot mode. Of course, it also depends on your camera.
9. Look for the “cherry on top”
What is the difference between a good street photograph, and a great street photograph?
For me, it is the “cherry on top” — a small detail which elevates an image.
For example, you might capture a pretty good street scene. But without a small detail or a happening which is unique, it won’t be great.
The “cherry on top” can be many different things. It can be a kid doing a backflip in the background, it can be someone’s reflection in a mirror, or it can be a certain gesture or emotion in someone’s face.
I generally don’t identify the “cherry on top” of a street photograph while I’m shooting. Instead, I will identify the “cherry on top” after I’ve taken the photograph.
10. You can’t control the scene, but you can control which photos you decide to share
In street photography, you can’t control the light, what your subjects are wearing, and whether you will make a good photograph. Much of street photography is luck — being at the right place at the right time.
So you might get certain photos that are “almost” — except a small detail which ruins your photograph.
A lot of street photographers will settle for “good enough” — but I say aim for your personal best.
You can’t control whether you will make good street photographs or not, but you can control what photos you decide to share (and what photos you decide not to share).
Street photography is the most difficult genre of photography out there. You need skills in terms of composition, timing, physical endurance, mental courage, and assertiveness. To make a great street photograph is really hard.
But still, my suggestion is to only show your best work. People will judge you by your worst photo. Less is more.
11. A 35mm focal-length is ideal for most street photographers
There is no “ideal” focal length for all street photography. However I have found for most street photographers, a 35mm lens (full-frame equivalent) is ideal.
Why?
It is wide enough to capture most things in the scene, and yet close enough for portraits. It is the ultimate versatile focal length.
However I still encourage you to experiment with different focal lengths. But realize the wider your lens is, the more difficult your street photography is. For example, with a 28mm lens, you are more likely to get more clutter in the scene.
How about a 50mm lens, like what Henri Cartier-Bresson used to shoot with? I find it is generally too close for most situations in the streets, but if you find it a focal length you like, stick with it.
12. Don’t chimp while you’re shooting on the streets
“Chimping” is looking at your LCD screen while you’re shooting. Try not to “chimp” when you’re shooting on the streets.
Why not?
Personally, I have missed thousands of potentially good street photos because I “chimped” while shooting on the streets. The problem with “chimping” is that it kills your flow of shooting on the streets.
When you’re shooting on the streets, only focus on shooting. The second you look at your LCD screen, you will get distracted, and no longer be in the “zone” or “flow” of shooting street photography.
Also whenever I look at my LCD while I’m shooting, I lose sight of another scene which might be even a better photograph.
13. Avoid the “middle distance”
I generally find the two types of street photos that are the most interesting are the ones which are shot at two different distances:
- Very close
- Very far
When you take photos in the “middle distance” — they tend to be a bit awkward, and lacking in intensity and intent.
If you shoot very close to your subject, you feel physically and emotionally intimate with your subject. This also conveys similar emotions to your viewer.
When you shoot very far from your subject, it looks intentional. You get more of a sense of the background, context, and scene.
The problem that many of us do in street photography is that we settle for a “middle distance” — which isn’t close enough to feel intimate, yet not far enough to look intentional.
What exactly is a “middle distance”? For me, a middle-distance is around 5 meters. I find a good close distance to be from .7-1.2 meters. I find a good “far” distance to be from 10-20 meters.
14. The “.7 meter” challenge
I got this tip from my friend Satoki Nagata — if you want to overcome your fear of shooting street photography, pre-focus your lens manually to .7 meters, and only shoot at that distance for a month.
Why? It will force you to get unusually close to your subjects. And you can ask for permission, or shoot candidly.
Most of us are uncomfortable with close distances in street photography. But the more we practice shooting at this close distance (.7 meters is roughly 1-arm length away), we will get used to it.
15. Shoot the streets according to your personality
When I first started to shoot street photography, I thought there was only one “right” way to shoot — like the master Henri Cartier-Bresson. I wasn’t allowed to talk to strangers that I photographed, I had to be as stealthy as possible, and not leave behind a trace or “influence” the scene.
I now realize that is all a bunch of B.S. You want to photograph according to your personality, not how other photographers have shot in the past.
For example, Henri Cartier-Bresson was an introvert. He shot according to his personality. Me on the other hand, I’m an extreme extrovert. I like to talk to my subjects while I’m photographing them.
The summation of all ancient Greek philosophy is, “Know thyself.” Similarly — seek to know yourself in street photography.
Do you prefer to capture “decisive moment” photos when you are patient and wait for hours for a good moment? Or are you more restless, and prefer to “hunt” on the streets for a good moment? Do you prefer to have nice compositions in your street photography and focus on layers, depth, and geometry? Or do you prefer faces, gestures, and emotion?
16. Shoot in “P” (program) mode
There are many different technical ways to shoot street photography. But I feel the easiest is to just set your camera to “P” (program) mode where your camera automatically chooses your aperture and shutter-speed. Why? It allows you to focus on fewer technical settings, and more about you framing, overcoming your fears of shooting street photography, and capturing the right moment.
In terms of my camera settings, I prefer “P” mode, center-point autofocus, and ISO 800-1600 (ISO 800 during the day, ISO 1600 indoors or when it is a bit darker outside).
Many accomplished street photographers I know use similar settings. Nobody cares if you shoot fully-manual in your photography. The most important thing is your image, and whether you caught the right moment, emotion, energy, and dynamism in your frame.
17. Stalk bus stops
One of the best places to shoot street photography is at bus stops. Why? People waiting at bus stops are generally stationary, not going anywhere, and you also get a good mix of people. You get subjects ranging from young to old, and people from all different walks of life — sitting together, patiently.
When I’m shooting in a busy downtown area, I always walk by bus stops, and check out the scene. I generally try to walk into the street, and shoot towards the bus stop. This allows me to capture more faces in my street photography. And I will sometimes pretend like I’m just photographing the advertisement of a bus stop in order not to draw too much attention to myself.
18. Look for gestures
The problem I made when I first started to shoot street photography was that all of my subjects were boring. They weren’t doing anything — just walking, with their hands by their sides.
If you want more engaging street photos, look for subjects who are doing something with their hands, or body language. Look for people walking in the bright sun, covering their eyes with their hands. Look for people pointing in certain directions. Look for people putting their hands on their hips.
Why capture hand-gestures? Because often hand-gestures show more emotion. Furthermore, gestures are more engaging than people walking with their hands by their sides. 90% of human communication is through our bodily gestures. So for a street photograph that cannot talk, the hand gestures and bodily language in a photograph do all the talking.
19. Don’t share the back-story of your street photo
When I started street photography, I would always put a lengthy description of the back-story behind my photos. The problem is that by doing so, it took away all the mystery and fun behind a street photograph.
The most engaging photos are the ones in which the viewer can make up his/her own story of the frame. If you give away what you’re trying to say in a street photo, or try to “explain” it, it no longer becomes interesting to the viewer.
Furthermore, sometimes we try to salvage “so-so” street photographs by adding an epic story behind the image. But that does nothing to prop up a weak street photo.
A great street photograph should be able to stand on its two legs, without a fancy description.
Nowadays, I just caption my photos by the city and date, such as: Los Angeles, 2016.
20. Don’t drop your camera immediately after taking a photo
If you want to be stealthy in your street photography, don’t immediately drop your camera from your eye after you take a photograph.
Why? It gives you away.
Rather, try this: if you’re shooting street photography with a camera that has a viewfinder, hold your camera up even after you’ve taken an image. Take a few photos, pause, take a few more photos, pause, and hold your camera up to your eye. During those awkward few seconds, people will assume you’re photographing something else, and just stop paying attention to you.
But if you take a photo of someone, immediately drop your camera, and keep moving — it will be pretty obvious that you’ve made a photograph of them.
To build upon this idea, it is called the “video camera technique” — hold up your camera to your eye (or waist-level if you’re shooting with an LCD screen), and walk around like you’re recording a video. Instead, you’re taking street photos. But if you pretend like you’re recording a video, everyone will ignore you.
21. Street photography doesn’t have to include people in it
If you wanted me to define street photography, I would say it is: “Documenting humanity.”
Now if you document humanity, you don’t necessarily have to photograph people. You can photograph buildings, places, or things — that somehow shows a sense of “humanity.”
Technically anything can be a “street photo” — the question is, whether your street photo is engaging, interesting, or emotional.
I like to shoot street photos of urban landscapes— buildings made by humans that show emotion, decay, or some sort of personality.
I like to shoot street photos of things I see on the street— discarded gloves, trash, or other objects that reflect humanity.
Just know that there is no ultimate definition of “street photography” — simply define it for yourself.
22. Start off shooting single-subjects
The problem most street photographers have is that they have too much clutter, subjects, and information in their frame.
If you’re starting off, try to just start with single-subjects. With just one person in the frame. Try to make as simple of a background as possible, with no overlapping figures in the background.
By starting off with a single-subject, you will be able to focus on one interesting person or moment in a frame. By starting off with simple compositions and mastering it, then you can work on creating more complex scenes— with more subjects, layers, and gestures.
23. Focus on the edges of a frame while shooting
Many street photographers crop their images too much, because their edges of their photos are too messy.
A good solution: focus on the edges of your frame while you’re shooting, and make sure they are clean. Throw your subjects somewhere in the middle, and don’t worry about them so much.
By focusing on the edges of your frame, you will frame your scenes tighter. You will be able to get closer to your subjects, and have fewer distractions in your photo.
Generally as street photographers we do a good job of identifying interesting subjects. But we always disregard the background.
So no matter how interesting your subject is, if the background isn’t interesting or simple, the photo doesn’t work.
24. Don’t settle for just 1 photo of a scene
I had the misconception in street photography that I was only allowed to take 1 photo, and had to move on.
My suggestion: “work the scene” and milk the scene for all its worth. Because once you move on, you will never see that same exact scene ever again.
If you study the “contact sheets” (behind-the-scenes photos) of the master street photographers, you will see that most of them took far more than just 1 photo of a scene to capture a good moment. Some photographed 5 photos, 10 photos, 20 photos, or even 36 photos for just one photo! Some more contemporary masters of street photography (like Alex Webb) have been known to shoot 300 photos of a single scene (on film) to capture that one “decisive moment.”
In today’s age with digital technology — why settle for just 1 photo? Don’t be scared or timid. Ironically enough, the longer you hang around and “work a scene” — the less awkward it will be. Also don’t feel bad talking to your subjects while you’re shooting. Or you can just pretend like you’re shooting something else in the background.
By also taking multiple shots of a scene, you can later have more options to choose the best version of the scene. Even a half step to the left, to the right, or a moment a second before or after can make all the difference.
25. Decapitate your subjects
Sometimes street photos are more interesting when you cut off the heads of your subjects.
By not always showing the faces of your subject (and instead, showing just their hands, bodies, and legs) — you create a photo that is more open-ended, that has more mystery.
Experiment with this technique. Try to look only for hand-gestures, and focus on that. Or someone’s legs or feet. Practice with different angles and perspectives (experiment photographing someone’s legs by putting your camera on the ground).
Or you can even just photograph someone by showing just their teeth (and not their eyes).
Think of other ways you can chop up the frame and your subjects, to make more dynamic and mysterious shots.
26. Keep shooting until you get eye contact
This is a tip I learned from my friend Thomas Leuthard— try to get eye contact in your photos.
The technique is this: you walk close to someone, bring up your camera to your eye, and keep taking photos, until they notice your presence. Then the second they make eye contact with you, keep clicking. Then choose to say hello, and chat with them, or avoid eye contact, and keep moving.
There’s a saying that “eyes are the windows to the soul.” I feel street photos with strong eye contact are generally more alluring and engaging.
But sometimes it isn’t. That is the beauty of this technique— you can get both photos with and without eye-contact. And afterwards, you can choose the shot you prefer.
27. Judge your photos by first looking at the background and the edges of your frame
When I’m looking at my street photos and trying to figure out whether to keep them or not, I usually make the mistake of only looking at my subject.
My suggestion is to do the opposite— start off by looking at the background of your street photo and the edges, and then move inwards.
A great street photograph should have an interesting background and an interesting subject. Often we have the interesting subject, but no interesting background.
Or often our backgrounds are messy and cluttered. But if we have a photo with an interesting subject, we tend to excuse ourselves— and settle for “good enough.”
Never forget the importance of a good background in street photography.
28. Good street photographers are good liars
What is the difference between “street photography” and other forms of photography such as photojournalism and documentary photography?
I think street photographers don’t have the same ethical dilemmas as photojournalists/documentary photographers. Street photography is all about documenting your version of reality— rather than documenting an “objective” version of reality.
Therefore know that if you want to make good street photos, you want to be a good liar. Try to capture a certain moment which isn’t faithful to “reality” — rather, is a moment which you find interesting and unique.
The camera lies. It only captures a split-second of reality. Not only that, but you decide what to include in the frame, and what to exclude from the frame.
So be biased. Be personal. Be opinionated. Photograph only what interests you, and don’t photograph what doesn’t interest you.
29. Shoot at f/8-f/16 (not wide-open)
Another common mistake a lot of beginner street photographers make is that they always try to shoot wide-open (f/1.4, f/1.8, f/2) rather than shooting “stopped-down” (f/8, f/11, f/16).
The benefit of shooting at a smaller aperture with more depth-of-field (like f/8), is that you are more likely to capture your subject in-focus. Furthermore, by shooting at f/8, you will show more of the background and context of your frame.
It is easy to find an interesting subject and just photograph them at f/1.4. But the photos of a blurry background just get boring after a while. I like to see more context in a street photograph — where is your subject, what is going on in the background, and what is your subject’s connection with the environment?
Also technically speaking, if you always shoot wide-open (and your subject is moving), you will be less likely to capture your subject in-focus.
Also I recommend keeping your shutter-speed high (at least 1/250th of a second) to not have motion blur in your photograph. You can do this by increasing your ISO to 1600, 3200, or even 6400+ (if your camera allows it). I’d rather have a noisy photo than a blurry photo.
But what about these epic “panning”, “motion-blur” photos you see of people on bicycles online? Honestly those photos are just boring, we’ve seen them all a million times before. I’ve done it when I started off— so just do it to get it out of your system, but I find that capturing sharp photos that are in-focus as a lot more interesting.
30. Focus on the subject furthest away from you
Okay this is going to sound a bit counter-intuitive, and this is kind of a more advanced street photography tip.
The idea is that as you want to build more layers and depth in your street photographs, focus on the subject furthest away from you (not closest to you).
For example, let’s say you have a person in the extreme foreground of your frame, in the mid-ground, and the background. Put your focus all the way in the background, and intentionally have the person in the extreme foreground out-of-focus. This will give your eyes the illusion of depth— and lead your eyes through the frame (from the closest subject, to the one furthest away).
For this technique, you can shoot in aperture-priority mode (A/Av mode), at f/8, ISO 1600, and manual-focus (while putting your focusing at around 10 meters).
To study layered street photos, look at the work of Alex Webb, David Alan Harvey, and Constantine Manos.
31. Look for triangles
Another fun street photography composition tip is to look for triangles when you’re out shooting street photography.
A simple technique: look for 3 different subjects in your frame, and place them equally-distant from one another in the frame, until you create a triangle-like composition.
For a multiple-subject photograph, 3 subjects tends to make a nicely-balanced frame. And there is enough interest, and subjects to take your eyes around the frame. And 3 subjects tend to balance a frame.
Triangles are tricky to capture in the streets, but with enough practice and diligence, you can get a few good ones.
32. A street photograph without emotion is dead
I know a lot of great street photos that have wonderful compositions, but no emotion. To me, these photos are dead.
If you want to make a truly memorable street photograph, you need to imbue it with emotion, soul, character, and charm.
Emotional street photographs hit us in the heart, and embed themselves into our memories. Emotions are what make humans tick, and a lot of our memories are formed through emotions.
So when you’re shooting in the streets, shoot with your heart. Try to capture a wide-gamut of emotions. Look for misery, sadness, isolation, happiness, a sense of longing, joy, excitement, and euphoria.
If you look at your own street photos, and they don’t stir you in any emotional way — you should probably ditch it.
33. Shoot “indoor” street photography
Some of the best street photo opportunities happen indoors— in places such as malls, shopping centers, grocery markets, subways, and stores.
I think shooting street photography indoors is more difficult, because it is scarier. It is more difficult to run away if you’ve upset someone, or scared someone.
But shooting street photography indoors is one of the most untapped places to shoot. We see millions of photos shot in random streets and sidewalks, but how often do you see a compelling street photograph from inside a Costco or Walmart?
If you’re out in a somewhat public place, know that every opportunity can present street photography to you. It just matters how clever or inquisitive you are.
34. If you shoot street photography in color, you need good light
One of the things I wish I knew in street photography is how important having good light is when you’re shooting in color.
Why? When you shoot color photography in poor light, the color often look washed out and icky.
My suggestion: if you shoot color street photography, stick to shooting during “golden hour” (sunrise and sunset) when the light is the nicest.
Another tip — if the light isn’t good, use a flash. A flash will fill in any disagreeable shadows, and also will saturate your photos and add contrast.
One of the best photographers to study who use a flash in color is Martin Parr.
35. Street photography in black and white is generally easier
If you’re starting off in street photography, shooting in black and white or monochrome is generally easier.
Why?
When you’re shooting in black and white, you don’t need your light to be as good, and even if your exposure is a bit off — it looks more forgivable in black and white.
Furthermore, black and white allows for more simplicity and minimalism. When you’re shooting in color, you need to worry about the colors. With black and white, you can focus on the mood, composition, framing, and emotion of the scene.
I recommend shooting JPEG+RAW in street photography, and you can set your JPEG images to a black and white preview. This will help you better visualize when you’re shooting in black and white. And sometimes the Black and White JPEG files look better than any RAW photos you could process yourself.
Also as another tip, if you shoot in JPEG+RAW and use Adobe Lightroom, by default Lightroom only shows the RAW files. Therefore it will display your JPEG photos (as a preview), and then actually revert them into color RAW photos. The solution is to add a generic black and white preset to your images upon import. You can download my free Lightroom presets to use.
36. When shooting “street portraits”, try to capture the “unguarded moment”
I recognize “street portraiture” as another sub-genre within “street photography.”
Generally when you shoot “street portraits” — you’re more interested in a subject, their face, and expression instead of the context of a scene.
However one of the big issues when we shoot street portraits is that the photos look too posed when you ask for permission.
My suggestion: try to capture the “unguarded moment”—the moment when your subject drops his/her guard.
You can do this by asking open-ended questions to your subject like, “What is your life story? What is your dream in life? What are you up to today?” And while they’re talking— take photos. The more comfortable they feel around you, the more natural a moment you will capture.
37. Photograph the opposite direction in which everyone else is shooting
Often when I’m traveling (especially in touristy places), I try to photograph in the opposite direction from where the tourists are shooting. Often this means photographing the tourists themselves.
I think to build a good vision as a street photographer is to have a contrarian view of the world. To see what others do not see.
So photograph in places that other people disdain. Whenever I travel to foreign countries, I avoid touristy landmarks like the plague. Instead, I try to figure out where the locals hang out, while also wandering in the city without a destination in mind.
Let serendipity and randomness guide your journeys in your street photography travels.
38. Crouch low, and photograph people against the sky
One of the most difficult things in street photography is to capture a simple and a clean background.
When you’re shooting in crowded areas, one of the easiest ways to simplify your scene is to crouch down very low, and photograph people against the sky.
I generally like to do this by shooting vertically, as you don’t include as much clutter on the left and right side of the frame.
One of the benefits of crouching low in street photography is that you look smaller, and therefore are less threatening. Also people simply assume you’re photographing the buildings behind them, not them.
39. Use a flash
One of the best ways to create more dynamic and “edgy” street photos is to use a flash.
You can use the flash that is integrated into your camera, or a small external flash.
The benefit of the flash is that it helps freeze your motion, helps add contrast and fill the shadows of your photos, and also give it a distinct “look” that heightens the drama of a photograph.
There are a lot of famous street photographers who utilized flash in street photography, including Weegee, Bruce Gilden, and Garry Winogrand.
If you’ve never shot street photography with a flash before, I recommend just using the default settings, in “P” mode. Just point and click, and let the automatic settings do the trick.
I generally recommend using a flash in street photography when you’re shooting in the shade and shooting close-up to your subjects. Furthermore, use a flash if the sun is behind your subject’s face (causing their faces to be dark). You can also use a flash indoors if you want to create a dramatic “pop” in your photographs.
I’d only caution using a flash in street photography at night — because if you’re shooting in very dark places, it can scare the crap out of people. Therefore if you’re shooting with a flash in the evening, I recommend doing it in touristy places, or places that are already well-lit. I generally find that I’ve never had issues using a flash during the day, as people barely notice it.
40. Wear dark clothing
If you want to blend in when you’re shooting street photography, I recommend wearing dark-clothing. For example, I wear all black, and use a black camera. Therefore when I bring up my camera, my subject is less likely to notice me (and my camera).
Realize how you dress will change how you are perceived by others. You can take two strategies: either dress to look like a local, or dress to look like a tourist.
The benefit of dressing like a local is that you won’t stick out as much. The benefit of looking like a tourist is that people might not give you as much crap, as you just look like a “stupid tourist.”
For example, some of my friends who live in NYC wear a “I love New York” hat to look like a tourist in their own city. Some other street photographers I know intentionally try to stand out— wearing neon green shirts, and magenta-colored fanny-packs.
My suggestion is just dress whatever is comfortable to you.
41. You can always shoot in a “street photography style”
If you’re interested in street photography, you are most likely a unique individual. You have empathy for your fellow human beings, the human condition, and you want to capture life as you see it.
The problem is when we get too obsessed within this tiny genre of “street photography.”
Remember— you don’t only need to shoot “street photography.” Just let street photography be another tool in your photography kit.
Be flexible according to your environment.
For example, if you live in the suburbs, you don’t need to always drive downtown to photograph the locals. Photograph your close friends and family, and try to do it in a “street photography style” — integrate candids into your work, and try to create dynamic compositions.
Let’s say you go hiking and you see a nice landscape. Perhaps you can make it more interesting by adding your own shadow in the foreground, or by tilting the horizon a bit, or even using a flash. Try unorthodox strategies in your photography, by still retaining a bit of your “street style.”
42. Look for “a frame in the frame”
If you want more interesting composition or framing in your street photography, look for a “frame in a frame.”
For example, if you see someone’s arm on their hip, that can be a natural frame you can shoot through, to frame someone else.
Or perhaps you’re walking and see a barbed-wire fence. Photograph in-between the barbed wire fence, to photograph a subject in-between.
There are many other different frame-in-frames you can find. Shoot in-between someone’s legs while your camera is on the ground. Shoot through the backs of chairs. An easy one is photograph people in windows.
The whole world can be your frame.
43. Shoot head-on
One of the mistakes that a lot of street photographers make when they’re trying to shoot close is that they shoot too much from the side— what my friend Charlie Kirk calls “oblique angles.”
If you’re shooting with a wide-angle lens, and if you want a dynamic and edgy shot, you want to shoot head-on. If you shoot from the side, it won’t have the same compositional impact as a photo that is framed head-on.
But how do you shoot more head-on? Try to walk in crowded streets, and bring up your camera at the last section, while people are about to walk into you. Then after taking a photo, you can say “sorry!” and walk around the people.
Realize this technique takes some finesse. You might accidentally bump into people while you’re shooting this close head-on.
Another technique I learned from my buddy Charlie is the “cut-off technique” — when you see someone interesting, walk in a diagonal line towards them. And the second you are in front of them, take a photo very close head-on.
44. Don’t shoot the back of peoples’ heads
When I started to shoot street photography, I was very timid. I mostly shot the back of peoples’ heads— so they wouldn’t notice me.
However the problem is that the back of peoples’ heads is never as interesting as their faces.
Therefore, try to photograph people’s faces as much as you can.
I know it is scary, but try to do it by walking around your subject, and waiting for them to come close to you. Then bring up your camera and photograph them moving towards you, and keep your camera up to your eye, and let them pass you.
Or you can do the “360 degree” technique — where you see someone interesting standing on a street corner, and you start off by photographing from their back, take a step to the right, take another photo, and keep circling them, while shooting photos. You keep doing this until you get a shot of them head-on.
When you capture more faces in your street photography, your photos will have more vigor, energy, and dynamism. You will show more emotions and expressions in the face of your subject, which will resonate more with your viewer.
45. After taking a photo, smile and say, “Thank you!”
Another good way to overcome your fear of shooting street photography is by smiling and saying “thank you” after you’ve taken someone’s photo.
This is what usually happens: you take a photo of a stranger without permission. They stare at you, either confused, or with a “what the f*ck?” look. Then you make eye contact, give them your biggest grin, and say “thank you!” in the most enthusiastic voice you can. 99% of people tend to smile or grin back, and will either say “you’re welcome” or just keep moving.
46. Compliment your subject
Going off the prior tip, compliment your subject. If you photograph a stranger, there is probably a good reason why you are deciding to photograph them. You probably find something unique, beautiful, or special about them. Therefore don’t be afraid to tell your subject.
Sometimes when I see someone interesting I want to photograph (with permission), I will approach them and tell them what I find interesting about them. Then ask permission to photograph them. Generally most people say, “Yes” — once I’ve complimented the detail about them which I want to photograph (their sunglasses, their fingernails, their lipstick, their necklace, their tattoo, or the expression of their face).
What you can also do is compliment your subject after you’ve taken their photo without permission. A simple thing I do when I’m shooting in NYC is go to Wall Street and photograph men in suits, and say something like, “I like your suit!” after I photograph them. Why would they feel upset after you compliment them?
The tricky thing is you want to compliment your subject in a genuine way. Don’t give out false compliments. For example, if you see someone down on their luck — don’t just say that “You’re beautiful!” It might not come off as genuine. I might rather say, “You look really strong and like you’ve been through one hell of a life journey.”
I feel that no matter how people look, there is always something you can compliment them on.
47. Camp out on street corners, and let your subjects come to you
If you’re shooting street photography in a busy downtown area, try to shoot street corners— where you have a crosswalk, and people coming at you from 4 different directions.
By camping out there, and waiting for your subjects come to you — you will conserve your energy, and also find a more interesting mix and combination of people.
I learned this tip from the photographer Joel Meyerowitz, who would shoot the street corners of NYC, taking a step back, and capturing dramatic photos of the flow of street life.
Also as a general tip, I think it is better to go to where the action is, and let people come to you — rather than always running around the streets while wasting your energy.
48. The smaller your camera, the better
There is no “best” camera for street photography. But based on my personal experience, the smaller your camera, the happier you’ll be. The more likely you’ll carry it with you for long distances, you’ll always have your camera with you, and you will be more stealth when shooting on the streets.
The bigger your camera is, the more attention you will draw to yourself.
So try to make your camera as small as possible. I generally recommend using cameras that have non-interchangeable lenses, or small camera bodies with compact wide-angle prime lenses.
As of 2016, the cameras I recommend for street photography include the Ricoh GR-series cameras, the Fujifilm X100-series cameras, as well as the Micro 4/3rds cameras. They are the best combination of compactness, image quality, and performance.
49. Look for “leading lines”
If you want more dynamic compositions in your street photography, look for leading lines. You can find leading lines in alley-ways, from street signs, or curves in the road.
You can also pair leading lines with the “fishing technique” — look for an interesting leading line, and just be patient for your subject to enter the frame.
By adding leading lines to your street photos, it will be easier for your viewer to find the subject in your photograph. Furthermore, the lines will draw your eyes through the frame, and give the photo direction and energy.
50. Photograph what you’re afraid of
I have a rule for myself in street photography: if I see a scene I’m afraid of, I must photograph it.
I can walk for miles, and find nothing interesting or new to photograph. But every once in a while, I see a scene or a person which makes my heart thump. I feel my heart rate raise, sweat go down my back, and I feel nervous.
This is a sign that my body is telling me, “Hey Eric — this might be a good street photograph.”
Therefore rather than exterminating my fears in street photography, I let my emotions channel my shooting process. I ry to channel my fears and anxieties in a positive and creative way. I let my fear point me into knowing what to photograph (and what not to photograph).
So try the same thing. Photograph what you’re afraid of. And if you do that, you will learn to live with fear in a positive way.
51. Build complexity over time
If you start getting bored in street photography, it is because your photos are too simple for you.
To keep street photography fun, continue to build complexity in your work.
Try to add multiple subjects, layers, and emotional depth. Try to add different gestures in your frame, dramatic light, or the use of an external flash.
You can also build complexity in your street photography not just by focusing on single images— but working on longer-term street photography projects.
Perhaps you can document a certain part of your town, or work on a certain theme or concept.
Keep increasing the intensity of the challenge of your street photography, and you will constantly grow.
52. Choose photos that “pop off the page”
I got this tip from Bruce Gilden. When you are looking through your photos as small thumbnails (contact sheets), choose the photos that “pop off the page.” These are the photos that generally have strong compositions, and strong emotional content.
When I used to look through my street photographs, I would go through each photo one-by-one in full-screen mode. Nowadays I look at my photos quickly and scroll through them as thumbnails, and choose the ones that pop out to me.
There are many benefits to this method — you save time by not looking at all your photos. Furthermore, you are able to judge your compositions easier when they are small thumbnails (because you don’t get distracted by the subject-matter of a photograph).
If you shoot on film, this means looking at your “contact sheets.” If you shot digitally, it means looking at your photos as small thumbnails.
Also as a tip, Henri Cartier-Bresson used to flip his photos upside-down to better judge his compositions. You can do the same.
53. Treat street photography like fishing
If you’ve ever gone fishing you know that some days you catch a lot of fish, some days you catch none.
No matter how skilled you are at fishing, there is a degree of luck. You want favorable weather, or you want the fish to be in one spot.
Don’t be easily disappointed. Most fishermen go out for the thrill of the hunt, for the tranquility of the fishing-process, and to be at one with the water.
Treat your street photography the same way. Shoot street photography to be out on the streets, to enjoy your walk, and the excitement of the process.
You might go through dry spells where you don’t make any good street photographs for a long time. And that is okay. Just be patient, and enjoy the journey.
54. Incorporate “selfies” into your street photos
When we start in photography, we are often told not to put ourselves into our photos.
However in street photography, I recommend you do the exact opposite— intentionally try to put your own “selfie” into the photograph.
For example, try to get a self-portrait of yourself in the scene via your shadow, your reflection, or presence.
Try to get your shadow in the photograph in the bottom of the frame to fill your photo. Try to get a reflection of yourself in the camera in a mirror, just how many Renaissance painters would “secretly insert” themselves into their paintings.
By putting your “selfie” into your street photograph — it feels more personal. It puts the viewer into your shoes. It gives your photographs more authorship, fills in dead spaces, and also adds a voyeuristic element to your image.
For street photographs who have done a great job putting themselves into the frame, I recommend looking the self-portraits of Lee Friedlander and Vivian Maier.
55. Practice making eye-contact
One of the most difficult things is to make eye contact with strangers, and especially our subjects.
We are taught in society not to look at strangers, because it can be seen as an aggressive mood.
However if we don’t know how to make eye contact with others, we tend to seem more passive, introverted, and nervous.
My suggestion: practice making eye-contact with others (without feeling nervous).
You can start very simply by making more eye-contact with your friends and family when you talk to them. Then when you talk to a barista, a waiter, or someone in the service industry. Then when you’re commuting via public transportation, try to look at strangers, and make eye-contact with them. If you make eye-contact with them, don’t immediately look away. Just look at them gently, smile, and nod your head.
If someone gets upset at you for making eye contact with them and says something like, “Are you looking at me!?” Then smile back and you can say something like, “Oh — I thought you were someone I knew.” and then avert your gaze.
Once you can master making eye-contact with strangers, you will be a lot more bold and fearless in your street photography, hesitate less, and your confidence will fill the streets.
56. Master small-talk
I also recommend trying to master the art of “small-talk.”
We often frown down on “small-talk” because it feels shallow and superficial. However I think that small talk is crucial, especially when you meet strangers. Because if you can master small talk, then you can have your subject warm up to you. Then you can ask them deeper, more personal questions, which allows you to connect deeper with them.
Practice making small talk with strangers at dinner parties or at bars. You can talk about the weather, about current events, or what they did that day. Try to practice transitioning into talking about more serious topics, or more personal topics.
Then once you are more comfortable with small-talk, then you will find you can apply the same technique to your street photography. You can take a photo of a stranger, then engage them afterwards with small talk, which will make them feel more comfortable. Or you can start off by doing small-talk with a stranger, and then ask them politely to make their portrait afterwards.
I’ve also found that if you’re comfortable making small-talk, you’re also more comfortable dealing with strangers who get angry at you. Rather than panicking, you can learn how to simply apologize for taking a photo of someone without permission, and to calm them down.
57. Visit a place multiple times before taking any photos
I learned this tip from my buddy Chu Viet Ha, a street photographer in Hanoi, Vietnam.
Whenever he finds a place interesting that he wants to shoot, he visits there a few times first (without a camera), and talks with the locals. Therefore they start to feel comfortable with him, and treat him more like a friend than a stranger.
Then after several visits, he brings his camera, and when he wants to make photos, people feel comfortable around him, and just ignore him.
Similarly you can do this in your street photography. Visit the local cafe a lot, and talk to the baristas before you shoot the neighborhood. Then people will know you as a friendly person who is “cool” — and if someone ever gets upset at you, you will have people in the neighborhood defend you.
Furthermore, if you get to know locals in a certain part of town, you will be able to photograph them candidly and without permission, without having them be upset at you (or pose for you).
Building a sense of trust with a local community is crucial, if you plan on shooting street photography in a certain neighborhood regularly.
58. Learn how to “linger” when you see a potentially-good scene
Street photography is all about patience, and predicting the future.
Another tip I learned from my friend Charlie Kirk is how to “linger” in a scene. You might walk to a certain situation, and find interesting characters, and get a sense that something interesting is about to happen.
Instead of taking out your camera and start shooting senselessly, pause, and linger around. Mull around and blend in, by checking your smartphone, or just looking around.
Then when you see something interesting about to happen, bring out your camera and start making photos. Because after you bring out your camera, you will probably give yourself away, and the magic might disappear.
59. You will see more potential street photos when your camera is in your hand
I’ve found that if I have my camera in my hand (not in my bag), I see more potentially good street photographs.
I think this is because when you feel the weight of the camera in your hand, your body subconsciously knows, “Okay— time to start looking for good street photography opportunities.”
I generally recommend small cameras, and either having a neck strap or a hand-strap. The secret is having your camera always on you, and ready to shoot.
I used to just give the recommendation of always having your camera with you. But that isn’t good enough — when my camera is just hanging out in my camera bag, I don’t see as many scenes.
So always have your camera ready (and keep your lens cap at home).
60. When you think you’ve got “the shot”, shoot 25% more
My mistake in street photography is that I get over-confident. I see an interesting scene, and I take a few photos, and I think I’ve already got the shot.
But when I go home, I realized I should have made more photos and “worked the scene” more.
Therefore as a practical tip, when you think you’ve got the shot, shoot 25% more than you think you should.
What often happens is when you shoot street photography or a person or a scene, you feel a bit awkward, weird, and shy by a certain point. When you hit that wall, push further, and take 25% more photos. Often when you shoot a bit more, you force yourself to be more creative, and get even more unique photos than in the beginning.
61. Take more risks
One of the great things about digital photography is that whenever we click the shutter, it doesn’t really cost anything. Whereas with film, we had to be a lot more conservative with shooting (each shot costs money).
The only way you can innovate and create great images is by taking risks.
You can take risks by making certain photos that you think might not work. Tilt the camera, practice shooting flash with a long shutter-speed, shoot at really low and unusual angles, and take photos into crowds which might not work.
If you play it safe in street photography, you will never make exciting photos.
62. Traveling won’t make you a better street photographer
I wish someone told me this when I started street photography— that I wouldn’t magically become a better street photographer by traveling to Paris or New York City.
I recommend traveling for many reasons— to learn more cultures, to step outside of your comfort zone, and meet new strangers.
However it is hard to make any improvements in your photography while traveling.
Why?
Because inevitably everything will be interesting when you’re shooting in an exotic country. And when you go home, you will feel jaded, because your own home isn’t as interesting as the place you’ve traveled to.
Furthermore, it is always easy to shoot street photography in a foreign place, because you either look like a tourist or you don’t fear anybody recognizing you.
What you want to learn is to build confidence to shoot street photography near your own home. You want to be confident enough to photograph locals (without worrying that your neighbors will think you’re weird), and photographing not from the perspective of a tourist.
A tip I have instead is photograph your own hometown like you were a tourist.
Everyone thinks his/her hometown is boring (even if you live in NYC, Tokyo, Paris). Because if we live anywhere long enough, it becomes commonplace— and we become adjusted to it.
So try to think of your own city or neighborhood from the perspective of a tourist. If you live in the suburbs full of SUV’s and strip malls, what would a tourist from a developing country find interesting about where you live?
Sometimes it also takes an outside perspective. Whenever my friends visit me, they always find a lot more interesting things to photograph than I do. So perhaps invite some friends from out-of-town, and ask what they find unique or interesting about your own home city. And then try to embrace their perspective.
63. Reach at least 10,000 steps a day
Nowadays with modern smartphones and fitness-trackers, it is easy to see how many steps we make in a day.
I’ve found that the more I walk, the more likely I am to shoot street photography. And the longer I walk, the more street photo opportunities I will see.
So as an assignment, try to hit 10,000 steps in a day. Try it for a few days, for a week, or even a month.
If you’re a typical American like me, you will find it hard to make 10,000 steps. So perhaps that means trying to walk to work, take public transit, or walk around during lunch (instead of eating in front of your computer), or walking a bit after work before you drive home. Or in the evening walking around your neighborhood.
Go on your 10,000 steps with your camera-in hand. I guarantee you will end up finding more photo opportunities and luck.
64. Shoot street photography from your car
If you are stuck in a car for many hours a day, use that to your advantage.
I saw a great photo book called “Drive by shootings” in which a taxi driver shot street photography from his driver seat, after decades of driving around NYC.
Other photographers have attached their cameras to tripods, and photographed fellow commuters on the highway.
Some street photographers keep their cameras in their passenger seat or cupholder while they’re stuck in traffic, and take photos (carefully).
Another project I was inspired by was from Lee Friedlander, who would use the frame of his car as a natural frame while doing a road trip across America. All of his photos were shot from the vantage point of his driver’s seat.
So if you’re stuck in a horrible commute, or spend a lot of time in your car, see how you can shoot street photography this way. Or if you want to be safer, have your friend drive you around (while you shoot out of the car window from the passenger seat, something Garry Winogrand did towards the end of his life).
65. Don’t call it “street photography” — call it “going on a walk with your camera”
I’ve discovered that the more pressure I put on myself, the less likely I am to make a good photograph.
A tip: when you go out and shoot, don’t call it “street photography” — call it “going on a walk with your camera”.
This means you have no pressure or expectations, and you are more open to photo-opportunities.
I got this tip from my friend Jack Simon. He often commutes into SF and goes to the “Mission” district and walks around with his camera, enjoys a cup of coffee, and checks out the street art. If he doesn’t make a single good photo in the day, he doesn’t get disappointed— because he enjoyed a nice cup of coffee and a walk anyways.
I also see street photography as a good way to “zen out” and relieve stress. I love to walk, let my mind wander, and not worry about the stresses of day-to-day living. Even when I had a 9-5 cubicle office job, I would go on brief walks during my lunch break with my camera, just to clear my head. If I made a good street photograph, it was a plus. If I didn’t make any photos, I enjoyed the walk regardless.
66. Study the masters, then kill them
I’ve spent a long time studying the masters of street photography. I am very grateful to have learned the history of street photography, and the wisdom of the masters who paved the road in street photography.
However the problem is that we should only be apprentices for so long. After we feel like we’ve mastered the fundamentals and basics, we need to learn how to cut the umbilical chord— and kill our masters.
I’ve obtained a lot of knowledge about street photography over the years, which has helped me when I started off. But I’m at the point where all this information is starting to crowd my head, which causes me to enjoy the process of shooting street photography less. I have too many concepts, theories, and contradictory ideas in my head now.
So everyday I try to unlearn one thing I’ve learned in street photography from the masters. Instead, I’m starting to incorporate what I’ve learned with my own “rules”, “tips”, and observations.
Be grateful for the masters who paved the way in street photography, but know that a certain point you need to create your own rules for yourself.
67. Think of street photography as a mix between ballet and boxing
This is a tip I got from Joel Meyerowitz— approach the streets with the grace of a ballerina, but with the aggressiveness of a boxer.
What ballerinas and boxers both have in common is that they are always on their toes. Positioning, movement, motion, fluidness, and grace are important attributes.
So when you’re out shooting street photography, don’t keep your toes planted, or you’re going to get knocked out. Move around. Move left, right, dodge, parry, bob and weave— all while being graceful. Blend in, and don’t fall over or stumble.
68. Think of yourself as a “street sociologist”
I studied sociology in university — which is about studying fellow humans, society, and communities.
I also happened to pick up photography when I entered university. I soon discovered that by combining my passion of sociology and photography, I discovered street photography.
Instead of being a traditional sociologist (using a notepad and pen) to jot down my observations about my fellow humans, I used a camera as my research tool instead.
So you can think of yourself also as a “street sociologist.” There is a lot of psychology, cognitive science, anthropology, and other humanities-related fields which mesh with street photography.
I feel that street photography is a way for us to better connect with those around us, and understand the human condition.
Study the humanities and liberal arts, and see how you can mesh these perspectives with your street work.
69. Follow the light
If you’re shooting the streets later in the day and the sun is setting, follow the light.
Follow the light where you get nice strips of light in-between buildings. Set your exposure-compensation to minus, so you can get dramatic shadows, with your subjects well-illuminated in the strips of light.
Or even when you are shooting at other points in the day, go to where the light is the best. It is hard to find good light if you’re shooting in a big downtown city with huge skyscrapers.
Another tip — look for light bouncing off the glass windows of buildings. This will add a dramatic spotlight, which will make for beautiful street photographs with lovely exposures.
70. Photograph like a child
Street photography should be fun. Imagine yourself like a child in the streets, just wandering around with a camera. You’re not making photos to potentially make money, to gain fame, or more social media followers.
You’re photographing because the act of photographing is fun in itself. You’re photographing because you love to play with reality, and re-combine these shapes and forms into novel ways. You’re photographing because it allows you to explore the world, meet new strangers, and expand your knowledge about the streets.
I gain the most inspiration in my street photography from children. Give any kid a camera, and watch them wander. See how curious, fearless, and brave they are. And see how much fun they have. They are photographing for intrinsic reasons (for themselves), rather than extrinsic (for the approval of others).
Always try to channel your inner-child in your street photography, then you will never be bored, always have fun, and always stay curious for your entire life.
Conclusion

I hope some of the tips in this article have sparked some new ideas in your street photography.
I know a lot of the information presented here has been presented elsewhere, but consider this as an evolving page, where I will continue to edit into the future (adding content, removing content).
Don’t follow this list of tips in a linear order. Skip around randomly, and let one of the tips of ideas spark some creativity.
Have fun with your street photography, and make your own tips, and share them with others.
See you on the streets,
Eric