Month: August 2010

  • The Best Camera for Street Photography

    The Best Camera for Street Photography

    This is the best camera for street photography.
    This is the best camera for street photography.

    Haha–tricked you. As there is no “best” paintbrush for a painter, there is no “best” camera when it comes to the street photographer. The camera is merely a tool, and there are different tools required for different situations and tasks at hand.

    In street photography as well as general photography, photographers can sometimes become more obsessed about camera gear over actually taking photos. Photographers who are obsessed with camera gear often feel that their images are lacking due to their equipment, when their underdevelopment of photographic vision is the culprit.

    Therefore many individuals fall into this trap and go on a never-ending chase in the hope that buying more expensive camera bodies and lenses will help them get better images. However most of them are quite dismayed when they realize that when they buy the newest and most expensive equipment, their images don’t get any better. Now don’t get me wrong—nice bodies and lenses can indeed give you images with better sharpness, resolution, and color, but they won’t give one intrinsically better photos.

    When it comes to street photography, I like to believe that the best policy is to have the least obtrusive camera and lens as possible. The antithesis of an ideal camera for street photography would be a 1D Mark IV with a Canon 70-200 f/2.8 L lens attached to it.

    Although my knowledge of cameras may be limited when compared to the 20+years plus photo veteran, I will try my best to outline the pros and cons of different cameras that street photographers use, including rangefinders, DSLRS, or compact “point and shoots”.

    Rangefinders

    Leica M9

    Rangefinders are glorified for their ability to take images without a battery, being small and unobtrusive, quick in operation, and virtually silent in terms of a shutter sound. Rangefinders are fully manual, meaning that you have to manually focus and manually control exposure through aperture and shutter speed.

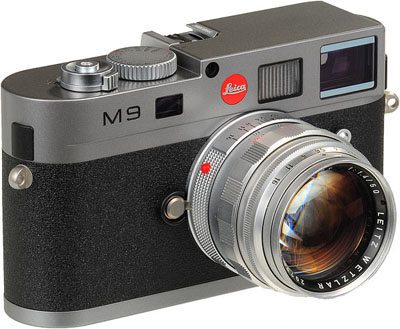
    The most popular rangefinder (by far) when it comes to street photography is the Leica. It carries all of the fore mentioned characteristics and has a tradition for being built like a tank with superior optics. Shoot—the granddaddy of all street photography (Henri Cartier-Bresson) used a Leica for his entire career.

    Taking photos with a rangefinder is much different than many other cameras because what you see through your viewfinder is not necessarily what your photos show up as. There are superimposed grid lines showing the borders of how much your camera will actually capture which many photographers claim that gives them a sense of freedom and seeing entire scenes.

    However there are obviously cons with using a rangefinder camera. First of all, rangefinders are fully manual, meaning that one has to learn how to constantly adjust for the changing lighting in an environment with aperture and shutter speed, while modern digital cameras can do this automatically. Although many advocates of using fully-manual settings do not see this as a disadvantage, the aspiring street photographer may have a difficult time constantly adjusting his or her settings.

    Furthermore if one decides to get a digital Leica rangefinder, they are most likely going to drop a huge chunk of change.

    DSLRS

    Canon 5D

    It seems that nowadays many street photographers use digital SLRs (DSLRs) to take their photographs. DSLRs are massively popular due to their overall image quality, quick shutter speed, and their ability to interchange lenses, and relative affordability.

    However the downside to DSLRs for street photography is that they are relatively large and clunky, and look intimidating to the average person. Furthermore due to the fact that it has a mirror inside, it makes a loud clicking (or clunking) sound when taking photos, which can disturb the serenity of a scene. There is nothing more apparent than the loud mirror-clacking of a DSLR on a quiet subway.

    However that doesn’t mean that it is impossible to use a DSLR for street photography. I currently use a Canon 5D for my street photography and in order to make my camera more stealthy, I covered up my “Canon” and “5D” logo with black gaffers tape. I feel the advantage of this is that it converts my “professional-looking camera” into any old generic-looking camera. This makes the camera look less conspicuous in public, and makes people feel less anxious when you are taking photos of them.

    Furthermore, DSLRS have great high-ISO capabilities, which make them ideal for shooting at night without having too much noise in the shots. The 5D is infamous for having creating clean images at even high-ISO’s. I never hesitate to shoot my camera at ISO 1600 or even 3200 at night when capturing scenes with faster shutter speeds.

    Furthermore, another huge advantage of DSLRs is the ability to interchange one’s lenses. Therefore, one can switch up his or her lenses once in a while if you want to shoot at different focal lengths.

    Generally for street photography, I recommend a 35mm “full frame equivalent” lens.

    "The Corridor" - Shot by me with my Canon 5D in Prague.
    “The Corridor” – Shot by me with my Canon 5D in Prague.

    Point and Shoots

    There are currently a handful of high-end point-and-shoots on the market that many street photographers use for shooting in the street. These cameras tout larger image sensors, which gives better image quality as well as cleaner images at higher-ISOs.

    The advantages of point-and-shoot cameras for street photography is that they are small, have a virtually silent shutter, and that they are unobtrusive. However on the other hand, many point-and-shoot cameras have shutter-lag, which can make it difficult to capture moving people without getting them blurred out.

    "Sunflower" - Shot by me and my 5-year old Canon Powershot SD600
    “Sunflower” – Shot by me and my 5-year old Canon Powershot SD600

    Micro 4/3rds

    Micro 4/3rds cameras are also a fantastic option in street photography, because of their near instantaneous autofocus, small form factor and weight, as well as solid image quality. Their image sensors aren’t as good as Aps-c DSLR sized sensors, but they still make beautiful images you can’t complain about.

    Learn more about street photography equipment

    Check out my newest and up to date recommendations on cameras for street photography here: Recommended equipment for street photography >>

  • Please introduce yourselves!

    Please introduce yourselves!

    Hello My Name Is...

    Hey guys,

    So after my guest post on Digital Photography School for my “10 Tips for the Aspiring Street Photographer,” I have been getting a lot of love from the online photography community. In order to get to know you guys better (and for you guys to get to know one another better as well), why not leave a comment and introduce yourselves? Let me know where you’re from, how you found out about my site, and what about street photography appeals to you? Looking forward in hearing from all of you :)

  • The Top 4 Street Photography Techniques

    The Top 4 Street Photography Techniques

    When it comes to street photography, everybody has their own style and techniques. What interests one street photographer may not necessarily catch the eye of another street photographer. However in order for you to get a better grasp of what kind of styles there are in street photography, I have compiled a few elements that street photographers like to use to their advantage when constructing their images.

    Play with Juxtaposition

    "Skating" - Paris, France.
    "Skating" – Paris, France.

    Juxtaposition is a big and fancy word that artists love to use. If you are not familiar with the word, it simply means drawing a stark contrast between two elements in an image. One could use juxtaposition in his or her favor by creating an image that is interesting, ironic, or just plain uncanny.

    For example, if you were to see a sign that says “get fit” and you see a woman eating an ice cream, that makes for an image with great juxtaposition. Or you can see a sign that says “get big” with a small person standing next to it.

    (more…)

  • Eric Kim Street Photography Typography

    Eric Kim Street Photography Typography

    I love typography. I played around with some new free font I picked up at Smashing Magazine and playing with color schemes from Colour Lovers and mashed this little piece up together. Leave me a comment below and let me know what ya think!

  • How To Buy an Amazing Road Bike for under $200

    How To Buy an Amazing Road Bike for under $200

    Nishiki Prestige. Circa 1980's
    My Nishiki Prestige. Circa 1980's

    Whoever is looking for a bike, take this advice from my friend Miles’ step-dad. He was a competitive biker back in the day, and he still fixes bikes for a living. An amazing period, with a great wealth of information. Big thanks to him for helping me purchase my first road-bike, a Nishiki Prestige (pictured above) for only $175 (I talked the guy down from 200) ! It runs like a dream, and is in mint condition. Also it looks pretty sweet with the red tires and all.

    Here is the original E-mail he sent me. Hopefully this will help other people who are looking for bikes themselves.

    Hi Eric (I’m Tom),

    I think we can do this, I’ll scour Los Angeles Westwood craigslist and send some ads to you so you can go out and look at bikes.  The best deals are the late 1980s Japanese bikes, the ones you want have aluminum alloy wheels, but a steel lugged frame. I highly recommend Centurion “Iron Man”, Nishiki ‘Prestige”, Miyata 600 and higher to 1000, Fuji “Team”, Shogun “1000”, Univega several models with 700c wheels,  Schwinn  “Tempo” and a few other models made in Japan  like”Prelude”

    In the mid to late 1980s, the dollar was strong against a weak Yen, the Japanese were producing world class bikes and selling them in the U.S. at prices that other manufacturers couldn’t touch.  This ended about 1990 and started about 1985 so you want to look for bikes from that time period only. After 1990, bikes became overly complicated and the frame quality declined as the Japanese economy was pulling ahead.

    Another possibility is an American bike like a Trek, or a British bike like a Raleigh, but the chances of finding those (a good quality one)for $200 is slim. (keep in mind that all the companies made low-end or junky bikes during this period as well as fabulous bikes, so here are things to watch for.

    #1 Frame tubing, The best Japanese steel was Tange #1 and Tange #2, there will be a sticker under the seat on the frame tube saying whatever the tubing is, Tange 1 and 2 are double-butted chrome-Moly and that is the lightest and strongest.  Double butted means the inside diameter varies, towards the ends that need extra strength, the tubing walls are thicker because that’s where the stress is. The middles of the tubes are thin. You don’t want to buy bikes where the tubes are dented at all or repainted, original finish is a must.  Paint scratches are O.K. but dents are a deal breaker.

    At 5’11”, depending on leg length, I’d recommend a 56 to 60cm frame, the measurement is from the centerline of the crank axle up the mast to where the seat-post drops in.  People selling bikes often give false measurements so you need to bring a metric tape measure.

    Avoid bikes with 27” wheels, if the bike has 27” wheels, it means the bike is either cheap or too old. Make sure you get 700c wheels, on aluminum rims, with aluminum hubs, bring a magnet if you can’t tell the diff.

    The deraillers should be Shimano, it’s possible that they could have SunTour, but those are most likely older than the time period we are looking for.

    Bikes of this period have a head sticker, not a headbadge, (unless it’s a Schwinn)

    #2, spin the wheels, there should be no wobble or hop, this is important, the wheels should spin for a long time, if the wheel stops after a couple seconds, something is wrong.

    #3 don’t worry about bad handlebar tape or worn or rotted tires, those should be replaced anyway when you buy a used bike, you never know where the last owner’s hands have been and you don’t need gross stuff on yours.

    #4 bring a 5mm and a 6mm Allen wrench, loosen the seat post and make sure it is still adjustable, same with handlebar neck, bikes left in the rain often get alumi-ferric corrosion in those areas and get stuck, and you don’t want that. The seat post clinch bolt is usually only turnable on the chainwheel side remember, one side does NOT spin. Sometimes people put the clinch bolt in backwards though, so carefully try the other side if the bolt on the chainwheel side does not spin easily.

    Let’s begin…

    T

  • “Dots” Feature on Juxtapoz Magazine

    “Dots” Feature on Juxtapoz Magazine

    Lately I have been trying to contact a bunch of Los Angeles art magazines to have them feature my work. One of the magazines that contacted me back was Juxtapoz magazine. I was lucky enough to get featured as their “pic of the day” on their site. Hopefully one day I could get featured in their paper-back magazine. Below is a screenshot of their site.

    Eric Kim "Dots" - Juxtapoz Magazine Pic of the Day
    Eric Kim "Dots" – Juxtapoz Magazine Pic of the Day
  • Street Photography 101 Guest Post on 7×5

    Street Photography 101 Guest Post on 7×5

    Street Photography 101 by Eric Kim

    Hey guys,

    Hope you guys had a great weekend and are ready for the rest of the week!

    Anyways recently, I had the great pleasure to write a guest blog post for a photography site called “7×5.” I wrote a somewhat easy-to-read post written very colloquially how a beginner can get started with street photography. Definitely not the most eloquent or comprehensive guide, but an interesting read I still think anyways! I got lots of great feedback on Twitter about this post at @erickimphoto as well!

    Read the guest post here.

  • Los Angeles, Beverly Hills, Hollywood, and Fairfax Street Photography

    Los Angeles, Beverly Hills, Hollywood, and Fairfax Street Photography

    So on this day, I decided I would do something fun with my street photography, which was to ride around on my road bike and take photos. I have never done this before, but I thought– hell why not. I then pondered where I wanted to go take photos, and I settled upon going to Hollywood to take some photos. I then packed my Timbuk 2 Commute 2.0 messenger bag with some water and my camera, and hopped on my bike, not sure where this journey would lead me.

    When heading toward Hollywood, I decided to ride down Westwood Blvd, and headed up Santa Monica Blvd toward Century City. The first thing I passed was this awesome wall on the side of a liquor store. I hopped off my bike and took a couple of snaps.

    Love these Stripes. Sick color combo.
    Love these Stripes. Sick color combo.

    In front of the store.

    Eric Kim Street Photography Los Angeles

    I then headed to the back of the store (where there was more dots), hopped off my bike and thought it would be a great thing to model. It is a 1980’s Nishiki Road bike and it rides like a dream. Here it is lookin all purty with the awesome art in the BG.

    Eric Kim Street Photography Los Angeles

    A vertical shot.

    Eric Kim Street Photography Los Angeles

    Another mural I saw while riding by. Discrimination? HELL NAW!

    Eric Kim Street Photography Los Angeles

    I then headed into Beverly Hills, where I saw this awesome portrait of who I believe to be, Kobe Bryant.

    Eric Kim Street Photography Los Angeles

    As I kept on biking, I came upon a car rental in Beverly Hills. Supposedly it’s “Black and White” (ie full of ballin cars)

    Eric Kim Street Photography Los Angeles

    FERRARI ENGINE!

    Eric Kim Street Photography Los Angeles

    SICKKKKKK

    Eric Kim Street Photography Los Angeles

    Some cool street art I also saw:

    Eric Kim Street Photography Los Angeles

    Eric Kim Street Photography Los Angeles

    I love the dystopia-like look of the below image.

    Eric Kim Street Photography Los Angeles

    Man, American Apparel is getting more and more trashy.

    Eric Kim Street Photography Los Angeles

    Self-Portrait

    Eric Kim Street Photography Los Angeles

    Checked out some of the stores near Fairfax.

    Eric Kim Street Photography Los Angeles

    Eric Kim Street Photography Los Angeles

    Lots of fun.

    Eric Kim Street Photography Los Angeles

    After biking around and taking so many photos all day, I was getting pretty damn hungry. I asked one of the locals where I should go to eat, and he highly recommended “Canters,” a local deli that has been around for more than fifty years. I went, and took a seat. The waitress asked me what I wanted, and I told her what was popular. Without even flinching, she struck my menu with her stubby and muscular pointing finer, which was aimed at the Pastrami Sandwich. Quite shocked, I jumped back and said I’d get one. She asked me what I wanted to drink and I automatically said “Coke.” Little did I know that Coke was going to cost me $2.50 (damn).

    Eric Kim Street Photography Los Angeles

    Anyways, the bad boy came out. And OMG… it was the most amazing pastrami sandwich I have ever had in my life. Perfectly juicy, and so soft and meaty. This photo just makes me drool thinking about it.

    Eric Kim Street Photography Los Angeles

    Oh yeah– I also wrote an essay about “Street Photography in Los Angeles.” I still gotta type it up and post it here.

    Eric Kim Street Photography Los Angeles

    After a bomb ass meal and getting a ton of writing done, I headed down Fairfax and came upon the Supreme store. Pretty sweet stuff in there.

    Eric Kim Street Photography Los Angeles

    Eric Kim Street Photography Los Angeles

    Kewl decks.

    Eric Kim Street Photography Los Angeles

    Biked some more, and got my favorite image of the day below.

    Eric Kim Street Photography Los Angeles

    After a long days of biking and shooting, went back to “The Lab” where the magic happens. I still have so many photos to process…but stay tuned for more fresh street photography from Los Angeles.

    Eric Kim Street Photography Los Angeles

  • Street Photography, Korea. Portrait by Charles Choo Jr.

    Street Photography, Korea. Portrait by Charles Choo Jr.

    Eric Kim, Street Photography, Korea
    Enjoying a beer outside in Seoul.

    An old image taken by Charles Choo while we were shooting street photography in Seoul, Korea last summer. I had tons of fun with the guy, and this is an image of us drinking a beer in the middle of the day in public outside a Korean “7-Eleven.” Got to miss the good times in Korea…

  • Chinatown, Downtown Los Angeles Street Photography

    Chinatown, Downtown Los Angeles Street Photography

    About a weekend or two ago, on a lazy Saturday morning, I decided that I was going to take photos that day–although not sure where or how I was going to get there. I therefore planned that I was going to check out the LA MOCA, and then took my stuff and jumped on the first bus that I could find.

    However while I was on the bus, I saw something interesting on the side of the street, and got off my bus way too early. After taking my photograph of what I wanted to, I realized that I was lost in the middle of nowhere. However I just walked around the streets, meandering where I wanted to go next.

    I then jumped on another bus and got off on the metro stop in the middle of Korea-town. I never took the subway in Los Angeles before, and I thought it would be the perfect opportunity to do so. Therefore I jumped on the subway, still not quite sure where I wanted to go. I looked at the map, and Chinatown was on the list. I had heard lots of interesting things about Chinatown in Los Angeles, yet never had the opportunity to go. I then thought to myself, “Why the hell not” and headed toward there.

    I had never been to Chinatown before, so I kind of followed where the streets lead me. However I was quite pleased to say, it was a great opportunity for street photography. The Chinatown area was very quaint and quiet–with a few people strolling in and out of the area. If you look at the below images, you will also see they have an interesting “film” look to them. I recently made a new preset based on one that I downloaded online, and I quite like the look. I feel it gives that “dreamy” look that I felt when I was experiencing the place.

    Hope you enjoy this little mini-photo essay of Chinatown in Downtown Los Angeles, through my eyes.
    Chinatown, Los Angeles Street Photography by Eric Kim

    Chinatown, Los Angeles Street Photography by Eric Kim

    Chinatown, Los Angeles Street Photography by Eric Kim

    Chinatown, Los Angeles Street Photography by Eric Kim

    Chinatown, Los Angeles Street Photography by Eric Kim

    Chinatown, Los Angeles Street Photography by Eric Kim

    Chinatown, Los Angeles Street Photography by Eric Kim

    Chinatown, Los Angeles Street Photography by Eric Kim

    Chinatown, Los Angeles Street Photography by Eric Kim

    Chinatown, Los Angeles Street Photography by Eric Kim

    Chinatown, Los Angeles Street Photography by Eric Kim

    Chinatown, Los Angeles Street Photography by Eric Kim

    Chinatown, Los Angeles Street Photography by Eric Kim

    Chinatown, Los Angeles Street Photography by Eric Kim

    Chinatown, Los Angeles Street Photography by Eric Kim

    Chinatown, Los Angeles Street Photography by Eric Kim

    Chinatown, Los Angeles Street Photography by Eric Kim

    Chinatown, Los Angeles Street Photography by Eric Kim

    Chinatown, Los Angeles Street Photography by Eric Kim

    Chinatown, Los Angeles Street Photography by Eric Kim

    Chinatown, Los Angeles Street Photography by Eric Kim

    Chinatown, Los Angeles Street Photography by Eric Kim

    Chinatown, Los Angeles Street Photography by Eric Kim

    Chinatown, Los Angeles Street Photography by Eric Kim

    Chinatown, Los Angeles Street Photography by Eric Kim

    Chinatown, Los Angeles Street Photography by Eric Kim

    Chinatown, Los Angeles Street Photography by Eric Kim

    Chinatown, Los Angeles Street Photography by Eric Kim

    Chinatown, Los Angeles Street Photography by Eric Kim

    Chinatown, Los Angeles Street Photography by Eric Kim

  • Jacob Patterson Street Portraits

    Jacob Patterson Street Portraits

    My full-series of Jacob Patterson, a Los Angeles based artist who specializes in graffiti, shoes, and street art. A truly amazing and inspirational artist and person. I look forward in collaborating with him more in the future.

    I got in contact with Jacob, and he gave me a tour of the “ThinkTank” in Downtown Los Angeles, an art warehouse he is currently building up with fellow artists. We talked, chilled, grabbed a burrito (thanks Jacob!) and I told him that I would snap him a few photos before he left. This is the product of literally 5-10 minutes of shooting.

    Check out his sites:

    YouTube - TumblrTwitter

    Jacob Patterson, Artist. Take four
    Jacob Patterson, Artist. Take one.
    Jacob Patterson, Artist. Take five
    Jacob Patterson, Artist. Take two.
    Jacob Patterson, Artist. Take three
    Jacob Patterson, Artist. Take three.
    Jacob Patterson, Artist. Take two
    Jacob Patterson, Artist. Take four.
    Jacob Patterson, Artist. Take five
    Jacob Patterson, Artist. Take five. "Shock 9000"
  • Serendipity – Street Photography 101

    Serendipity – Street Photography 101

    "Strength" - Skid Row, Downtown Los Angeles
    "Strength" – Skid Row, Downtown Los Angeles

    Serendipity. One of the most beautiful things about street photography. Stumbling upon something totally unexpected, but so intrinsically unique and beautiful it cannot be put into words. All of your sensations tingling, giving all of your sensory features a feast from a thing or a place that you have never known existed.

    Serendipity. A reward for being adventurous and daring. Taking the road off the beaten path. Not being a dumb tourist and following everyone else like sheep. Being a nomad; thirsting for new sights and adventures.

    Serendipity. Being in the present and on the prowl, like a jaguar in the streets. Disregarding your “common sense.” Taking the “scenic” rather the quickest route.

    Serendipity. Your own little jewel. Taking it and forever keeping it in your box of memories. Taking a photo of it for a keepsake and making it immortal. Wanting to share it with the world, and wanting others to experience a small slice for themselves as well.

    Serendipity. Living life without a map. Spinning around in a circle while closing your eyes, then throwing a dart on the map—determined to go wherever the hell it lands.

    It is not the destination, stupid. It is about the adventure.

    Serendipity. Taking your time and being patient. Not rushing to the nearest attractions but appreciating the beauty in the mundane. Looking for ordinary things, rather than the large and glamorous.

    As a street photographer, you must jump into experiencing serendipity. Grab nothing but your camera and storm out into the streets, and letting your curiosity lead you.

    Now it’s your turn.

  • Jacob Patterson Portrait Sneak Peak

    Jacob Patterson Portrait Sneak Peak

    Was able to meet up with the famous Jacob Patterson over in Downtown Los Angeles, in the Fashion District where he is working on his art. Was able to snap a few photos of him. Since I’m super tired right now and cannot process all of these images, I’d like to at least give you guys a sneak peak.

    Jacob Patterson
    Jacob Patterson, Artist.

    More to come…

  • Santa Monica Street Photography Outing

    Santa Monica Street Photography Outing

    Images from a recent visit to Santa Monica. Tons of great street photography to be done around here:
    Photobucket

    Photobucket

    Photobucket

    Photobucket

    Photobucket

    Photobucket

    Photobucket

    Photobucket

    Photobucket

    Photobucket

    Photobucket

    Photobucket

    Photobucket

    Photobucket

    Photobucket