Your cart is currently empty!
Free Book: Street Photography 102

Dear friends,
If you’ve wanted to take your street photography to the next level, I am excited to introduce my new e-book: “Street Photography 102” (102.MB Direct Download)
This book will introduce new intermediate/advanced street photography concepts and techniques, and will hopefully be the little fire you need to take your passion to new heights.
Download
PDF (Large/102.MB):
PDF (Small/28.3MB):
.txt (Markdown):
.docx (Microsoft Word):
PDF (text only):
iBooks Author (408.8MB):
Table of contents
- Preface
- Chapter 1: Projects
- Chapter 2: Techniques
- Chapter 3: Indoor “street photography”
- Chapter 4: Street photography without people
- Chapter 5: Emotion
- Conclusion: Never stop hustling
Street Photography 102

Preface

I’ve been shooting street photography for a decade now (from age 18 to 28) and I’ve learned a thing or two.
If you’re a street photographer that wants to take your street work to the next level; this book is for you.
As a disclaimer, all the things I share in this book is simply my opinion. None of this is “fact” nor should it be seen as any sort of “authority.” Everything I write in this book is simply advice I wish I could have given myself when I started.
I hope this book helps you push past any sort of boundaries you might have, and take your street photography to new heights.
Always,
Eric (Berkeley, April 3, 2016)
Chapter 1: Projects

Focus

If you’re reading this book, I expect that you’re a bit frustrated with your photography. You go out and shoot as often as you can, but you feel like your photos lack depth. You want to have a stronger vision in your photography– you want to make photos that express yourself, photos that feel unique to you, and you want to develop your own “style.”
Personally I have struggled with this for a long time. I’ve always looked up to the “masters” of street photography, but have always lacked my own unique voice or vision. To be honest, I’m still discovering myself every single day; as my work and vision is constantly evolving.
One of the best ways to give your work more focus is knowing what types of photography not to shoot. For example, don’t get distracted by all the different genres of photography out there. If you want to get really good at one style of photography, you need to say adios to all your other photographic interests.
For example, if your primary interest is in street photography — take a break from your other interests. I am not saying give them up all-together; but just take a break from the other genres of photography to simply focus on street photography.
Projects

If you want to focus on your photography; a practical guide is to embark on a photographic project. A project is a concept that you work on diligently (often for a long time, sometimes for a short period). I think projects is what separates the newbies from those with more experience in photography.
As a disclaimer, you shouldn’t feel like you need to work on a project to be taken as a “serious” photographer. Only embark on a project if it fits your temperament, and it helps give you focus. Otherwise, you can always go out and shoot random street photos and stitch them together later.
What is my project idea?

You are unique; your life experiences are totally different from anyone else out there. Don’t seek to ask others for project ideas– your ideas must come from within.
Personal photography
A photographic project must be something that is personal to you. If you grew up as a white kid in the suburbs, please don’t go to the hood and try to take photos of impoverished black people.
Draw upon your personal life experiences– things that you struggle with, things that make you happy, or communities you are a part of.
For example, if you are a steady church-goer; perhaps your photographic project can revolve around you documenting your own church. If you have lived in a certain city or neighborhood for a long time, do a project where you only shoot that area (nowhere else). If you are an extrovert (like me), perhaps you can pursue a “street portrait” project; where you take close-up portraits of interesting strangers you meet on the streets.
Think ahead; if you finished your project, will it bring you personal fulfillment? Dig deep within.
Don’t overthink it
Another common mistake I see a lot of photographers make when it comes to working on a project is this: they overthink things. If you have any project idea, you just need to go out and do it. Everyone has a million good ideas; it is only execution that matters at the end of the day.
Unfortunately not every single photographic project idea is “do-able.” And the only way to figure out whether a project might work or not is to go out and make photos, and see if it makes sense to others.
As a practical tip: don’t ask other photographers or your friends or family whether a certain idea is good or not. Simply keep your idea to yourself, go out and try to make photos, and then show a “beta” or a “preview” of some of your images and idea to your colleagues. Then you can seek and solicit their feedback.
Take your time
Great photographic projects take a long time. You cannot expect to learn a foreign language in a single day, a week, or even a month. Similarly– do you expect a great redwood tree to grow to hundreds of feet simply overnight?
Trust me; I’m impatient as hell. I’m the guy who gets frustrated when Google Maps takes more than a second to locate me. However what I have learned from my personal experiences working on photographic projects is to savor the process.
When I am done with a project, I feel a bit hollow and empty inside. The process of working on a project is always the most enjoyable. This goes with any artistic craft; the action and the process of creating art is always more fun than the end-product. A great project can take decades.
Start small

Don’t be afraid to kill your project ideas, two sayings to keep in mind:
1. “Fail fast”
2. “Fail forward”
A project that can take decades? No thank you (is what you might be thinking). I know– so start small. Start off working on your project for a week or a month. Think of yourself like a scientist or an engineer– you’re going to “prototype” your idea and simply “experiment.”
When you start a project and you feel like your heart truly isn’t in it (or if it isn’t something you’re passionate about), my recommendation: kill your project. Don’t get overly attached to what project you might have. In Silicon Valley, we say, “Fail fast” or “Fail forward.”
Ultimately a project can be as big or small as you want it to be. Some of my photographic projects are small as 3 images (shot on a weekend); others are around 15 images that have spanned over 3 years. Remember: you set the rules, there are no ultimate “rules” to follow.
Editing & Sequencing
When editing (selecting your best photos), remember the saying:
“Kill your babies”
Okay, so you’ve come up with a project idea, you’ve shot a few photos, and you’re pretty happy the direction your project is going. So what is the next step?
Easy: start killing your babies.
Whenever we work on a photographic project, it is generally very personal. So we get attached to our photos (like they were our babies or children). We get attached to photos that aren’t great photos, but we refuse to get rid of them for some sentimental reasons, or some interesting backstory behind the photos.
If the purpose of your photographic project is 100% personal (you don’t plan on showing it to anybody else), then you can keep whatever photos you want. However if you plan on publishing your photographic project to the public, then you need to create a nice, concise, and consistent edit (selection of images).
I think the common mistake that many photographers make is that they show too many images for a project (especially when it is on their website). For books, my favorite projects range from 30-50 images.
Less is more

For one of my favorite photographic books and projects is: “Minutes to Midnight” by Trent Parke. His images are majestic– they transport you to a different universe and world. Not only that, but his photos are personal, dramatic, and strong.
One of the things that impressed me of Parke’s book is that every single photo in the book was strong (could stand on its own) and also fit together as a flow and narrative. In addition, I was astonished to hear that he didn’t end up putting all of his favorite photos in the book. There were several photos that he really loved, but didn’t make sense in the context of the project. So he didn’t include them.
I am personally guilty of this– I want to show all my photos, rather than only showing my best photos. However the strength of your project depends on the photos you decide not to show.
Aesthetic consistency
As a practical tip, if you are new to working on a street photography project, strive for aesthetic consistency by sticking to one camera, one lens, and either black and white or color (try not to mix black-and-white and color photos within a project).
This is not a “rule”, but simply a guideline. My personal opinion is that by keeping consistent to an aesthetic “look” — the viewer will be able to be transported to the world you create in your photos. By changing up the lens, camera, format, or “look” of the photos too much — you will end up confusing or distracting the viewer.
Also practically– by keeping consistent with the same gear, you won’t be stressed out in terms of knowing what camera/lens to shoot with. The fewer options you need to stress out about, the more focus you can give your project.
Variety of images

If you present a photography project with the same type of image over and over again– it can go two ways.
First of all, it can be pleasant for the viewer, because they know what to expect. However on the other hand, this can also lead to boredom (the photos all look the same).
As a tip; try to add variety to your images. For example in the context of a street photography project– combine urban landscapes, candid photos, street portraits, or “still life” photos. Try to weave them into a visual tapestry, and this variety will surprise and bring delight to your viewer.
For example in my “Only in America” project, I have kept consistent with my gear (film Leica, 35mm lens, and Kodak Portra 400 film). But I have variety of the type of image, which makes it more fun to look at the images, and gives it flow.
Enjoy yourself
I know some photographers who like to self-flagellate themselves (beat themselves up) when it comes to their photography. They treat photography more like “work” than “play.”
If photography isn’t bringing home the bacon, and you have a normal day job that pays the bills; why add more stress to your life? Shouldn’t photography be removing stress from your life?
Remember– your photographic project should be meaningful, fun, and enjoyable.
By enjoying the project you are working on, you will have the motivation to continue working on your project, and to go deeper into the concepts and themes within your project.
Sometimes the subject-matter of your project can be dark and depressing; but if you feel it brings your life meaning, continue to push forward.
Marinate your photos

Like a nice steak, the longer you let your photos marinate, the better they will taste.
It often takes me a long time before I figure out whether my photos are good or not. So whenever I am in doubt of my photos, I let them sit, and look at them over-and-over again (over the course of weeks, months, sometimes years).
I have discovered that the longer I let my photos “marinate”, the better I can judge them. There are certain photos that I have shot that I am very excited the day I shot them, but after a week or month, my enthusiasm for the image fades.
But on the other hand, there are some images that the longer I let them sit, the more I like them. These are the key images you want to include in your street photography project.
When to stop?
Another practical question I get is, “When should I decide to stop my project?”
This of course is a personal decision. My personal opinion is this: follow your gut. Your heart and soul will know when it is done.
In life, we often try to rationalize everything we do. We create pro/con lists, we analyze things with our brain, and try to have concrete reasons why we decide to do what we do.
But with personal projects, if your project no longer brings you joy, love, or excitement– thank the project for its time, bid it farewell, and finish it.
If you’re the type who doesn’t know when to stop a project, simply give yourself a hard deadline.

How to publish your project

When you feel “done” with your project, you might wonder, “What is the best way for me to present or publish my project?”
Remember: the medium is the message– which means how (the medium) you decide to publish your project will affect the the message (what you’re trying to say) with the project.
For example, let’s say you do a project about poverty or homelessness in your local neighborhood. Perhaps the best way to publish your project is on cheap newspaper print– and distribute it for free to the local community.
If you do a project on how people are addicted to their smartphones, perhaps you should publish the project on Instagram.
Book publishing
Generally we think of printing and publishing our photos in a book as more “legitimate” and more “prestigious.” I would say it is simply a different way to publish your work.
If you want to print your work as a book, I recommend just using Blurb or any other print-on-demand service. While the printing costs are more expensive, you don’t need to self-publish 1,000 copies and have them sit in your garage (unsold) while being $10,000 in debt.
If you want a more “legit” publisher, put together a well-polished PDF proposal and start contacting publishers. Look at photo-books that you like and find the contact information of the publishing houses. Realize this process is going to be political, money-based, and dependent on your work.
Web-publishing

Of course the ultimate and most democratic way to publish your work is on the web.
While you can publish your work on social media, I recommend publishing your work on your own personal website. Register a domain (firstnamelastnamephoto.com) and put together your photos as a web-gallery. If you are technical, use Koken (an open-source website gallery portfolio platform). If you aren’t technical, use a paid service like Squarespace or Format, which will automatically optimize your images to be seen on mobile and on laptops.
Another idea: if you publish your photos to social media, try to publish your images one-at-a-time, using a #hashtag to show that they are part of a certain project or a series. You can either publish them all at once, or upload an image every single day (drip feed).
Never stop
Once you are done publishing a project (which you might have worked on for weeks, months, or years), you will probably feel withdrawal symptoms. I know I do. You get so emotionally-attached to your project, that once it is finally done, you don’t know what to do next.
My suggestion? Never stop. Keep pushing forward. Continue to work on new projects, to evolve, and not be satisfied with your past work. Continue to work hard to pave new ground, and discover new streets.
If your old projects have been digital, perhaps try new projects in film. If you’re a black-and-white purist, try color. If you’re a 35mm guy, try out medium-format (or even large-format).
Try to shoot different neighborhoods, explore, discover, and have fun.


Chapter 2: Techniques

I know I’ve said this over and over again (to the point that it gets cliche), but if you want to make powerful street photos, you need to be close enough. Emphasis on “enough.”
90% of street photos I see online are too far away. They aren’t close enough. They don’t have enough energy, emotion, and intimacy in the frame. However what does it mean to be close “enough”?
Well, you want to fill-the-frame with your subject. By filling the frame, your photos are more emotionally-gripping. The viewer feels like they are a part and active participant of the scene, rather than a disconnected voyeur. Not only that, but if you can get street photos where your subjects make eye-contact with you, it will evoke excitement (sometimes fear) into your viewer’s heart (because it looks like the subject is looking straight into the eyes of your viewer).
In this section, I will share some practical tips and technique on how to get close enough.
Click, get closer, repeat

This is a technique I use when I see a scene or a moment that I want to capture, and I want to also get closer to my subject.
I first start off by seeing my subject from afar. I take the first photo as a gut-instinct, to ensure that I got the shot. Then for the next shot, I take a step closer, and “click.” While I am clicking, I try to look at the edges of my frame, and to notice whether I am close “enough.”
Even for me, most of my photos aren’t close enough, so I will continue to keep “clicking” and “getting closer” until my subject notices me, or whether I am too close (and need to take a step back).
In this photograph, the light was great in SF (sunset) and I saw this suit who looked stressed out. Using my Ricoh, I took a photo, and continued to “click” and “get closer” until he noticed me (frame #5). I feel that shot works the best, because of the eye contact.
After, I pretended I shot something behind him (to avoid confrontation) and simply walked away.
What is a good distance?
For street photography, I generally recommend most street photographers to use a 35mm “full-frame” equivalent lens. I find 50mm to be “too close” and a bit restrictive, and most street photographers don’t get close enough for a 28mm lens.
For 35mm lenses, a good distance of “close enough” is 1.2 meters (roughly 2-arm lengths away). For a 28mm lens, a good distance is .7-1 meter (around 1-arm length away).
The wider your lens, the closer you need to get.
Why?
The wider your lens, the more difficult it will be to “fill the frame” with your lens. As a practical tip, when you’re shooting on the streets, focus on the edges of your frame, and make sure there is no dead space or clutter at the edges.
I recommend sticking with one focal length for a very long time (I shot 35mm for almost 10 years, now I am experimenting with 28mm). By sticking with one focal length, you can master framing.
Click until they notice you

This is a tip I learned from Thomas Leuthard — walk close to your subject, and keep clicking until they notice you, and then capture an image with strong eye-contact.
In this photograph, I was in NYC on 5th avenue, and found something interesting about this lady. I got close with my Ricoh GR (28mm) and brought up my camera, took a photo, and then waited for her to notice me.
The second she looked towards me, I took another photograph, and you can see how having the strong eye-contact makes this photograph powerful.
After they notice you, you can simply smile and say “thank you” or if you want to be more covert, divert your eyes and keep moving in the streets.
Walk around and in front
There is nothing more boring than a street photograph that is shot from behind. Why? The back of someone’s head is never as interesting as their face. As human beings we are naturally interested in the faces of others.
If you see someone interesting from behind, walk around them and shoot them head-on (in front). This works best at traffic intersections, when people are standing and waiting for the light to change.
This technique also works well for people who are simply “chilling” and not going anywhere. This can work well on smokers, people looking at their phones, or reading a book. I know it can be pretty scary and a bit confrontational, but know that more powerful photos are shot head-on.
Shoot head-on

If you’re shooting with a wide-angle lens, try to avoid from shooting from the side. A lot of street photographers (in an attempt to get closer to their subjects) will shoot from “oblique” angles (from the side, as your subject walks away from you.
My friend Charlie Kirk has a technique he calls the “cut-off” technique in which he sees someone he wants to take a photograph of, and cuts them off (by walking in front of them in a diagonal). And while he is walking past his subject, he will photograph them head-on.
For this photograph I shot on the right, I was walking down 5th avenue in NYC, and saw this interesting man with these great reflective glasses. What I did was I held my camera down, and walked directly in front of him (he stopped walking for a moment) and I took a photograph head-on. After I took a photograph, I fumbled around and said, “Oh, sorry for getting in your way” and simply walked around him.
Shoot into the crowd

Another technique when shooting in busy and crowded places: shoot into the crowd. Integrate yourself into the sea of people, and get uncomfortably close. Shoot during “golden hour.”
Direct your subject

If you find an interesting subject on the streets, you can direct them to capture a certain type of image you want.
For me, I will stop my subject, ask them to stand against a simple background, and ask them to look towards me, look up, look down, look left, and look right. If I find an interesting tattoo on their hand or rings, I will ask them to bring up their hand to their face, and make some sort of gesture.
If my subject is feeling stiff and looking unnatural, I will say, “Hey! You look a bit stiff. Can you just jump up and down a bit?” and while I am saying this I will literally jump up and down, while shaking my shoulders. Almost always, the subject will laugh, and mimic my motion. And once they jump up and down, blood flows through their body, and instantly they become more relaxed, invigorated, and more engaged.
I will also direct my subject by asking them to move forward or a bit backwards, depending on the light.
For example on this photograph on the right, I was having lunch with Cindy at a cafe, and saw this amazing-looking woman, with this light illuminating her face. I liked the idea of trying to make a photo where only half of her face was in the sun, so I first said, “Oh my gosh miss, you look so beautiful here in this light. Do you mind if I made a few photos of you?” She laughed and obliged.
I then asked her to move forward a bit, and I leaned over the bar counter to make the photograph work. I “worked the scene”, and for the ultimate photo, I darkened the bottom-left of the frame to make this image more dramatic.

Shoot, a lot

When I took a Magnum workshop with David Alan Harvey, the most memorable lesson I learned from him was this: “The difference between great photographers and weak photographers are that weak photographers are satisfied with only taking 1-2 photos of a scene. A great photographer will shoot 300 (if possible).
Case-in-point, if you see a good scene: shoot as many photos of the scene as humanly possible.
Discover the composition while you shoot

Why shoot a lot? Well, a lot of street photography is this: “I don’t know what I want until I see it.”
I find that when I am shooting street photography, I will discover the composition and type of image I want while I’m taking the photograph. And more often than not, I will discover the photograph after I have shot the scene (and am looking at the photos on my computer).
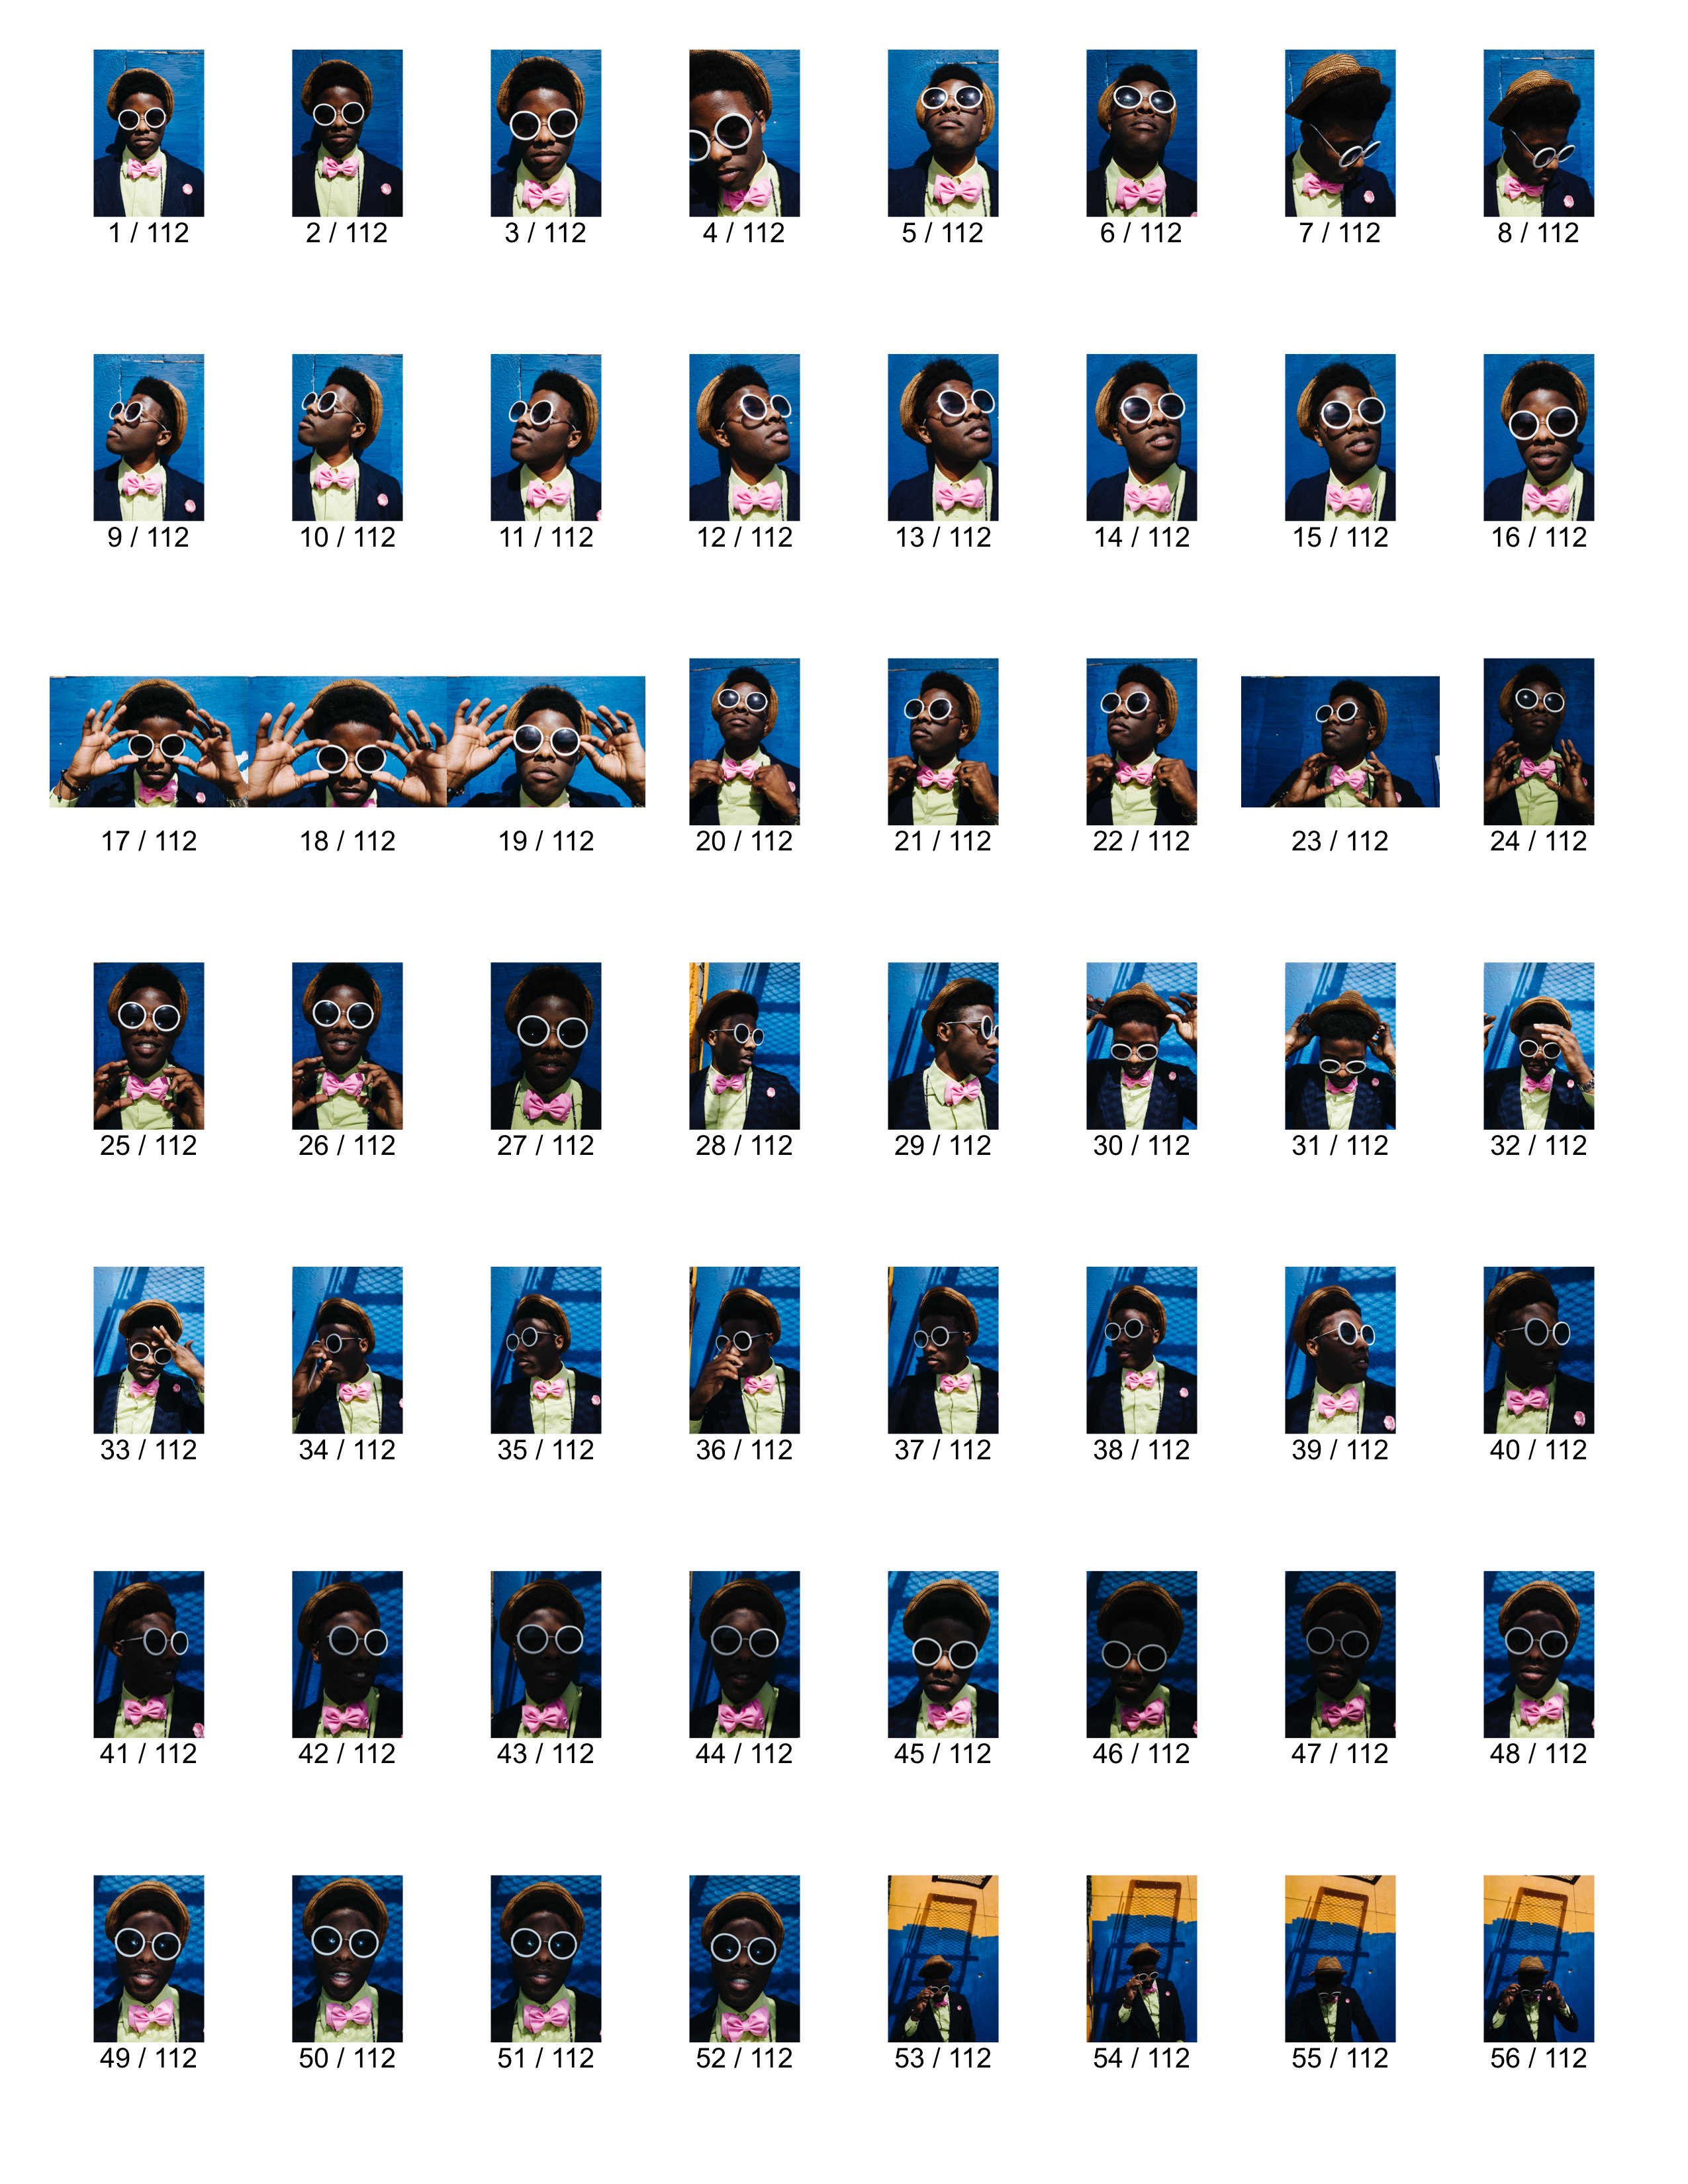
For this photograph, I wasn’t quite sure what I wanted. I was teaching a workshop in New Orleans, and we saw this great guy on the streets. We approached him, and asked if we could make some portraits of him. He loved the attention, and we took a long time taking many photos of him. I shot 112 photos of him in total.
My favorite photograph was frame #81, when I tried experimenting shooting from a very-low angle, and the hand gesture is the “cherry on top.”
Talk while shooting

When it comes to street portraits, I like to talk to my subjects while taking photos of them. Why? This technique allows you to get more natural facial gestures and expressions (rather than telling your subject what exactly to do).
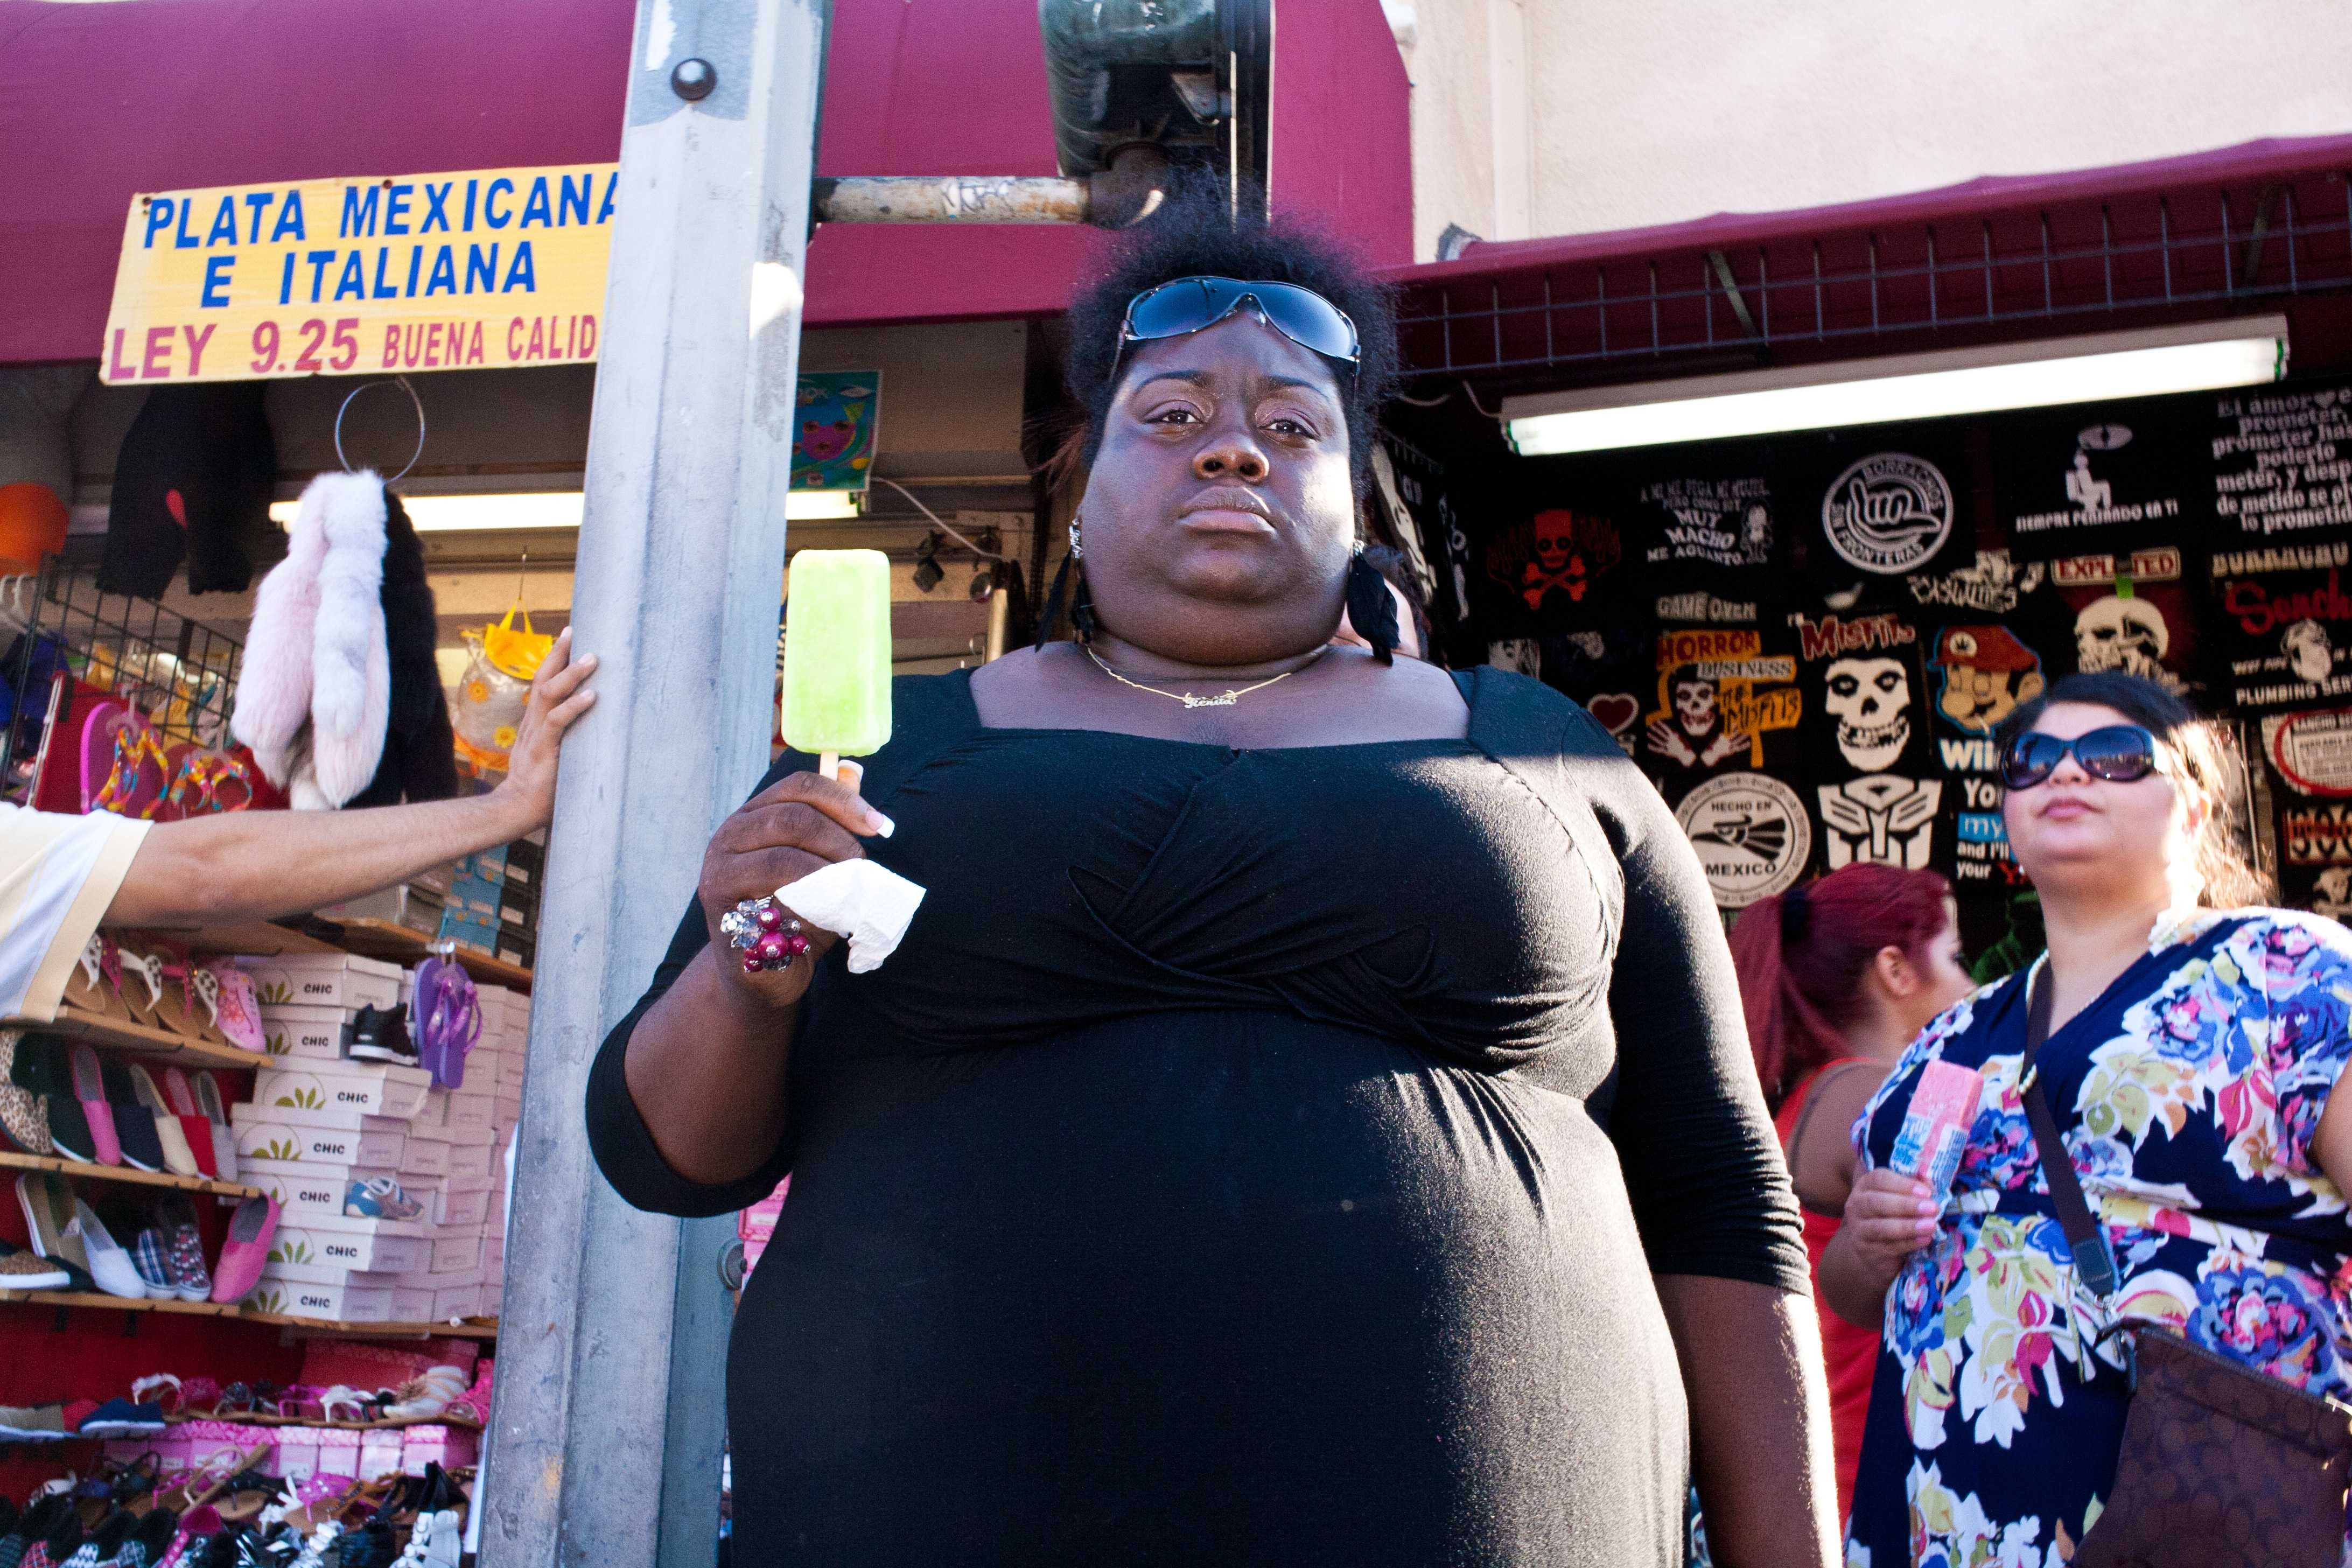
In this photograph, I saw this lovely-looking lady hobbling, walking towards the cross walk. She was tiny– she must have been 4 feet tall, with a massive hunch in her back.
But there was something about her elegance, beauty (and colors) that struck me, so I approached her, crouched down, and talked to her and told her how beautiful and lovely she looked. She was flattered, and I asked if I could make some photos of her. She agreed.
I saw the buildings behind her, and got really close with my Ricoh GR (shot at 28mm in macro mode), and tried to get the buildings to create leading-lines to her head. I asked her what she was up to that day, and she told me that she was heading to Easter Sunday mass. She also told me that she was 82 years old.
I then asked her, “What is the secret of aging well?” By asking this open-ended question, I could focus on making portraits of her. But also it helped us engage in interesting conversation– she told me it was important to be active in a community, to walk a lot (she told me she walked for miles everyday), and to be social.

Not only did I thoroughly enjoy my conversation with her, but I also made this interesting frame (#7) the second she leaned towards me and started to engage me in conversation.
Don’t feel bad or guilty taking portraits of people while you are talking with someone. Your subject understands– you are a photographer, and your job is to make an interesting photo of them.
I have personally found the benefit of using a compact camera with an LCD screen is that I can continue to have eye-contact with them, chat with them, while holding the camera at a low angle and taking photos.
If you have a difficult time shooting while talking with someone, don’t ask “yes” or “no” type questions. Ask open-ended questions like, “What is your life story?” or “What is your dream in life?”
The funny thing I found about shooting street portraits? The more personal the questions you ask, the more personal the connection you can make.
Chapter 3: Indoor “street photography”
As street photographers, we spend most of our time literally in the streets. But if you want to create more unique images; get off the street, and try to shoot more indoors.
There is an appeal of shooting in public places outdoors– if we have any sort of confrontations, we can easily run away. However with interior spaces, it takes a lot more courage. Why? Shooting indoors is more awkward and frightening.
However I feel that in the genre of “street photography”– shooting indoors is one of the large and untapped areas to innovate in.
But is shooting street photography indoors really “street photography?” To me it is. I like to think of street photography as a genre of capturing and documenting humanity; whether it be outdoors, indoors, in a subway, at a park, at the beach, and who knows– maybe one day on a different planet.
Buy a stranger a beer

Often when I am out shooting in the streets, I see interesting storefronts for bars, cafes, or other stores. Whenever my curiosity is piqued, I say “screw it” to myself and enter. Sometimes when I enter places, I look like a lost tourist– looking around the entire establishment, while having the storeowners stare at me strangely. I will often say, “Oh, don’t mind me– I’m just a tourist, and I love how it looks in here” while giving a big smile. This usually kills any sort of suspicion that others have of me.
Shooting street photography indoors is also a great idea if you live in a boring town or city where there isn’t a lot of people walking around. Or in the winter, when it is cold– most people will treat a bar or a pub as a “public indoor space.”
When I did a Magnum workshop with David Alan Harvey, I decided to do a mini-project at a dive bar called “The Old Colony.” I visited there with my buddy Quoc in the evenings, would drink a beer, and start chatting randomly with people inside.
One of the best ways to open a door with a stranger is to offer to buy them a beer. After all, who will refuse a free beer at a bar?
I met this interesting gentleman at the bar– and I loved his aura and look. It seemed that he went through a lot in life, and after chatting him up and buying him a beer (or two) I heard his entire life story, and how he ended up in Provincetown.
After building up some rapport with him, I asked if he minded me taking photos of him. He had no issues, which also allowed me to shoot candid photos while he was just hanging around the bar.
Make friends indoors, and everyone else indoors will feel more comfortable with you in there.


Street portraits indoors

Once while teaching a workshop in SF, me and some students stopped by a McDonalds to pick up a bottle of water. On the way inside, I saw this guy with great eyebrows eating a burger. I knew I wanted to make some photos of him, but I didn’t want to piss him off.
What I ended up doing was approaching him, and told him, “I love your look!” and asked if I could make some photos of him eating. Believe it not, he shrugged his shoulders, and had no issues. I put my Ricoh GR on “P” mode, and started to shoot photos of him with a flash. While taking the photos, I knew that the background was too messy and distracting. Not only that, but I was a lot more interested in his face, rather than him just eating a burger.
So I went up to him and asked him if I could make some portraits of him as well.
I asked him to stand up, and looked for a simple background to shoot his portrait against. I found a simple patch of yellow, and asked him to stand in front of it.

I then started to shoot a bunch of portraits of him in macro mode, and asked him to look different directions. I asked him to look right, left, to look up, and towards me.
The last photo #23 was the little gift he gave me. He turned towards me and gave me a little devious look.
Later I asked the students which photo they preferred, and one of my students told me, “The other photos are ordinary photos of an extraordinary guy, but this photo is an extraordinary photo of an extraordinary person.”
Needless to say, I also prefer this photo the most– his fantastic eyebrows, his hair, and grin.
Provoke a response

Many street photographers like to shoot candidly and to stay in the shadows. They don’t like to “disturb” or “influence” the scene– which is fine. However often by having you influence the scene, you make more interesting photographs.
For this photograph, I was at a cafe in Paris, and saw this interesting gentleman at the counter. I chatted with him in my broken French, and I asked if I could make a portrait of him. He said okay, so I turned on my flash (SF 24D) on my film Leica, and framed him and took a photograph.

I realized the photograph was a little bit too stiff and posed, and wondered how I could get a more interesting portrait of him. Earlier I remember that he had this great looking teeth, and I wanted him to show his teeth.

So what I said was, “Can I get one photo of you with your teeth?” and at that moment I opened up my teeth and smiled really big, and started to laugh really loudly. He reacted to me, and started to laugh, and that is when I shot photo #2, which is my favorite photo. I like the energy of the shot– him leaning out of the frame, and the natural expression of his face, and (of course) his fantastic teeth.
Of course you can provoke a response in more than one way; you can tell people bad jokes, you can give them a big smile (hopefully they will smile back), you can ask them to think of a difficult time they’ve had in life (for more solemn images). Or you can ask people to look into the lens and not smile.
When you’re shooting on the streets, you can be “aggressively friendly” — which will affect how your photos turn out. And when you’re shooting indoors, I say turn up your charm and try to be extroverted as possible to engage your subjects.
Get low

One of my favorite (recent) photos is shot inside a pub (at around noon) in Berlin. I was with two students, and we saw this interesting pub from outside– and I encouraged us all to enter.
For this scene, I saw this fantastic man drinking a beer in the corner. At first, he looked a bit unapproachable. However after chatting up the bartender (an older lady) the man started to feel more comfortable having us around. So when we finally asked him to take his portrait (some of the students asked him in German), he was cool with it.
If you want to create more engaging images, get low. This will give your subject the “superman” effect and make them look “larger than life.”
When I took portraits of this man, I tried to also get him in “action” — drinking the beer, looking at the beer, and interacting with the beer.

###Vary your distances
When I was “working the scene” and taking photos of this man, I also made it a point to vary my distances. Some of the photos I shot of him were very close (1 meter with a 35mm lens), and other photos I took a step back and shot more “environmental portrait” shots of him with the background (at around 2 meters).
While I was taking the photos (all with a flash), I got closer, took a step back, crouched down, took a step left, and took a step to the right. All of these photos were shot on film, so I didn’t get distracted by “chimping” (checking my LCD screen).
Also as a practical tip, when you are shooting indoors, don’t be afraid to use a flash (especially when you have permission). Using a flash will create more dynamic and “edgy” photos– and bring out textures from your subjects.
No regrets

Sometimes you find the most interesting characters in the least likely of places. For this photograph, I was in an elevator in Chicago, and saw this woman in her lounge-wear, and with curls in her hair.
It is very rare that I see women in this outfit in public places, but I felt a little bit awkward interacting with her in the elevator. But I knew I would massively regret not asking for permission to take her portrait.
I have a personal rule: whenever I am afraid of taking a photograph, I must ask permission to take that image.
So I told this lady that I loved her “look”, and if I could make a portrait of her. Surprisingly, she said, “yes” and I shot some photos with a flash.
###Don’t think, just shoot
Another practical tip when it comes to shooting photos in uncomfortable situations; don’t think too much, just take the damn photo.
Whenever I over-analyze a scene, I just end up not taking a photograph, because the more I think, the more nervous I get, the more self-conscious I get, and the more awkward I feel.
The solution? Just shut off your brain, don’t think, and just click.
The best analogy I can think of is just be like a pigeon attracted to shiny stuff. Whenever I see something that I am attracted to, I just gravitate towards it, bring up my camera, and take a photograph– simple as that.
Keep your camera in “P” mode, and just click.


Chapter 4: Street photography without people

When we think about “street photography” — we commonly think that it needs to have people in it. My opinion: I think street photography needs to show humanity— not necessarily people.
Once you are bored of just taking photos of people walking in the streets, take a leap forward and try to shoot “street photography” without having people in it. This can mean taking photos of interesting or weird things you see in public places, shooting “urban landscapes”, or “still life” photos.
I find that taking photos without people to be more challenging than having people in the photo. Why? Taking photos of strangers is mostly about conquer your fear, and having the courage to take a photograph. However I feel that taking photos without people is to learn how to see– and to have extremely observant and “noticing” eyes.
The great thing about this style of photography is that you can shoot it anywhere.
Artifacts of humanity

Perhaps one day after humans are extinct, aliens will look behind at all the objects or artifacts that we created and interacted with– and learn about humanity and society this way.
For example, what is so interesting about a dirty mattress? I personally love the colors and diagonal patterns in it, the use and tear marks, and it makes me wonder the story behind the mattress. Who was the prior owner? How did the owner interact with the mattress? Why did they decide to throw it away? Why did they choose that particular pattern?
A mattress doesn’t exist on its own. Humans have created mattresses to sleep on top of, and interact with. The same goes with chairs, sofas, ladders, and other human-made objects.
###Emotion in objects
If you want to create interesting photos of objects you find in the streets, try to imbue it with human emotions.
For example, I like taking photos of abandoned things or things that are thrown away. I love capturing moods of loss, abandonment, and of nostalgia. This is why a lot of photographers like to shoot decaying photos of urban landscape in Detroit– we feel nostalgic about the “past glory.”
The light affects the mood of a scene greatly. So if you want to take a dramatic photograph of some shopping carts, do it when the light is soft– perhaps during sunrise or sunset.
Similarly if you want a harsh feeling in a photo, perhaps you want to shoot it mid-day.


Surrealism

To make an interesting photo means to have the viewer stop, stare, and try to figure out what is going on in a photograph.
Surrealism is one of the most difficult things to capture in photography. If you want to make interesting photos without people, try to make photos that have some hidden symbolism or concepts.
For example in this photograph above, I like the surrealism of the random video camera (juxtaposed against the desert on the bottom). To me, it suggests that there is a 1984 big-brother-esque government constantly watching and spying on you, even if you’re in the desert.
Don’t make your photos too easy to decipher– the more mystery you add to your photos, and the more ambiguous, the more engaging.


Chapter 5: Emotion

Gestures and emotion

A street photograph without emotion is dead.
One of the best ways to capture more emotions in street photographs is to capture gestures. For example, in my “Suits” project, most of the photographs I have captured (which have a strong sense of misery and isolation) involve a hand gesture in one way or another.
A lot of boring street photographs don’t have enough energy, vigor, or emotion in the photograph. You can capture a perfect composition of a scene, but if you don’t have any emotions in the scene– the photograph won’t be memorable.
Memorable photographs with strong emotions punch you in the gut, and burn themselves into your brain.
When you’re out shooting in the streets, look for these hand-gestures, and seek emotions.
###Autobiographic photos
Every photo we take is a self-portrait of ourselves. Not only that, but each photo we take is also an auto-biography of ourselves, our life experiences, and our emotions.
When I used to work a corporate job, I felt trapped, miserable, and stuck. I felt like I had all this creative energy I wanted to share, but the bureaucracy of the company held me back.
When I got made redundant from my job, I embarked on a project to document my feelings about this feeling of entrapment of the corporate world. This lead to my “Suits” project– which is how I can empathize with men in suits who feel trapped in life.
Of course, not everyone who works as a “suit” is miserable. But this was my personal experience, which I capture and document in others on the streets.
Know what not to include

One technique I like in street photography is the “decapitation” technique– intentionally cutting off someone’s head, and photographing either just their body, legs, or hands.
What you decide not to include in a frame is what makes the photograph more interesting. For example in this photograph above, I intentionally don’t show the man’s face. This gives more mystery to the shot– the viewer wonders who the man is, and his emotional state.
Judging by the vein in his hands, you can tell the man is tense, anxious, and overwhelmed with work. To top it off, you can tell it is NYC (yellow cab and the streets in the background).
###Don’t break the mood
When working on my “Suits” project, I captured a lot of photographs of men in suits who looked happy and jubilant. However I intentionally decided not to include these photos in my project, because it killed the consistency and mood of this project.
However you can also do it in a different way– you can juxtapose emotions within a single project (some photos which are happy, others which are depressing). This can add a nice “cadence” and flow to your images.
For me, I am not the best storyteller when it comes to photography, so I like to keep it simple for the viewer. For the “Suits” project– misery is the theme that permeates the images.


###Take difficult photos
Based on my personal experiences, I find that the scarier it is to take a photograph, the more difficult it is to shoot, the better the photograph.
Why?
The more difficult a street photograph is to shoot, the less likely other street photographers have shot a similar scene. This is why I enjoy shooting shooting street photography indoors, or in the bus or subway (candidly with a flash)– because it takes a lot of guts, and the difficulty results in some interesting photographs.
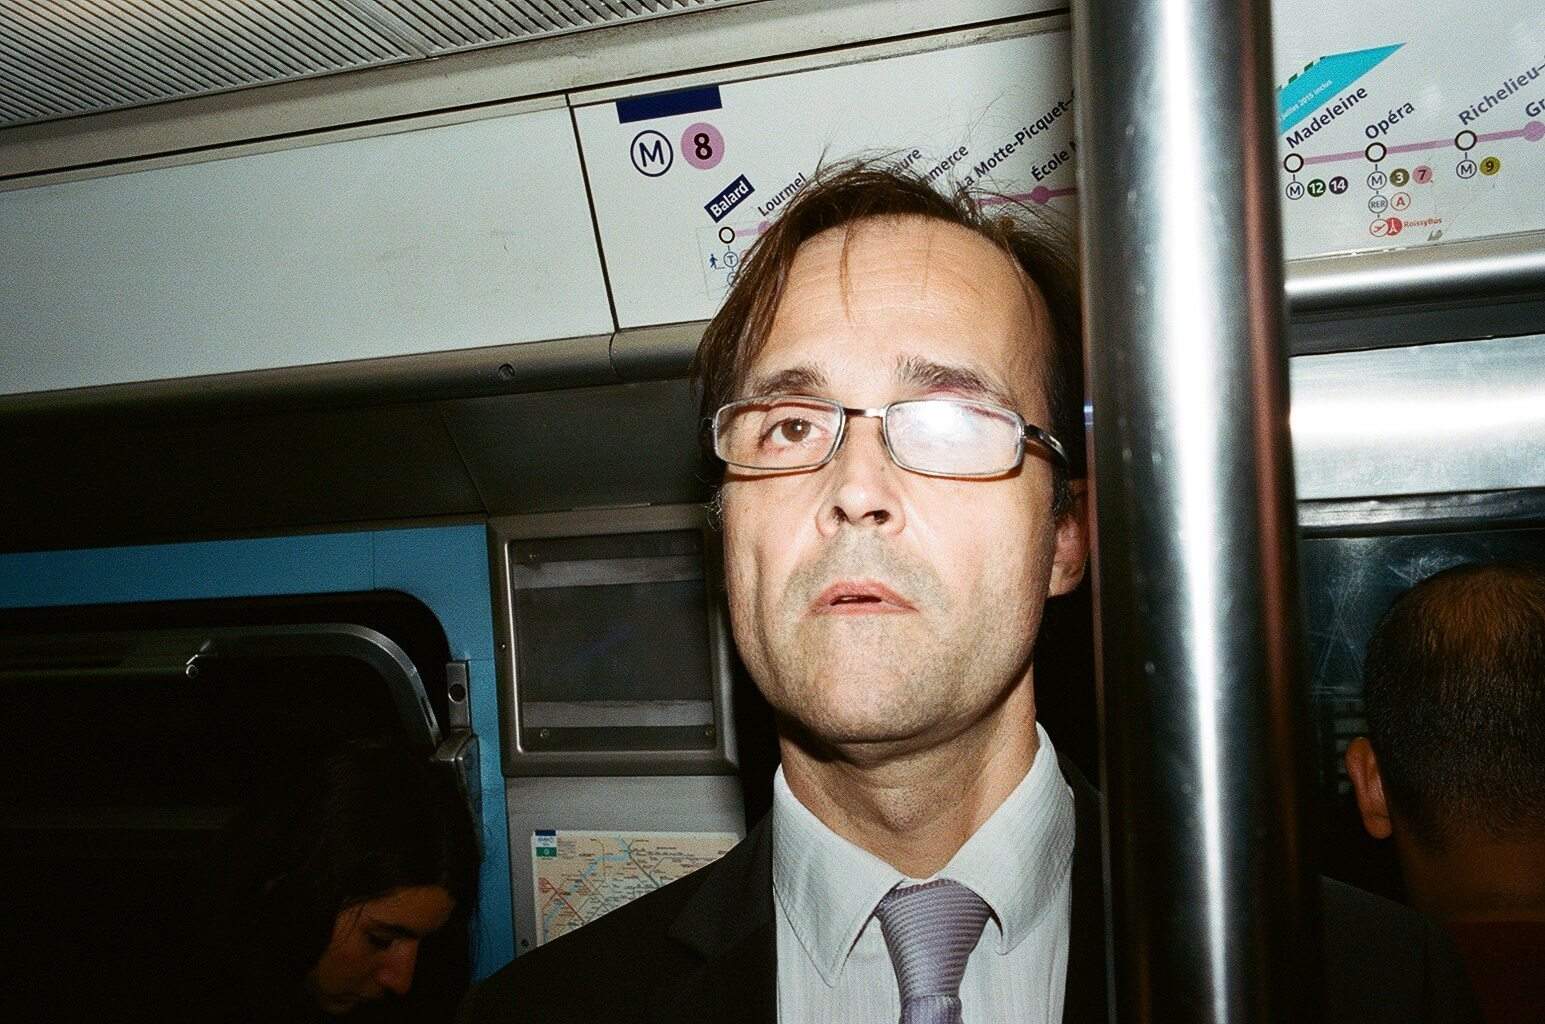
For example, I saw this “suit” in Paris, and I felt strong emotions in the expression in his face. He was standing across from me (in a crowded metro train), and I could feel my heart thumping in my chest. I knew it would be a good photograph, but I felt nervous.
But I mustered up my courage, and turned on the flash on my camera, and crouched down, and took a quick photograph. The flash disturbed everyone in the train, but after taking the photograph, I took a step towards the metro map (behind the man in the suit) and pretended like I was just a dumb Asian tourist.
The man in the suit stayed in the train for several stops, and I was able to calm my beating heart by not making eye contact with him the entire time. Furthermore, I used body language which suggested that I did not take a photograph of him. I didn’t act weird or awkward, I just pretended like I was lost on the subway, and took a photo of the map behind him.
Symbolism

Finding symbols (especially when they pertain to your photograph project) almost never appear. But when they do appear, be ready– because they can be some of your most killer shots.
When I was in Paris, I was shooting quite a lot for my “Suits” project. I was shooting in “La Defense” — one of the suit hotspots just outside of Central Paris. I was shooting around an escalator, and I saw one man taking off the suit from his neck. I knew this might ben interesting “detail” photo, so I stalked him for a bit.
The second he took off his tie and put it into his hands, I set my 35mm Leica lens to .7 meters, and took a quick flash of the tie. Months later (when I got the film processed), I noticed the tie looked like a noose. The perfect ending shot.


###Emotional editing
When it comes to choosing your best photos, also use your emotions and gut to get a sense of which of your photos are.
Of course, as a beginner your intuition often fails you. But the more you study street photography, the history of photography and the more experienced you get as a photographer, your intuition will show you the way.
Before you decide to upload a photo on social media, or whether you decide to admit it into your project, ask yourself, “How does this photograph make me feel?” Consider the emotions in your photo– and whether these emotions will also connect to your viewer.
Photos without emotion are dead.
Conclusion: Never stop hustling

I have read countless books on photographic theory, absorbed the artistry of other photographers through their books, and ingested as many interviews and videos from photographers I admired.
However the only thing I have learned through this personal journey is that it all comes down to the “hustle” — the amount of hard work you put into your work. No amount of theory or concepts can teach you how to do the work; actually hitting the streets, putting your heart on your sleeve, and making photos that make your heart shudder.
To be a more “advanced” street photographer is to advance your vision, your passion, and your work ethic. But of course, you want to enjoy the process, and to take your photography a day at the time.
So never stop learning, never stop hustling, and never stop believing in yourself. You are your own self-imposed limitation; the sky is the limit.
Always, Eric (Berkeley, April 3, 2016)
Keep reading
- Monochrome Manual (2016)
- Film Street Photography Manual (2016)
- Street Photography Contact Sheets (2016)
- 100 Lessons From the Masters of Street Photography (2016)
- The Street Photography Composition Manual (2015)
- The Street Portrait Manual (2015)
- Street Photography 101: An Introduction to Street Photography (2015)
- Street Photography Aphorisms, Heuristics, and Sayings (2015)
- How to Overcome Photographer’s Block (2015)
- The Social Media Blackbook for Photographers (2015)
- Zen in the Art of Street Photography (2015)
- Letters from a Street Photographer (2015)
- 31 Days to Overcome Your Fear in Street Photography (2012)