Your cart is currently empty!
24 (More) Lessons Mary Ellen Mark Has Taught Me About Street Photography

Read as a Google Doc (where you can suggest edits, and also download as a PDF).
I recently came across the excellent book: “Mary Ellen Mark on the Portrait and the Moment”, an educational workshop book published by Aperture, at the home of my friend Brian Sparks. Mary Ellen Mark is a photographer who endlessly inspires me, and especially with her recent death, I wanted to meditate on some of her thoughts and philosophies about photography and life.
I have already written an article on Mary Ellen Mark titled: “8 Lessons Mary Ellen Mark Has Taught Me About Street Photography.” However I still learned new lessons that I want to share with you:
1. Connect with people
What I love about Mary Ellen Mark is that she is genuinely interested in her subjects, and has a deep sense of empathy and love for her subjects. To her, photography is less about making photos; it is more about making connections with her subjects.
A lot of photographers are shy with their cameras, but realize, a camera allows you to build a bridge with your subjects. The camera allows you to enter the lives of others:
“I saw that my camera gave me a connection with others that I had never had before. It allowed me to enter lives, satisfying a curiosity that was always there, but that was never explored before. On that day, I realized that the world was open to me. I realized all of the possibilities that could exist for me with my camera; all of the images that I could capture, all the lives I could enter, all the people I could meet and how much I could learn from them. On that day, my life changed forever.”
As a street photographer, you are curious about human beings and humanity. Of course we all want to make good photos, but first we need to strive to make connections with our fellow brothers and sisters.
Assignment:
As an assignment, start off finding a subject that you find interesting in. But in the beginning, don’t even bring out your camera or mention photography. Get to really know your subject. Start off by just chatting with them, and wait at least 30 minutes before bringing out your camera.
Then you can say something like: “Excuse me sir (or miss), I really enjoyed getting to know you and more about your life story. Do you mind if I made a few photos so I can remember this wonderful memory?”
2. Less is more

Photography is more about subtraction than addition. However there is a fine line; how can you continue to subtract from the frame without having nothing to look at?
There is a quote I like from Einstein which says: “Everything should be made as simple as possible, but not simpler.”
This is similar to the concept of “Occam’s razor” — a concept that a simple solution is often better than the more complicated one.
Mary Ellen Mark also applies the same philosophy to her photography; she tries to make her photos simple as possible (but not too simple). She strives to distill her frames into the essence of what she is trying to say:
“I always think less is more. Simplicity is really important. The line between extreme simplicity and an empty frame is a delicate one. […] I think whether simple or complex, it’s all a matter of being able to say what you want to say with your camera.”
Assignment:
Learn to subtract, not to add to the frame.
The next time you’re out shooting on the streets, see how you can subtract from a scene. Try to eliminate distracting elements from the background, and focus on the edges of the frame.
Also try to cut out elements to add more mystery to your shots.
For example, cut out the eyes of your subject. Cut out limbs and faces. Leave out key information, to add more mystery to a photograph– make your images more “open-ended” and open to interpretation.
3. Focus on the background
The common mistake that we do as street photographers is as follows:
We shoot on the streets, and roam– looking for interesting moments or people. Once we see someone interesting, we start clicking away (without looking at the background). Then when we get home, we realize that our subject and content matter is great, but the background is either messy or doesn’t add to the photo.
I personally make this mistake quite a bit. So what I have tried to do to remedy this problem is this: focus on the background, not the subject.
This has helped me make stronger images, in which the subject and the background contribute to a great photograph.
Mary Ellen Mark shares the importance of the background in the photo:
“The difference between a picture that works and one that doesn’t is often what’s in the background. What you put in the background i as important as what you have in the foreground.”
Another practical tip from Mary Ellen Mark: try to separate the elements in your background, and avoid overlapping figures:
“The background can sometime fight with the subject. When you’re in a crowded area, you have to separate the elements: move around and layer a crowded frame to place things at different distances and angles. Use a flash to separate the foreground if needed. When things are layered properly between the foreground, middleground, and background, they are not blocking each other and the focal points are clear. Even if the situation is crowded, it’s up to you as the photographer to organize the picture.”
Assignment:
This assignment is to avoid overlapping figures.
When you’re out on the streets, try to shoot multiple subjects, but don’t have figures blending into one another.
Some great photographers to study in regards to this include Gary Winogrand, William Klein, and Alex Webb.
4. A photo should stand up on its own
We’ve all seen it before; someone uploads a photograph to Flickr or Facebook (that isn’t great), but they add a fancy and in-depth backstory to support the image.
But the problem with this kind of image is this: a photograph should be able to stand on its own.
Mary Ellen Mark says the importance of an image being a self-contained, and how it should stand on its own:
“You don’t necessarily have to know what’s happening to recognize a great picture. If a picture needs a caption to work, i may not be a great one; it should stand up as an image of its own.”
Assignment: Can this photo stand on its own?
I personally don’ title my photos. I just use the city and year the photo it was shot. For example: Tokyo, 2013.
But don’t get me wrong, I used to use the cheesiest titles on my photos like: “Lost in thought” or “Wandering in the dark” or my favorite, “What is the meaning of life?”
I do believe a photo should be able to stand on its own two feet. If you need a fancy caption, you need to kill the photograph.
So when it comes to editing (choosing your best images), ask yourself: “If this photo had no context or caption, would it still work?”
Of course there are documentary photographers and photojournalists who use captions to describe their stories. That is an important part of their work. But as street photographers, we are creating our own reality; not trying to show some sort of “objective” reality.
5. Be an interpreter
To be a great photographer isn’t to simply take photos of interesting things you see. Rather, it is to interpret what you see, and to create a new meaning out of reality.
For example, if you see a guy with a red afro and you take a photo of him, ask yourself, “Could any Asian tourist with an iPhone have taken the same shot?” If the answer is, “Yes”, you should probably ditch the shot.
The best photographs are often the ones where the photographer is able to make interesting juxtapositions, comparisons, and craft moments inside his/her frame.
One of the best ways to do this is to show your own unique perspective and viewpoint of the world. What are you trying to say, which nobody has said before? Mark explains more below:
“You want to be an interpreter with the camera, not an illustrator. Try to go beyond overly literal photographs. Try interpreting what you see rather than just shooting it. Show me your point of view, how you feel about the subject. What are you saying? Why are you here?”
Mark shares the importance of interpreting what you see before you, and the importance of how you decide to shoot a scene:
“Be an interpreter, not just an observer. Think about how you frame the picture, how close you are, what angle you choose, where the light hits the subject. Is it light or dark? Don’t be afraid to be who you are, and think what you think, when you’re photographing.
Assignment: Juxtapose
The best photos are often the ones where there are interesting juxtapositions in a shot– where you put two totally unrelated elements next to one another.
So next time you’re out shooting, don’t just settle for one interesting thing you see. Try to build upon it. Add more layers to the scene, and elements. Do you see a guy with a red afro in the streets? Don’t just shoot him, perhaps look around the scene and see if there is anything else red you can add to the scene. Try to add more complexity and interest to your frame in this way.
6. Don’t rely on spectacular environments
I also feel that the best photographers are able to make interesting photos in their own backyard. The best photographers (William Eggleston and Mark Cohen come to mind) have shot for decades in their backyards, and made interesting photos out of boring subject-matter.
Don’t get me wrong, I get easily bored by my hometown (Berkeley). But traveling outside of Berkeley for the last few months has helped me realize how much I love my home, and how many interesting things there are to shoot there. I need to quit complaining that I don’t live in San Francisco.
Don’t rely on exotic places for your photography, as Mary Ellen Mark explains:
“It doesn’t matter where you are. It’s too easy to rely on the exoticism of a foreign place, or on costumes. You can work in a spectacular environment, but that doesn’t make the picture for you. It has to go beyond that.”
If you do happen to be traveling, don’t take the same cliche photo that everybody has already shot before. Try to avoid taking photos that you have already seen by Steve McCurry or any other national geographic photographer. Don’t just take portraits of old men with turbans, with kids and cotton candy, or street performers. Try to make a unique photo that the world hasn’t seen before.
This is advice that Mary Ellen Mark told her students in her workshops when in Mexico:
“I want you to make pictures that work across all cultures and boundaries. The photo doesn’t just work because someone in the market has a basket on their head.”
Sometimes we can be drawn away by the “costume” (the look, outfit, or subject matter) we see. Anyone can make an interesting photo of someone with a face tattoo. But we need to go deeper– we need to integrate other elements like “…content, emotion, composition, and depth”:
“The picture should be more than the costume, more than the event that’s taking place. Move beyond the circus, the dance, whatever the action. To make a great photograph, you need other elements like content, emotion, composition, and depth.”
Another practical tip from Mark: don’t take obvious photos. Rather, look for gestures and other interactions:
“For example, if you go to a protest, make a picture that says more than the signs people are holding. Go for juxtaposition and boldness. Focus on the gestures and exchanges between people, or look for humor in the event.”
Of course there is a balance, you want to photograph what you find interesting. Just try to find a new perspective, regardless of what you have shot before (or what others before you have shot already):
“Everyone tends to take the same types of easy pictures again and again in a spectacular environment. It’s better to find a different perspective on a subject. Look for ways of shooting that we haven’t seen before; surprise people. But most important, follow your own interests.”
Assignment: Make interesting photos in your own (boring) city
Many photographers I know complain that their home cities or towns are boring. But the more boring the town you live in, the better. This will be a “creative constraint”, that will force you to make interesting photos out of nothing.
After all, isn’t that what street photography is all about? Capturing the beauty in the mundane.
So restrict yourself to your town. Better yet, choose a 1-square mile radius from your house, and only shoot that neighborhood. Try to pay attention to details, and imagine what you would find interesting if you were a tourist in your own backyard.
7. Avoid vague emotions
What kind of photos stick with you? The ones that are emotional, and hit you like a ton of bricks to your heart.
So when you’re out shooting, look for emotional moments. But at the same time, you want to avoid boring or “vague” emotions.
For example, if I want to get a good photo of someone happy, I want it to be over-the-top. I want their laughter to be so ridiculous and over-the-top, that it just explodes with energy. Avoid taking photos of people with boring smiles and peace signs.
Mary Ellen Mark expands on the moments she looks for:
“I’m always looking for the kind of moment you can’t quite put into words but something that is odd or sad or funny. I’m looking for something that just hits me. That said, a person’s expression can’t be too vague or too cute. Wait for a true emotional moment.”
Assignment: “What is your happiest/saddest memory?”
Often when I am shooting street portraits of strangers, I will ask them some questions that stir up emotions in them. Two ideas:
- “What is your happiest memory?”
- “What is one of the most difficult experiences you have overcome in your life?”
These open-ended questions allow people to show their true emotions, and also for them to drop their guards and forget about the camera.
Think of some other questions that might provoke emotions from your subjects. Whatever you do, don’t ask boring questions.
8. Don’t force it
At the same time, sometimes you need to let moments spontaneously arise, and not to force things. It is to approach the Taoist philosophy of “wu-wei”– action without force.
For example, one of Mary Ellen Mark’s images shows a photo of a man pointing his gun at his wife’s head. Mark explains the image, and how lucky she was that the man happened to be (unknowingly) pointing the gun at his wife’s head:
“You have to wait for things to happen rather than overdetermine it. More often than not, the subject will do something you never would have dreamed of.”
Gun pointed at wife’s head , Husband and wife, Harlan county, Kentucky, 1971
Assignment: Linger
Sometimes when you’re out shooting, you leave the scene too quickly. This might be because you are nervous, you are scared, or self-aware.
But in these moments, learn to “linger” — to hang around longer than you think you should.
I often find that the longer I stick around with a scene or a person, something more interesting happens, better than I could ever imagine. And this happens without me forcing anything.
I have a personal rule: whenever I think I’ve gotten the shot, I remind myself: “Shoot 25% more than you think you should.” Often it is the several other shots which end up being the best shots.
9. Build the layers in your images
A good metaphor for crafting interesting images: build layers in your photos like a brick-layer would build layer of bricks for a foundation of a house.
Generally the strongest images tend to have an interesting foreground, middleground, and background. Not only that, but the more interesting interactions in your scene, the more interesting it is for the viewer to observe and look at the scene.
Mary Ellen Mark expands on building out layers in a frame:
“I love to work in a documentary style probably more than formal portraiture. In this type of shooting, you wait for the action and build the frame, looking for different layers. From there, build the other parts of the frame to form a juxtaposition, or even look where the light is beautiful.”
Assignment: Extreme depth
One technique I learned from my friend Charlie Kirk is to add “extreme depth” to photos by focusing on the background, and having someone in the foreground who is intentionally out-of-focus.
For example, set your camera to aperture-priority mode, set the aperture to f/8, ISO to 1600, and set your lens to manual focus and prefocus to 5-10 meters. Then try to make photos that have layers and depth, by adding elements in the extreme foreground, and by not focusing on what is closest to you.
Street photographers starting off generally always focus on what’s closest to them. But the more experienced ones focus on the background.
10. On using the flash
Shooting with a flash gets a bad reputation, especially in street photography. People see Bruce Gilden in action and assume that all a flash does is piss people off.
However in reality, if you use the flash mindfully, it will add another dimension to your photos. Some master photographers who have used the flash amazingly include William Klein, Daido Moriyama, Anders Petersen, Martin Parr, Diane Arbus, and Mark Cohen.
I personally shoot a lot with a flash, because I love the separation it creates, as well as the surreal feel and emotion it adds to an image.
But if you’ve never shot with a flash before, how can you start? Mary Ellen Mark gives some advice:
“If you’re willing to work with flash, keep in mind that there are no rule. Go to places where people are more open to being photographed. A flash will change the environment. Understand the effect it can have, but continue to shoot as you’re invisible so people don’t look at the camera.”
Assignment: Flash it up
For an entire week, only shoot with a flash. Turn your camera to “P” (program mode), and either use the integrated flash on your camera, or use the smallest one that has “TTL” mode. Set your ISO to 400, and just start experimenting.
Photograph people you know a first, like your friends and family. Then go outside and flash flowers, trees, and other inanimate objects. Try to take two photos of each scene: one with flash, and the other without flash.
Then discover the effect and influence your flash has on your images. See if you like the added dimension, and then take it a step further; try using a flash when taking portraits of strangers (with permission). Then if you feel up for it, try to shoot candid street photography with a flash (during the day). You might be surprised to see how much people ignore you (or don’t notice the flash going off).
11. Stick with one subject

I recently attended a Magnum workshop with David Alan Harvey and Constantine Manos. One of the most important things I learned was that it is better to photograph fewer scenes and people, but once you find a scene or a person you are interested in, shoot the hell out of it.
For example, rather than shooting 1-2 photos of everything you see in a day, be picky with who/what you decide to photograph. But once you find an interesting person or a scene, take 50-100 photos of it.
Mary Ellen Mark has a similar philosophy; she believes in sticking with one subject you find interesting, and to focus on depth over breadth:
“I always recommend sticking with a subject you like to photograph. You don’t have to be on a magazine assignment to follow your interests and instincts. Following one subject can be an assignment in and of itself.”
Assignment: Work the scene
For this assignment, you have to roam the streets all day, and you are only allowed to take photos of 3 scenes you find interesting. But once you find a scene you are interested in, you have to take at least 50+ photos of that one scene.
I recommend finding interesting scenes and backgrounds, with a lot of action. For example, find a busy intersection or the exit of a metro terminal. Wait for people to come to you, and “work the scene.”
Similarly if you find someone interesting on the streets, and you ask to take their photo (and they say yes), try to take at least 20+ photos of them. Don’t just take 1-2 photos and leave. WORK THE SCENE.
12. Don’t photograph people smiling

One interesting lesson I learned from Martin Parr is that when he takes photos of strangers (with permission), he will say: “Look into the lens and don’t smile. This is a dignified portrait. Pretend like you’re having your passport shot.”
The rationale behind having your subjects not smile in the frame was this: we are so used to seeing photos of people smiling in photos, because that is what we do in family albums. Think about your mom or dad saying, “Smile for the camera!”
But the reality is that very few people (not even me) walk in the streets with a huge smile on their face. So generally when you have photos of people smiling, it just looks like a boring Facebook profile picture.
Mary Ellen Mark does the same; she intentionally tries to get photos of people not smiling. She expands below:
“Sometimes, the hardest thing is to get people to stop mugging for the camera. Also with children, if they are playing too much to you, it’s not real. Treat them like adults. Sometimes I’ll say, “If you smile, I won’t take your photograph.’
She is often direct with this point:
“I always tell people not to smile: ‘Don’t smile, but look at me.’ Or, ‘Don’t look at me, don’t look a the camera. Look down.’ It depends.”
Assignment: Look into the lens and don’t smile
Start off by approaching a loved one or friend and just ask them to do two things: 1) Don’t smile and 2) Look straight into the lens.
You will be surprised how much more “genuine” these images will feel, and how much more interesting.
Of course it isn’t an issue of having people smiling in photos. Some of my favorite photos are of people laughing (like the NYC laughing woman). But what you want to avoid is posed smiles. If you want good genuine smiles in photos, tell your subject a joke, or ask them to think of happy memories. Or in my case with the photo I shot in NYC, I took 20 photos of her, and around so #15, she started laughing and said, “You are so crazy!” That is when I got my shot.
13. Don’t put away your camera
Mary Ellen Mark told a fantastic story of how she got one of her most iconic images: a photo of a girl named Amanda smoking in the backyard.
Mark was photographing this girl named Amanda for an entire day, and was about to pack up and leave. She went to the backyard to say goodbye to Amanda, and she saw her smoking a cigarette inside an inflatable pool with her cousin, Amy. She took 2-3 frames quickly with her Leica, and one of them was the iconic shot (the photo at the top of this article).
The morale of the story? Don’t put away your camera too quickly. Mary Ellen Mark shot a lot of formal portraits of Amanda earlier (with medium-format and large-format camera), but fortunately she had her 35mm Leica around her neck, which allowed her to capture this great “decisive moment.”
So Mark tells this to her students:
“I often tell students, ‘Don’t put away your camera. Keep it out at all times, even when you think you have the shot already.’ Something can always happen.”
For me, the problem is that I often put away my camera too quickly. When I shoot for an entire day and my neck is sore, I will put my camera back into my backpack. But sometimes it is those moments that I see good shots (when my camera is still in my bag, and I can’t take out my camera quickly enough to get a shot).
Morale of the story? Always have your camera either around your neck or on your hand, even when you think you already have the shot.
Assignment: Sleep with your camera
For an assignment, make your camera an appendage of your body. I recommend using a small point and shoot camera. Have it with you when you’re going to the grocery store, when you are going to eat at a restaurant with your partner, if you’re going to a bar with your friends, or if you’re driving to work (keep it in your cupholder). When you go to sleep, keep your camera by your bed stand.
The smaller your camera, the more likely you are to carry it with you, and the more likely you are to make interesting photos. If you don’t have a compact camera, just use your smartphone.
If you only own DSLR’s and big cameras and want something smaller, I highly recommend the Ricoh GR.
14. Don’t be afraid to take control

As a photographer, you don’t want to be meek and shy. The more insecurity you project, the less comfortable your subjects will feel around you.
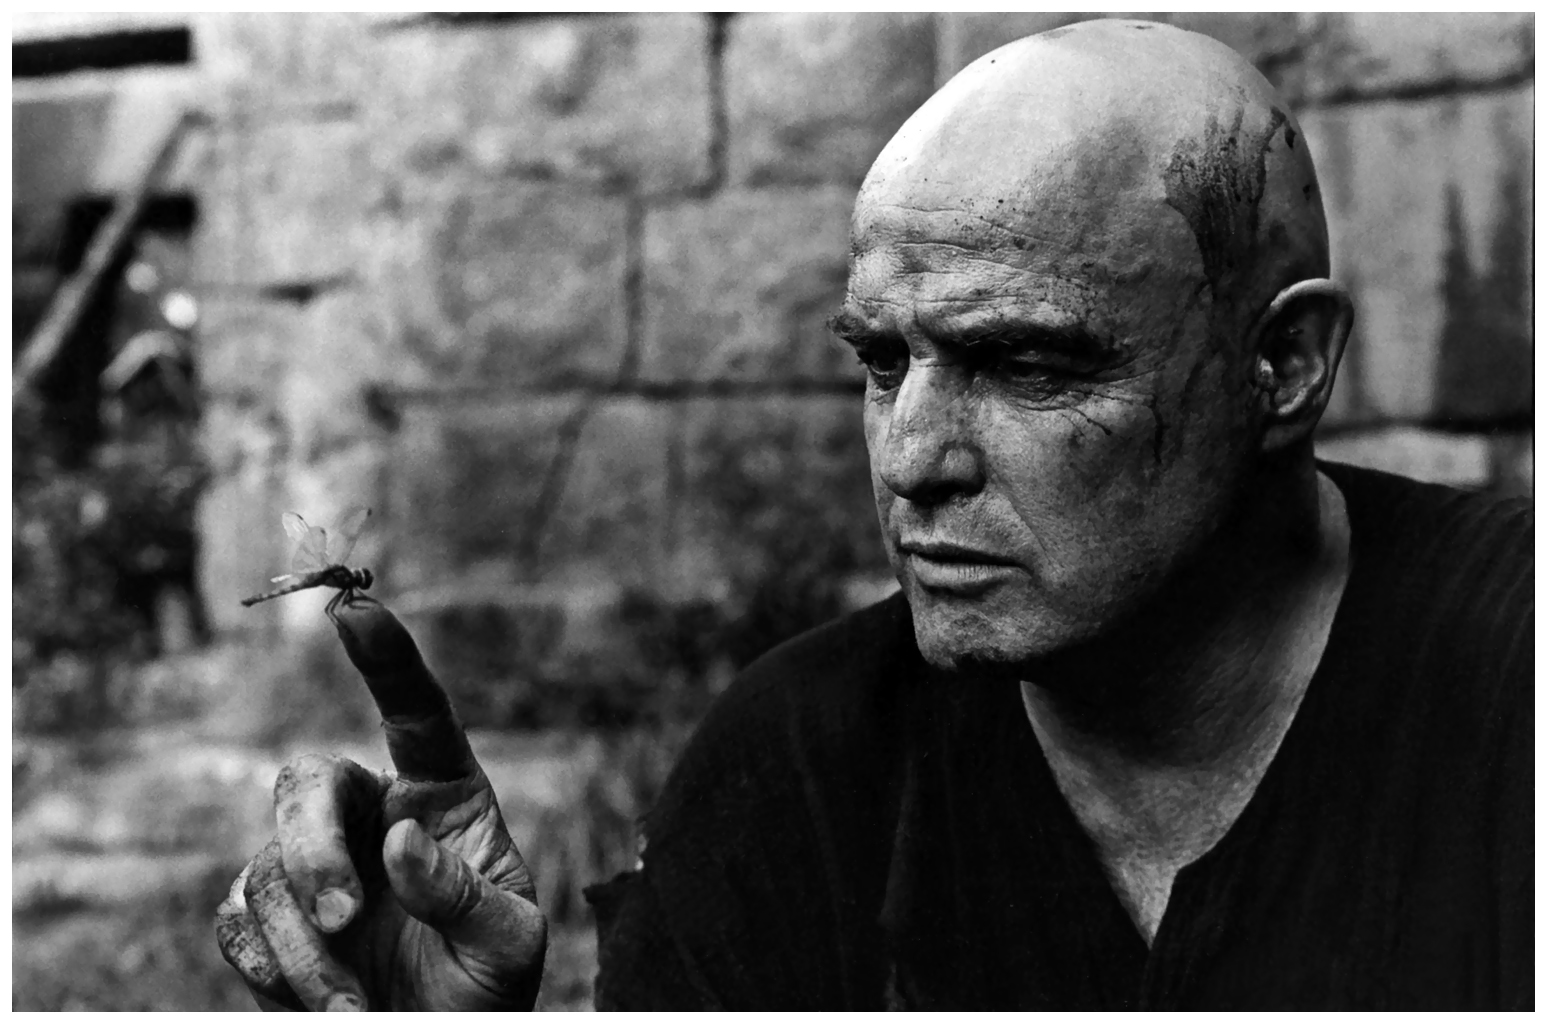
For example, Mary Ellen Mark shares how nervous she was photographing Marlon Brando, who never allowed anybody to shoot him without his permission. In the beginning she was very timid, but she knew that if she needed to get strong images of him, she needed to push herself out of her comfort zone. And push she did, and she ended up getting some of the most iconic images of him with a dragonfly.
However at the same time, you have to learn how to gauge people; to find that balance between not forcing it, but pushing to get the shot:
“As a photographer, you have to understand how to gauge people. You have to read their signals and know how far you can push and when you need to back off. But I also think it’s very important to get strong and intimate photographs, and for those, you have to push.”
Mark gives more in-depth advice about taking control of your subject, and not to be shy. As a photographer, you need to show confidence and courage:
“Don’t be afraid to take control; move the subject around in the background, give instructions. When I’m shooting, I communicate that i’m in charge, im the one taking the picture—sometimes I actually say that, but mostly I just act the part. Whether you’re working with a group of children or a president, they need to feel that you are in control of the shoot; they trust you more. If you’re doubtful or insecure they can tell, and you won’t get the photograph or the right reaction from your subject.”
In street photography, don’t go out and shoot like you are awkward and timid. The more awkward and uncomfortable you feel shooting on the streets, the more awkward and uncomfortable your subjects will feel.
Remember as a street photographer, you’re not doing anything wrong. You’re just trying to create beautiful moments from everyday life. In-fact, you’re doing a good thing. You’re creating historical documents for generations to appreciate in the future.
Assignment: Take control
Walk in the streets like you own the streets, like you belong there. Then it isn’t so much that you are taking the photos of others. Rather, it is that these individuals are entering your images, and entering your space.
With street portraits, don’t feel meek. Control your subjects by telling them what to do. Ask them to stand against a more simple background, and ask them to look different directions (up, down, left, right). Ask them to look head on, or to do an interesting hand gesture. The funny thing is that most people like being told what to do, and often feel more anxious when you don’t direct them.
15. Don’t go backwards
In the film industry, there is a saying with film directors: “You are only good as your last film.”
The same philosophy applies in photography. You are only as good as your last photograph, or your last project or book.
What kept Mary Ellen Mark curious and so passionate all these years, until she passed away at 75?
She always tries to push herself forward, she tries to avoid going backwards in her photography. She thrived over the excitement of pursuing new and exciting projects:
“I feel sort of let down after I finish a big series—I firmly believe that I’m only as good as the next thing I do. Im not interested in going back but in going forward. I miss the excitement—that amazing excitement—of starting a new project, which is why I am a photographer.”
Therefore know the same is with you; you are only as good as your weakest shot.
Assignment: Only show your best
I recently did something quite radical; I edited my Flickr profile to just my best 20 or so photos over the last 9 years I have been shooting street photography. I have a new rule that I will (try) to follow; if I want to add a new photo to that set of 20 images, I have to remove a photograph which I feel is weaker.
This will force me to only focus on my best work, and not to take a step backwards in my photography. I want to push myself, and see the upper-limits of my ability.
One of my other hobbies back home is powerlifting. Every week at the gym, I try to add 2.5 pounds to my deadlift, benchpress, and squat. I don’t succeed every week, but this constant journey to improve (just a little bit everyday) is what drives me forward.
So the next time you decide to upload a new photo series or project, or image, ask yourself: “Is this photograph as good as my last one, or worse?”
Don’t let your bad work drag you backwards.
16. Don’t stick with the same scale
Variety is the spice of life. There is nothing more boring than eating the same thing everyday, over and over again.
The same thing is with photography. You want to have variety in your work. You don’t want to just keep making the same type of photograph over and over again. You want to push your boundaries, and see what you’re made out of.
A practical suggestion I learned from Mark was this: when working on a photo series, don’t have all your photos at the same distance. Rather, vary the scale of images. Include some photos that are shot really close, and some that are shot from really far away.
This will add to the sequence and flow of a photobook. For example, in Mark’s “Prom” book, she started off shooting all the photos at the same distance. But then she realized that she needed to vary the distances, to add a “tension in the sequence” in the photobook:
“Too much of the same type of picture can get tedious. I knew going in that Id have to create some tension in the sequence to keep the viewer looking. So I was always trying to break the boredom of the same scale, the same distance.”
Assignment: Shoot different distances
Try to put together a photo series with variety in terms of scale.
So if you’re doing a photo series of your loved one, don’t just shoot all close-up portraits of them. Try some close-ups, try some shot from 5 meters, try some at 1 meter, and add more variety to the orientation of the camera (landscape and portrait).
To make a great photography project, there is always a tension between consistency and variety.
Be consistent in terms of your subject matter and aesthetic and equipment. Add variety in framing and distances.
Or try the opposite: have a consistent distance you shoot your subject, but add variety in terms of the cameras, film, or equipment you use.
17. Focus on one great frame at a time
Sometimes the idea of becoming a great photographer or making a great project or body of work is paralyzing.
Try another approach: just focus on one frame at a time.
Mary Ellen Mark had a very ambitious approach in her photography: she wants to make every photo she takes into an “iconic” photo. She admits this is impossible, but by focusing on one frame at a time, you can slowly build yourself into becoming a great photographer.
I think it is also a great philosophy in life; nobody knows how to have a “happy” life. But focus on just making every hour of your day enjoyable, and make each day of your life as perfect as you can.
I also heard another analogy from a writer: try to make beautiful paragraphs, as “perfect pearls.” And when you’re writing, just try to “string together your pearls.” By the end, you will have a beautiful pearl necklace.
I try to write every article like it were my last. I try to improve upon each article a little better than the one that I wrote before it. For example in this article, you might have noticed that I have added a new “assignment” subsection behind every tip.
In photography, imagine every day is the last day of your life. How can you best make use of that one day to make a memorable image?
Mary Ellen Mark share this approach of focusing on one image at at a time:
“I want every picture to be iconic (which is of course, impossible). I want to elevate the subject beyond their moment and circumstance. I think in terms of individual images rather than the photo-essay. For me, photography is about making one great image, one great frame.”
Assignment: What shot do you want to be remembered for?
What is one photo you want to be remembered for? Almost all famous photographers are only remembered for 1 image. Cartier-Bresson is probably most remembered for his “man jumping over the puddle” shot. Nick Ut is remembered most for his “napalm girl” photo. Garry Winogrand is probably most famous for his photo of the interracial couple holding a chimpanzee. Richard Avedon is probably the most famous for his “beekeeper” shot.
Honestly, if you can just make 1 iconic shot in your lifetime before you die, you’ve done your job as a photographer.
For me, if I died with my laughing NYC lady as my best shot, I would have no regrets. Of course, I am still striving to make better images, 1 shot at a time.
So what is that 1 shot you want to be remembered for? Identify it, print it, or make it the wallpaper on your laptop or smartphone. Then everyday strive to make a (slightly) better shot than it.
18. Don’t let legacy paralyze you
I think it is paramount to study the masters who have come before us, to get a sense of what makes great photography.
However at the same time, what has happened to me in the past is that I become so paralyzed by the amazing legacy left behind these amazing photographers who have come before me, and I get depressed and discouraged. I think to myself, “Man, no matter how hard I try, I will never be able to make photos as good as them.”
However what I learned was this: gain inspiration from the masters, but use it as a positive fuel to inspire and drive you forward. A photography project should never depress you; it should always encourage you to try harder.
Ultimately at the end of the day, strive less to be the most original photographer out there. Inevitably, your photos will always be different; after all, you took the photo (not somebody else).
You might get criticized for trying to copy “photographer x” or “photographer y” — but fuck it. Just focus on trying to make a great photograph, and disregard all the other bullshit you might hear from others. Mark hits the spot with this quote below:
“You can’t let legacy paralyze you. You must be your own person and contribute to the legacy. Don’t worry bout style and separating yourself from others shooting the same subject matter too much; the pictures will happen by shooting from your own personal point of view. Worry more about getting a great picture.”
Assignment: Fast from images
There is a lot of evidence that “intermittent fasting” is good for our health. Similarly, intermittent fasting from looking at the images of others is also good for our health and photography.
Try to go a month without looking at the images of others. This means uninstall all the social media and photo-sharing apps from your phone. Uninstall Instagram, Tumblr, Facebook, Google+, or any other sharing platform you may use.
I recently did this assignment for myself, and it has totally cleansed my mind, and helped me be more satisfied and focused with my own photography. I care less of whether my photos are “cliches” or if the have been shot before (or not). Rather, I focus on putting my energy, heart, and soul into the images I craft.
Try it out, I can guarantee it will cleanse your mind, soul, and help you be more creative with your work.
19. Don’t take ‘no’ for an answer
When it comes to street photography, I have often followed the motto: “It is better to beg for forgiveness than ask for permission.” Or the other popular mantra: “Shoot first, ask questions later.”
Don’t get me wrong, I still ask for permission when shooting “street portraits.” However even when I approach a stranger to take his/her portrait, I am generally quite pushy; I don’t take “no” for an answer (at least not easily).
The way I approach it is this: I see someone interesting that I am dying to photograph, and I project my confidence and desire to photograph them. I do it wit so much conviction that the idea of saying “no” doesn’t even enter their mind. Also when I am approaching that stranger, I don’t even think of the possibility of them saying “no.”
Sometimes my subject will indeed say “no” to being photographed. But I don’t take a “no” as a “no”. Rather, I interpret a “no” as a “maybe”.
I then try to push harder to try to get a “yes.” I do this by saying, “But you look so great! I promise, it will just take one second. Can’t I just get one shot?” Usually most people will then say “Oh okay, fine, just one shot!” Sometimes they will just flat out say “no” and walk way. Then you can’t do anything in that situation, but move onto the next situation.
Mary Ellen Mark also shares the same philosophy:
“I’ve always thought you should never just take ‘no’ for an answer.”
In her workshop book, Mark tells a story of how she was doing a project on rural poverty, and went to a church in Kentucky. The minister said it was okay to photograph, but the net day changed his mind and kicked her out. But she waited for the church service to come out, and followed some people home. She went to a house and knocked on the door. The parents didn’t answer, but this boy came out with his kitten, which allowed her to get her shot.

On another project, Mark went to Falkland Road, the area where the least expensive prostitutes lived and worked. When deciding to pursue the project, she visited Falkland Road during the day until late in the evening. She describes her experience:
“At first it was really hard. I got garbage and slurs thrown at me, and my wallet was stolen But that did not deter me. I went back everyday. I didn’t want the women to think I had given up or was afraid. They had all seen me walking up and down the street for about a week and had started getting used to me. to do this kind of work, you need to be passionate about it, obsessed. You cannot give up easily.”

Morale of the story? Don’t give up so easily. Be persistent. Don’t take a “no” as a “no.”
Assignment: Turn a “no” into a “yes”
For this assignment, your assignment is to turn a “no” into a “yes”, when asking a stranger for a photo of them.
Intentionally go out and try to look for mean looking people, or people you expect to say “no.” Then if they say “no” to being photographed, try to convince them otherwise. Tell them that you are a photography student, and you need practice. Tell them that you can email them the photo afterwards, or bring them a print. Tell them that you won’t publically post it online. Be honest, truthful, and genuine. But try to get the “no” into a “yes.” Record what works well and what doesn’t in your “shooting diary” (any cheap notebook can do).
20. Have a genuine interest in your subjects
People are great bullshit detectors. Even a half-idiot can tell when you are trying to feign fake interest in them to get something out of them.
In the past, I have feigned fake interest in people to get an interesting shot from them. It made me feel dirty, unclean, and fake. Nowadays I’ve tried to reform my ways; I try to find people that I genuinely are interested in, and would actually want to get to know closer as a human being. The human connection comes first, then the photo comes second.
Mary Ellen Mark also shares the importance of being truly interested in your subject. instead of just faking it to get an interesting photo (that might get you a lot of “likes” on social media):
“Sometimes I watch photographers act in a way that’s meant to draw out a subject and help them get pictures. They’re being friendly, asking questions, but it’s because they want pictures. There’s no real interest; it’s an act. I can see right through that and so can the subject.”
Assignment: Buy a stranger a beer (or coffee)
In the Magnum workshop I attended with David Alan Harvey, I was given the assignment to do a documentary project. I decided to visit a local bar in Provincetown, and would go there at night with some of my friends, have a beer, and get to know some of the locals at the bar.
I found interesting characters in the bar. I sat down, listened to their life story attentively for about an hour, and even bought them a few beers. This helped me build rapport with them.
Later on, I asked if I could make some photos of them. They had no problem, as I was able to make them trust me by me opening up to them as well. I didn’t just ask them questions about their life, I also told them about my life; my difficulties, my insecurities, and my frustrations. The more you open yourself up to your subjects, the more they will open themselves up to you.
So as an assignment, find a stranger at a cafe or a bar that you find interesting, and you want to learn about their life story. Approach them, ask them if the seat next to them is taken, and ask them about their life story. Offer to buy them a coffee or a beer (not to bribe them, but do it out of genuine generosity).
See where this leads you, and don’t forget to make a few photos along the way.
21. Edit ruthlessly

In photography I try to follow a mantra: “Kill your babies.” The concept is this: you become emotionally attached to your photographs like they were your own children. But in reality, your photos have no feelings, and you shouldn’t let the memories of the backstories of the photos influence your judgement of them.
Therefore you need to learn how to ruthlessly edit your shots; to only keep your best images. Remember, you’re only as good as your weakest photo.
As an analogy, imagine a 100-ton wrecking ball suspended by metal chains in the air. All the chains are solid, steel-welded, and bullet-proof. But one chain is weak. What happens to the wrecking ball? You got it, it breaks (from that one weak link).
Morale of the story; don’t have any weak links in your body of work, and edit ruthlessly. Mark explains:
“If you want to be a photographer, it’s important to learn how to edit your work. It is one of the most difficult things to do. To be a great editor, you need to be ruthless about cutting picture that almost work, pictures that are not quite good enough because the expression is off or the moment is there. ‘almost’ and ‘not quite’ are not good enough. Ou have to separate yourself from the subject and only consider the picture on its own merits. Would you put the picture I a frame on the wall? Will that picture live on its own?”
It is extremely difficult to edit your own work, but always easier to edit the work of others. Start off by editing the work of your close friends and colleagues in street photography, and also ask them to edit your work:
“it can be easier to learn to edit by working with other people’s photographs—you’re not attached to the subject in the same way and have no memory of the moment. You only think about the finished picture.”
Assignment: Keep, or ditch?
A lot of photographers upload images to social media, wanting some sort of feedback. The problem? They don’t ask for it.
So the next time you have a photo you aren’t sure about or want some honest critique on, upload it to your social media platform of choice with the caption: “Keep, or ditch?” And then you can follow-up and ask, “Why is that a keep, or why is that a ditch?”
Most photographers will be blunt and honest (if you ask for it).
Another tip: when you show your photos to somebody, ask them to “ruthlessly edit” your shots and to “kill your babies.” Once you’ve given them permission to turn off their filter, they will tell you how it is.
It is painful, I know– I get emotionally attached to my shots (especially my bad ones). But the only way to improve is to get honest and constructive critique on your work.
22. Don’t leave the scene too quickly
We’ve all been there before; we see a good scene, but we feel nervous or afraid that the person will be annoyed or angry. We end up just taking 1-2 shots, and wanting to run the hell out of there.
Don’t worry, this is a common response. You are a human being after all. There is the “fight or flight” saying in psychology, when we feel afraid or confronted. The other two also include: “freeze or faint.”
Sometimes I have been approached by a stranger who got very angry at me, and I would want to just run away, freeze (from the fright), or want to just pass out (faint).
But know that at the end of the day, you won’t die from shooting street photography. The worst that will even happen is someone will yell at you, threaten to call the cops, or perhaps even shove you. But I have never heard any stories of people getting stabbed, seriously wounded, or killed for shooting a street photograph. In-fact, driving a car in a downtown city is probably more dangerous than shooting street photography.
So when you see a person or a scene that you find interesting, don’t “flee” from the scene too quickly. Stick around longer than you think you should.
The moment you feel uncomfortable with the subject is the moment you need to stick around longer. I have a personal rule: whenever I feel uncomfortable being around my subject, I try to stick around 25% longer than I think I should. Generally this results in better photos (usually the photos I shoot towards the end of a session tend to be better than the photos from the beginning). Mark shares her wisdom:
“It can be hard to break the ice and take the time needed to make a strong picture. Part of photographing involves staying with a subject or a person longer (don’t leave the moment you start to get uncomfortable), and part of it is just having the nerve to go ahead and photograph. You have to give yourself permission to be there, to stay there.”
Assignment: Make yourself uncomfortable
Put yourself into a situation (on purpose) that will make you feel uncomfortable, and when you start feeling uncomfortable, stick around for 25% percent longer.
Some ideas you can make yourself uncomfortable:
- Say hello to a stranger in an elevator and ask them how their day is going.
- When entering an elevator, stad the opposite direction that everybody else is.
- Do pushups in a random and public place (cafe, airport lounge, bar).
- Tell the barista at a coffeeshop that you are having a bad day, and if they could cheer you up by giving you a free coffee.
- Stand foot-to-foot with a friend or loved one, and make uninterrupted eye contact with them for one minute (with permission, of course).
The more comfortable you are wit awkwardness, the more you can develop your confidence in street photography.
23. Don’t chimp
There is something called “chimping” in digital photography, which is checking the LCD screen after you take each shot. Why is this bad? It fools you into thinking that you got the shot, when in reality, the next photo you take might be even better.
Turn off the LCD screen review if you shoot digital. If you’re like me and have absolutely no self-control, just shoot film. Then you literally can’t chimp. I know some photographers who actually tape up the back of their LCD screen with gaffer’s tape, because they can’t control themselves.
Mark explains more in depth the downsides of “chimping”:
“With digital, one can just snap through a number of pictures, and some people tend to look at the back of their camera instead of the subject. When you can look at what you just shot on the camera, you might think you have the picture and stop too soon when in fact you didn’t get it. You can’t really tell if you’ve caught the right expression or subtle gestures or fine focus on the tiny back of the camera. Of course, you can’t tell that with film either, but at least youre not looking at the back of the camera or stopping because you are confident that you got the picture.”
Assignment: Don’t look at your photos for a week (after shooting them)
As a simple assignment, the next time you go out and shoot digitally, you’re not allowed to look at your photos until a week after you’ve shot them.
So turn off your LCD screen, and stay in the moment when you’re shooting an interesting scene. Then let your photos sit and “marinate” for a week before looking at them.
This will help you be more objective when judging your images, and also help you be more present while shooting.
24. Never stop

Mary Ellen Mark shot into the very end, when she died at age 75. Her life, career, dedication to photography and teaching has been astounding. What kept her going all these years? She explains below, by showing her love for photography:
“How do you know if photography is what you should be doing? If you love it, if its something that you can’t get away from, if you’re consumed by it if you’re obsessed with it, then maybe it’s something you should be doing. Its not an easy life. But if you love it, you may not be able to stop. Everytime I start a new project or am assigned to photograph someone, i’m always terrified, thinking i’m going to fail. It always like jumping into cold water. But I find photography truly exciting and I continue to love it after so many years. I’m still fascinated by wonderful photographs. They don’t have to be mine. When I look at really great work, i’m moved by it. Its still difficult and challenging for me to take truly great picture. Its very easy to make a good picture, but a great picture is a different story. And that challenge keeps me going back out there. Youre only as good as the next thing you do.”
Conclusion
For more inspiration from Mary Ellen Mark, make sure to see more of her work on her website, and also pick up some of her books, especially her workshop book published by Aperture: “Mary Ellen Mark on the Portrait and the Moment.”
If there’s one main lesson I’ve learned from Mary Ellen Mark it is this: to focus on one shot at a time, and not be overwhelmed by everything else. She taught me to enjoy the photographic process and the importance of connecting with your subjects and treating them with love, compassion, and heart – – like every human being deserves to.
Rest in peace Mary, your legacy lives on!
Artist Books by Mary Ellen Mark:
To learn more about Mary Ellen Mark’s work, check out her website or see her books below:
1. Mary Ellen Mark (Phaidon 55’s)

A solid (and affordable) introduction to Mary Ellen Mark’s work.
2. Mary Ellen Mark: Ward 81

One of Mary’s most intimate bodies of work– photographing the Oregon State Hospital, a mental institution.
3. Mary Ellen Mark: Prom
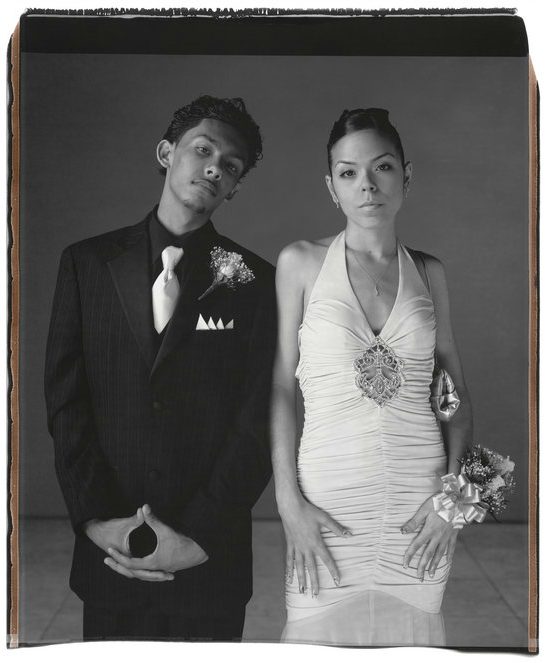
Amazing large-format portraits of prom-goers all across the United States — an insightful sociological look into the lives of teens.